
A horizontal bar just below the title bar of a toplevel gtk.Window is
reserved to display series of menus. It is an object of gtk.MenuBar
class in PyGTK API.
An object of the gtk.Menu class is added to the menu bar. It is also used to create context menu and popup menu. Each menu may contain one or more gtk.MenuItem widgets. Some of them can be a submenu.and have cascaded MenuItem buttons.
The gtk.MenuBar is subclassed from the gtk.MenuShell class. It has a simple default constructor −
In order to construct a menu, create a MenuItem widget with a label which is desired to appear in menu bar and set it as submenu.
For example, the following code is used to set up a File menu −
For example, 'New' menu item having image is created in the following way −
An object of the gtk.Menu class is added to the menu bar. It is also used to create context menu and popup menu. Each menu may contain one or more gtk.MenuItem widgets. Some of them can be a submenu.and have cascaded MenuItem buttons.
The gtk.MenuBar is subclassed from the gtk.MenuShell class. It has a simple default constructor −
gtk.MenuBar()To add a menu to MenuBar, the append() method of the MenuBar class is used.
In order to construct a menu, create a MenuItem widget with a label which is desired to appear in menu bar and set it as submenu.
For example, the following code is used to set up a File menu −
menu1 = gtk.Menu()
file = gtk.MenuItem("_File")
file.set_submenu(menu1)
Now, one or more widgets of the MenuItem class can be added in the menu.item1 = gtk.MenuItem("New")
item2 = gtk.MenuItem("Open")
These MenuItems are added to the Menu widget and the menu object in turn is added to the menu bar.menu1.append(item1) menu1.append(item2) mb.append(menu1)The PyGTK toolkit offers many types of MenuItem widgets. An ImageMenuItem is a menu item with an image associated with it. You can use any of the stock images by using Stock ID parameter or assign any other image by set_image() method.
For example, 'New' menu item having image is created in the following way −
new = gtk.ImageMenuItem(gtk.STOCK_NEW)
menu1.append(new)
Similarly, it is also possible to add CheckMenuItem using the following code −
chk = gtk.CheckMenuItem("Checkable")
menu1.append(chk)
A group of radio items can also be added using this code −radio1 = gtk.RadioMenuItem(None,"Radio1") radio2 = gtk.RadioMenuItem(radio1, "Radio2") menu1.append(radio1) menu1.append(radio2)Sometimes, you may want to add a seperator line between menu items. For that purpose, the SeparatorMenuItem is also available.
sep = gtk.SeparatorMenuItem()
menu1.append(sep)
You can also assign keyboard shortcuts to menu items. PyGTK has accelerators. Start by creating an accelerator group and attach it to the toplevel window.
acgroup = gtk.AccelGroup()
self.add_accel_group(acgroup)
To assign shortcut, use add_accelerator() function with the following prototype −
Item1.add_accelerator(signal, group, key, modifier, flags)The following are some of the predefined modifiers −
- SHIFT_MASK
- LOCK_MASK
- CONTROL_MASK
- BUTTON1_MASK
- BUTTON1_MASK
new = gtk.ImageMenuItem(gtk.STOCK_NEW,acgroup)
new.add_accelerator("activate", acgroup, ord('N'),
   gtk.gdk.CONTROL_MASK, gtk.ACCEL_VISIBLE)
Example
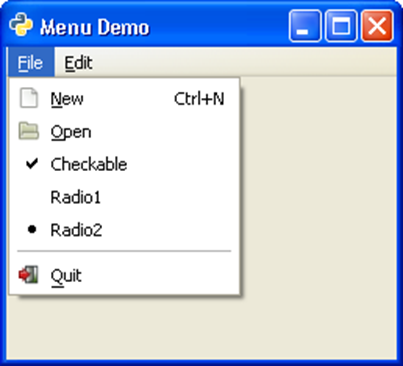
The following example demonstrates the features discussed above −import gtk class PyApp(gtk.Window): def __init__(self): super(PyApp, self).__init__() self.set_title("Menu Demo") self.set_default_size(250, 200) self.set_position(gtk.WIN_POS_CENTER) mb = gtk.MenuBar() menu1 = gtk.Menu() file = gtk.MenuItem("_File") file.set_submenu(menu1) acgroup = gtk.AccelGroup() self.add_accel_group(acgroup) new = gtk.ImageMenuItem(gtk.STOCK_NEW,acgroup) new.add_accelerator("activate", acgroup, ord('N'), gtk.gdk.CONTROL_MASK, gtk.ACCEL_VISIBLE) menu1.append(new) open = gtk.ImageMenuItem(gtk.STOCK_OPEN) menu1.append(open) chk = gtk.CheckMenuItem("Checkable") menu1.append(chk) radio1 = gtk.RadioMenuItem(None,"Radio1") radio2 = gtk.RadioMenuItem(radio1, "Radio2") menu1.append(radio1) menu1.append(radio2) sep = gtk.SeparatorMenuItem() menu1.append(sep) exit = gtk.ImageMenuItem(gtk.STOCK_QUIT) menu1.append(exit) menu2 = gtk.Menu() edit = gtk.MenuItem("_Edit") edit.set_submenu(menu2) copy = gtk.ImageMenuItem(gtk.STOCK_COPY) menu2.append(copy) cut = gtk.ImageMenuItem(gtk.STOCK_CUT) menu2.append(cut) paste = gtk.ImageMenuItem(gtk.STOCK_PASTE) menu2.append(paste) mb.append(file) mb.append(edit) vbox = gtk.VBox(False, 2) vbox.pack_start(mb, False, False, 0) self.add(vbox) self.connect("destroy", gtk.main_quit) self.show_all() if __name__ == '__main__': PyApp() gtk.main()The above code will produce the following output −
No comments:
Post a Comment