
In this chapter let us study about Theme Tutorial. Let's create Grav theme taking an example.
The following steps describe creation of theme:
Step(1): Base Theme setup
There are some key elements to Grav theme as we studied in the Theme Basics chapter which are to be followed in order to create new theme.
Next, create a theme configuration file bootstrap.yaml in themes/bootstrap folder and write the following content in it.
We will skip the blueprints folder as we have no configuration options and will use regular CSS for this chapter.
Step(2): Add Bootstrap
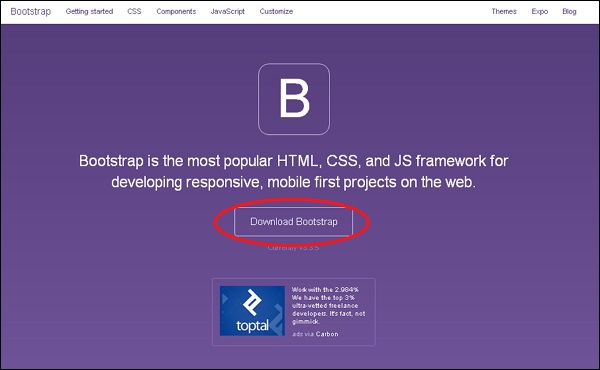
In order to create bootstrap theme, you must include Bootstrap in your theme. So you need to download the latest Bootstrap package by clicking this link as shown below.
 Unzip the package and you will see three folders namely css, fonts
and js. Now copy the contents of these 3 folders into similarly named
folders in user/themes/bootstrap that were created earlier.
Unzip the package and you will see three folders namely css, fonts
and js. Now copy the contents of these 3 folders into similarly named
folders in user/themes/bootstrap that were created earlier.
Step(3): Base Template
As we studied from previous chapter, the content is stored in the default.md file which instructs the Grav to look for rendering template called default.html.twig. This file includes everything that you need to display a page.
There is a better solution that utilizes the Twig Extends tag which allows you to define base layout with blocks. This will allow the twig template to extend the base template and provide definitions for blocks defined in the base.
Use the below steps to create a simple Bootstrap base template:
Let's see how code works in base.html.twig file as shown below.
All the JavaScript tags and CSS link tags are rendered by the template when call to {{ assets.css() }} or {{ assets.js() }} is made respectively.
The syntax {# ... #} is used to write comments in Twig.
To include another Twig template {% include 'partials/header.html.twig' %} tag is used.
The content from a template is provided by the {% block content %}{% endblock %} tag.
To add custom JavaScript initialization or analytic codes, the {% block bottom %}{% endblock %} tag is used as placeholder for templates.
Step(5): Header Template
When {% include 'partials/header.html.twig' %} is executed the Twig rendering engine searches for the Twig template. So create header.html.twig template file inside user/themes/bootstrap/templates/partials folder with the following content.
Step(6): Default Template Each item of content has a particular file name such as default.md which instructs the Grav to search for template file called default.html.twig. Now let us create the default.html.twig file in your user/themes/bootstrap/templates/ folder with below content.
Step(7): Theme CSS
In partials/base.html.twig file we referenced to a custom theme css using assets.add('theme://css/bootstrap-custom.css',100), which stores any custom CSS used in your site.
Now create bootstrap-custom.css file in user/themes/bootstrap/css folder with the below content:
Now you have to change your default theme with new bootstrap theme. Open user/config/system.yaml file and edit the line which contains:
Antimatter
When you install the Grav base package the default Antimatter theme is installed, which uses Nucleus (a simple base set of CSS styling). Nucleus is a lightweight CSS framework that contains essential CSS styling and HTML markup which gives a unique look and feel.Bootstrap
Let us create a theme that utilizes popular Bootstrap framework. Bootstrap is open source and most popular HTML, CSS, and JS framework making front-end web development faster and easier.The following steps describe creation of theme:
Step(1): Base Theme setup
There are some key elements to Grav theme as we studied in the Theme Basics chapter which are to be followed in order to create new theme.
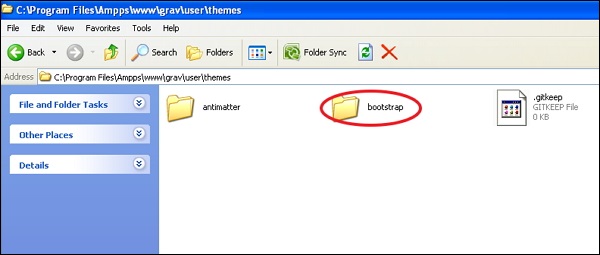
- After installing the Grav base package, create a folder called bootstrap under user/themes folder as shown below.
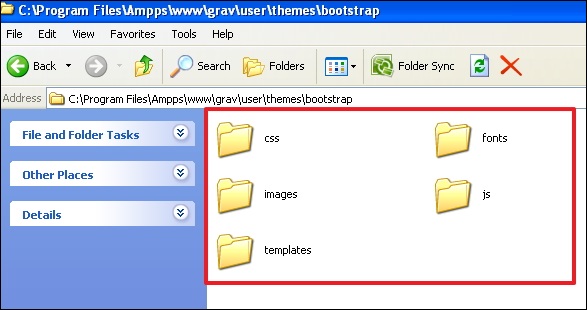
- Next inside user/themes/bootstrap folder create css/, fonts/, images/, js/ and templates/ as shown below.
- Then create a theme file called bootstrap.php in your user/themes/bootstrap folder and paste the below content in it.
<?php
namespace Grav\Theme;
use Grav\Common\Theme;
class Bootstrap extends Theme
{
}
enable: true
In order to create bootstrap theme, you must include Bootstrap in your theme. So you need to download the latest Bootstrap package by clicking this link as shown below.
Unzip the package and you will see three folders namely css, fonts
and js. Now copy the contents of these 3 folders into similarly named
folders in user/themes/bootstrap that were created earlier.Step(3): Base Template
As we studied from previous chapter, the content is stored in the default.md file which instructs the Grav to look for rendering template called default.html.twig. This file includes everything that you need to display a page.
There is a better solution that utilizes the Twig Extends tag which allows you to define base layout with blocks. This will allow the twig template to extend the base template and provide definitions for blocks defined in the base.
Use the below steps to create a simple Bootstrap base template:
- Create a folder called partials in the user/themes/bootstrap/templates folder. This is used to store our base template.
- In partials folder, create a base.html.twig file with following content.
<!DOCTYPE html>
<html lang="en">
    <head>
        {% block head %}
        <meta charset="utf-8">
        <meta http-equiv="X-UA-Compatible" content="IE=edge">
        <meta name="viewport" content="width=device-width, initial-scale=1">
        {% if header.description %}
        <meta name="description" content="{{ header.description }}">
        {% else %}
        <meta name="description" content="{{ site.description }}">
        {% endif %}
        {% if header.robots %}
        <meta name="robots" content="{{ header.robots }}">
        {% endif %}
        <link rel="icon" type="image/png" href="{{ theme_url }}/images/favicon.png">

        <title>{% if header.title %}{{ header.title }} | {% endif %}{{ site.title }}</title>

        {% block stylesheets %}
            {# Bootstrap core CSS #}
            {% do assets.add('theme://css/bootstrap.min.css',101) %}

        {# Custom styles for this theme #}
            {% do assets.add('theme://css/bootstrap-custom.css',100) %}

            {{ assets.css() }}
        {% endblock %}

        {% block javascripts %}
            {% do assets.add('https://ajax.googleapis.com/ajax/libs/jquery/1.11.1/jquery.min.js', 101) %}
            {% do assets.add('theme://js/bootstrap.min.js') %}

            {% if browser.getBrowser == 'msie' and browser.getVersion >= 8 and browser.getVersion <= 9 %}
                {% do assets.add('https://oss.maxcdn.com/html5shiv/3.7.2/html5shiv.min.js') %}
                {% do assets.add('https://oss.maxcdn.com/respond/1.4.2/respond.min.js') %}
            {% endif %}

            {{ assets.js() }}
        {% endblock %}

        {% endblock head %}
    </head>
      <body>
        {# include the header + navigation #}
        {% include 'partials/header.html.twig' %}

        <div class="container">
            {% block content %}{% endblock %}
        </div>

        <div class="footer">
            <div class="container">
                <p class="text-muted">Bootstrap Theme for <a href="http://getgrav.org">Grav</a></p>
            </div>
        </div>
    </body>
    {% block bottom %}{% endblock %}
</html>
Step(4): Breaking it Down
Let's see how code works in base.html.twig file as shown below.
- {% block head %}{% endblock head %} syntax used to define an area in the base Twig template. The head inside the {% endblock head %} is optional.
- The if statement test whether there is a meta description set in the page headers or not. If not set, then template should render by using site.description as defined in the user/config/site.yaml file.
- The path of the current theme is outputted by the theme_url variable.
- The syntax {% do assets.add('theme://css/bootstrap.min.css',101) %} is used to make use of Asset Manager. The theme:// represents the current theme path and 101 represents the order where higher value comes first followed by lower. We can also provide CDN links explicitly as:
{% do assets.addCss('http://fonts.googleapis.com/css?family=Open+Sans') %}or
{% do assets.addJs(' https://ajax.googleapis.com/ajax/libs/jquery/1.11.3/jquery.min.js') %}
When {% include 'partials/header.html.twig' %} is executed the Twig rendering engine searches for the Twig template. So create header.html.twig template file inside user/themes/bootstrap/templates/partials folder with the following content.
<nav class="navbar navbar-default navbar-inverse navbar-static-top" role="navigation">
    <div class="container">
        <div class="navbar-header">
            <button type="button" class="navbar-toggle" data-toggle="collapse" data-target=".navbar-collapse">
                <span class="sr-only">Toggle navigation</span>
                <span class="icon-bar"></span>
                <span class="icon-bar"></span>
                <span class="icon-bar"></span>
            </button>
            <a class="navbar-brand" href="#">Grav</a>
        </div>
        <div class="navbar-collapse collapse">
            <ul class="nav navbar-nav navbar-right">
                {% for page in pages.children %}
                {% if page.visible %}
                {% set current_page = (page.active or page.activeChild) ? 'active' : '' %}
                <li class="{{ current_page }}"><a href="{{ page.url }}">{{ page.menu }}</a></li>
                {% endif %}
                {% endfor %}
            </ul>
        </div>
    </div>
</nav>
Above code creates a navbar and displays all menu items automatically whenever new page is created in the user/pages folder.
Step(6): Default Template Each item of content has a particular file name such as default.md which instructs the Grav to search for template file called default.html.twig. Now let us create the default.html.twig file in your user/themes/bootstrap/templates/ folder with below content.
{% extends 'partials/base.html.twig' %}
{% block content %}
    {{ page.content }}
{% endblock %}
The above default.html.twig file extends the partials/base.html.twig and tells base template to use {{ page.content }} for the content block.
Step(7): Theme CSS
In partials/base.html.twig file we referenced to a custom theme css using assets.add('theme://css/bootstrap-custom.css',100), which stores any custom CSS used in your site.
Now create bootstrap-custom.css file in user/themes/bootstrap/css folder with the below content:
/* Restrict the width */
.container {
  width: auto;
  max-width: 960px;
  padding: 0 12px;
}

/* Place footer text center */
.container .text-muted {
  margin: 18px 0;
  text-align: center;
}

/* Sticky footer styles
-------------------------------------------------- */
html {
  position: relative;
  min-height: 80%;
}

body {
  /* Margin bottom by footer height */
  margin-bottom: 60px;
}

.footer {
  position: absolute;
  bottom: 0;
  width: 100%;
  /* Set the fixed height of the footer here */
  height: 50px;
  background-color: #dcdcdc;
}

/* Typography */
/* Tables */
table {
    width: 100%;
    border: 1px solid #f0f0f0;
    margin: 30px 0;
}

th {
    font-weight: bold;
    background: #f9f9f9;
    padding: 5px;
}

td {
    padding: 5px;
    border: 1px solid #f0f0f0;
}

/* Notice Styles */
blockquote {
    padding: 0 0 0 20px !important;
    font-size: 16px;
    color: #666;
}
blockquote > blockquote > blockquote {
    margin: 0;
}

blockquote > blockquote > blockquote p {
    padding: 15px;
    display: block;
    margin-top: 0rem;
    margin-bottom: 0rem;
    border: 1px solid #f0f0f0;
}

blockquote > blockquote > blockquote > p {
    /* Yellow */
    margin-left: -75px;
    color: #8a6d3b;
    background-color: #fcf8e3;
    border-color: #faebcc;
}

blockquote > blockquote > blockquote > blockquote > p {
    /* Red */
    margin-left: -100px;
    color: #a94442;
    background-color: #f2dede;
    border-color: #ebccd1;
}

blockquote > blockquote > blockquote > blockquote > blockquote > p {
    /* Blue */
    margin-left: -125px;
    color: #31708f;
    background-color: #d9edf7;
    border-color: #bce8f1;
}

blockquote > blockquote > blockquote > blockquote > blockquote > blockquote > p {
    /* Green */
    margin-left: -150px;
    color: #3c763d;
    background-color: #dff0d8;
    border-color: #d6e9c6;
}
Step(8): Testing
Now you have to change your default theme with new bootstrap theme. Open user/config/system.yaml file and edit the line which contains:
pages:
  themes: antimatter
and change the above code to:
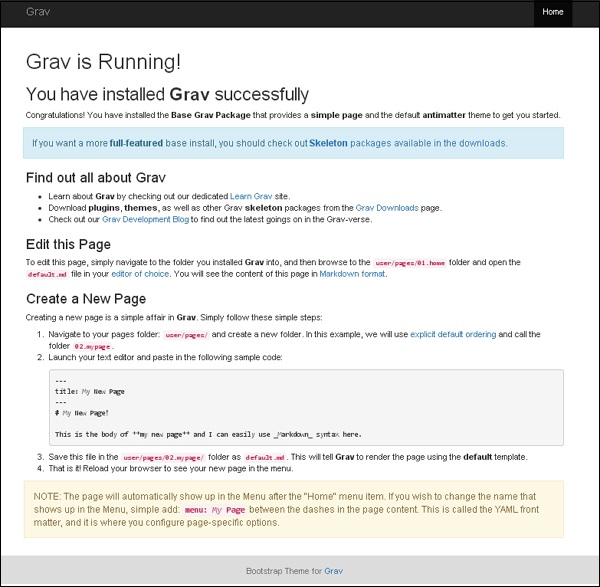
pages:
  theme: bootstrap
Now reload your Grav site and you will see newly installed theme as shown below.
No comments:
Post a Comment