
Forms are used in all web applications to accept inputs from the user
as request. The data is accepted as an input, then manipulated and
saved in the database or any other operation is being performed.
Phalcon includes a component named Phalcon\Forms which helps in the creation and maintenance of forms.
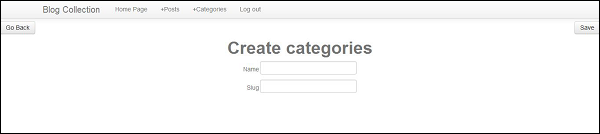
Consider the example of Blog-tutorial, which we created in the previous chapters. It includes a form which is used to create a new category.
 The input fields of form are rendered with the help of Phalcon/tag component. Each element in the form can be rendered as per the requirement of the developer.
Following is the syntax for rendering value.
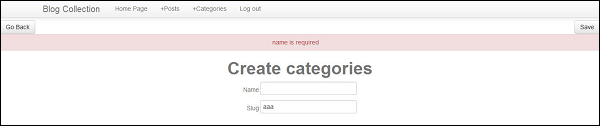
Once the values are rendered in the controller, the values will be entered in the database with the help of models. Phalcon forms are integrated with the validation component to offer instant validation. Built-in or custom validators can be set to each element.
Phalcon includes a component named Phalcon\Forms which helps in the creation and maintenance of forms.
Consider the example of Blog-tutorial, which we created in the previous chapters. It includes a form which is used to create a new category.
<?php echo \Phalcon\Tag::form(array("categories/create", "autocomplete" => "off")) ?>
   <table width = "100%">
      <tr>
         <td align = "left">
            <?php echo \Phalcon\Tag::linkTo(array("categories", "Go Back", "class" => "btn")) ?>
         </td>
         <td align = "right"><
            ?php echo \Phalcon\Tag::submitButton(array("Save", "class" => "btn")) ?>
         </td>
      <tr>
   </table>

   <?php echo $this->getContent(); ?>

   <div align = "center">
      <h1>Create categories</h1>
   </div>
   <table align = "center">
      <tr>
         <td align = "right">
            <label for = "name">Name</label>
         </td>
         <td align = "left">
            <?php echo \Phalcon\Tag::textField(array("name", "size" => 30)) ?>
         </td>
      </tr>

      <tr>
         <td align = "right">
            <label for = "slug">Slug</label>
         </td>
         <td align = "left">
            <?php echo \Phalcon\Tag::textField(array("slug", "size" => 30)) ?>
         </td>
      </tr>
   </table>
</form>
Output − It will produce the following output.
The input fields of form are rendered with the help of Phalcon/tag component. Each element in the form can be rendered as per the requirement of the developer.Following is the syntax for rendering value.
echo $form->render(element-name)Validation −
Once the values are rendered in the controller, the values will be entered in the database with the help of models. Phalcon forms are integrated with the validation component to offer instant validation. Built-in or custom validators can be set to each element.
<?php
use Phalcon\Forms\Element\Text;
use Phalcon\Validation\Validator\PresenceOf;
use Phalcon\Validation\Validator\StringLength;

$name = new Text(
   "Name"
);

$name->addValidator(
   new PresenceOf([ "message" => "name is required", ])
);

$form->add($name);
Output − It will produce the following output.
No comments:
Post a Comment