
While you're developing Rails applications, especially those which
are mainly providing you with a simple interface to data in a database,
it can often be useful to use the scaffold method.
Scaffolding provides more than cheap demo thrills. Here are some benefits −
Rails lets you run in development mode, test mode, or production mode, using different databases. This application uses the same database for each.
When a user of a Rails application selects an action . e.g. "Show" - the controller will execute any code in the appropriate section - "def show" - and then by default will render a template of the same name - "show.html.erb". This default behavior can be overwritten by overwriting the code in any template −
The controller uses ActiveRecord methods such as find, find_all, new, save, update_attributes, and destroy to move data to and from the database tables. Note that you do not have to write any SQL statements, rails will take care of it automatically.
 Now enter some values in the given text boxes, and press Create
button to create a new recipe, your record is added into recipes table
and it shows following result −
Now enter some values in the given text boxes, and press Create
button to create a new recipe, your record is added into recipes table
and it shows following result −
 You can use either Edit option to edit the recipe or Back button to go to previous page. Assuming you press Back
button, it will display all the recipes available in your database.
Because we have only one record in our database so it will show you
following screen −
You can use either Edit option to edit the recipe or Back button to go to previous page. Assuming you press Back
button, it will display all the recipes available in your database.
Because we have only one record in our database so it will show you
following screen −
 This screen gives you option to see complete detail of the recipe and to delete this recipe and to edit the recipe.
Modify ~/cookbook/app/models/recipe.rb as follows and then test your application −
Scaffolding provides more than cheap demo thrills. Here are some benefits −
- You can quickly get code in front of your users for feedback.
- You are motivated by faster success.
- You can learn how Rails works by looking at generated code.
- You can use the scaffolding as a foundation to jumpstarts your development.
Scaffolding Example
Ruby on Rails 2.0 changes the way Rails uses scaffolding. To understand scaffolding lets create a database called cookbook and a table called recipes −Creating an Empty Rails Web Application
Open a command window and navigate to where you want to create this cookbook web application. I used c:\ruby. So run the following command to create complete directory structure and required .yml file MySQL database.C:\ruby> rails -d mysql cookbookHere we are using -d mysql option to specify our interest to use MySQL database. We can specify any other database name like oracle or postgress using -d option. By default Rails uses SQLite database.
Setting up the Database
Here is the way to create database −mysql> create database cookbook; Query OK, 1 row affected (0.01 sec) mysql> grant all privileges on cookbook.* to 'root'@'localhost' identified by 'password'; Query OK, 0 rows affected (0.00 sec) mysql> FLUSH PRIVILEGES; Query OK, 0 rows affected (0.00 sec)To tell Rails how to find the database, edit the configuration file ~\cookbook\config\database.yml and change the database name to cookbook. When you finish, it should look something like
development:
   adapter: mysql
   encoding: utf8
   database: cookbook
   username: root
   password: password
   host: localhost
test:
   adapter: mysql
   encoding: utf8
   database: cookbook
   username: root
   password: password
   host: localhost
production:
   adapter: mysql
   encoding: utf8
   database: cookbook
   username: root
   password: password
   host: localhost
NOTE −You can use similar setting for other databases adapters in case you want to use any other database except MySQL.
Rails lets you run in development mode, test mode, or production mode, using different databases. This application uses the same database for each.
Database table Definition
Assuming following structure for our recipes table −id INT(11) title VARCHAR(40) chef VARCHAR(40) instructions VARCHAR(255)
The Generated Scaffold Code
With the scaffold action, Rails generates all the code it needs dynamically. By running scaffold as a script, generate the model, plus scaffolding, and the database migration script needed as well as a controller, helper, and testing support files as followscookbook> ruby script/generate scaffold Recipe title:string \ chef:string instructions:textNote a singular name Recipe to create a plural table name recipes. However, above command will generate following messages −
   exists  app/models/
   exists  app/controllers/
   exists  app/helpers/
   create  app/views/recipes
   exists  app/views/layouts/
   exists  test/functional/
   exists  test/unit/
   exists  public/stylesheets/
   create  app/views/recipes/index.html.erb
   create  app/views/recipes/show.html.erb
   create  app/views/recipes/new.html.erb
   create  app/views/recipes/edit.html.erb
   create  app/views/layouts/recipes.html.erb
   create  public/stylesheets/scaffold.css
   create  app/controllers/recipes_controller.rb
   create  test/functional/recipes_controller_test.rb
   create  app/helpers/recipes_helper.rb
   route  map.resources :recipes
dependency  model
   exists    app/models/
   exists    test/unit/
   exists    test/fixtures/
   create    app/models/recipe.rb
   create    test/unit/recipe_test.rb
   create    test/fixtures/recipes.yml
   create    db/migrate
   create    db/migrate/20080614192220_create_recipes.rb
cookbook>
Now let's examine what has happened behind the scene.
The Controller
Let's look at the code behind the controller. This all code is generated by scaffold generator. So if you will open app/controllers/recipes_controller.rb then you will find something as follows −class RecipesController < ApplicationController # GET /recipes # GET /recipes.xml def index @recipes = Recipe.find(:all) respond_to do |format| format.html # index.html.erb format.xml { render :xml => @recipes } end end # GET /recipes/1 # GET /recipes/1.xml def show @recipe = Recipe.find(params[:id]) respond_to do |format| format.html # show.html.erb format.xml { render :xml => @recipe } end end # GET /recipes/new # GET /recipes/new.xml def new @recipe = Recipe.new respond_to do |format| format.html # new.html.erb format.xml { render :xml => @recipe } end end # GET /recipes/1/edit def edit @recipe = Recipe.find(params[:id]) end # POST /recipes # POST /recipes.xml def create @recipe = Recipe.new(params[:recipe]) respond_to do |format| if @recipe.save flash[:notice] = 'Recipe was successfully created.' format.html { redirect_to(@recipe) } format.xml { render :xml => @recipe, :status => :created, :location => @recipe } else format.html { render :action => "new" } format.xml { render :xml => @recipe.errors, :status => :unprocessable_entity } end end end # PUT /recipes/1 # PUT /recipes/1.xml def update @recipe = Recipe.find(params[:id]) respond_to do |format| if @recipe.update_attributes(params[:recipe]) flash[:notice] = 'Recipe was successfully updated.' format.html { redirect_to(@recipe) } format.xml { head :ok } else format.html { render :action => "edit" } format.xml { render :xml => @recipe.errors, :status => :unprocessable_entity } end end # DELETE /recipes/1 # DELETE /recipes/1.xml def destroy @recipe = Recipe.find(params[:id]) @recipe.destroy respond_to do |format| format.html { redirect_to(recipes_url) } format.xml { head :ok } end end endThis file have all the methods implemented automatically. You can perform any Create, Read, Delete or Edit operation using these available methods.
When a user of a Rails application selects an action . e.g. "Show" - the controller will execute any code in the appropriate section - "def show" - and then by default will render a template of the same name - "show.html.erb". This default behavior can be overwritten by overwriting the code in any template −
The controller uses ActiveRecord methods such as find, find_all, new, save, update_attributes, and destroy to move data to and from the database tables. Note that you do not have to write any SQL statements, rails will take care of it automatically.
The Views
All the views and corresponding controller methods are created by scaffold command and they are available in app/views/recipes directory. You will have following files in this directory −- index.html.erb − This is the template file to show the default page and will be executed when you type http://127.0.0.1:3000/recipes.
- new.html.erb − This is the template to create a new recipe and will be executed whenever you will try to create a new recipe.
- show.html.erb − This is the template to show all the recipes in your database and will be executed whenever you will try to see all the recipes.
- edit.html.erb − This is the template to edit any recipe in your database and will be executed whenever you will try to edit any recipe.
The Migrations
You will find a migration file created in ~/cookbook/db/migrate subdirectory. This file will have following content −class CreateRecipes < ActiveRecord::Migration def self.up create_table :recipes do |t| t.string :title t.string :chef t.text :instructions t.timestamps end end def self.down drop_table :recipes end endNow to create required file in your database, make use of helper script as follows.
cookbook> rake db:migrateThis command will create recipes and schema_migrations tables in your cookbook database. Before proceeding, please make sure you have required table created successfully in your database.
Ready to Test
All the above steps bring your database table to life. This will provide with a simple interface to your data, and ways of −- Creating new entries
- Editing current entries
- Viewing current entries
- Destroying current entries
- Simple text strings
- Textareas (or large blocks of text)
- Date selectors
- Datetime selectors
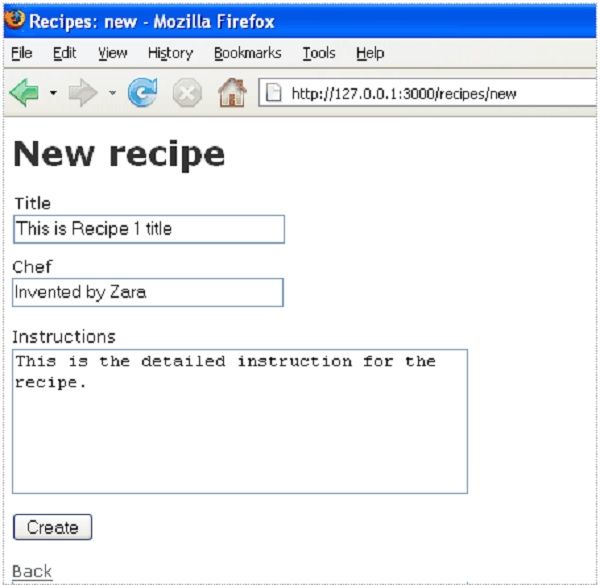
cookbook> ruby script/serverNow open a browser and navigate to http://127.0.0.1:3000/recipes/new, This will provide you a screen to create new entries in recipes table. A screen shot is shown below −
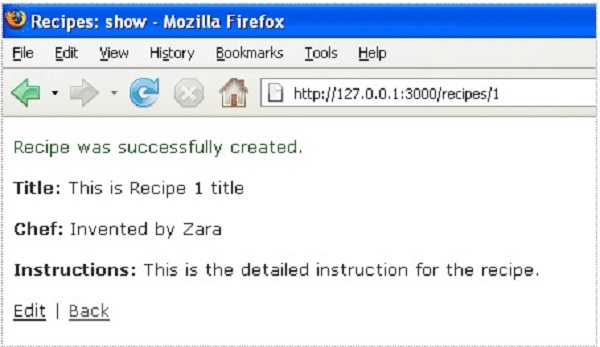
Now enter some values in the given text boxes, and press Create
button to create a new recipe, your record is added into recipes table
and it shows following result −
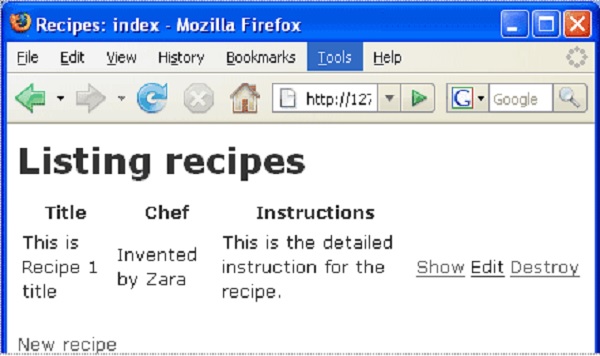
You can use either Edit option to edit the recipe or Back button to go to previous page. Assuming you press Back
button, it will display all the recipes available in your database.
Because we have only one record in our database so it will show you
following screen −
This screen gives you option to see complete detail of the recipe and to delete this recipe and to edit the recipe.Enhancing the Model
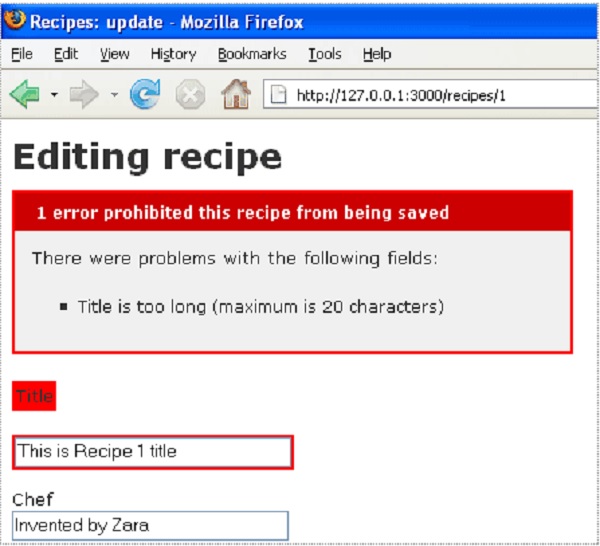
Rails gives you a lot of error handling for free. To understand this, add some validation rules to the empty recipe model −Modify ~/cookbook/app/models/recipe.rb as follows and then test your application −
class Recipe < ActiveRecord::Base
   validates_length_of :title, :within => 1..20
   validates_uniqueness_of :title, :message => "already exists"
end
These entries will give automatic checking that −
- validates_length_of − the field is not blank and not too long
- validates_uniqueness_of − duplicate values are trapped. I don't like the default Rails error message - so I have given my custom message.
No comments:
Post a Comment