
React uses JSX for templating instead of regular JavaScript. It is
not necessary to use it, but there are some pros that comes with it.
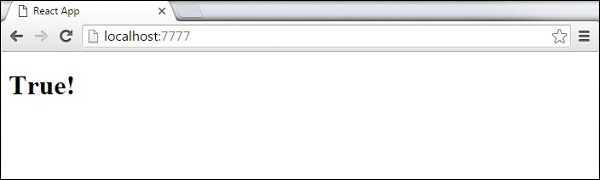
 You can not use if else statements inside JSX but you can use conditional (ternary) expressions instead. In example below variable i equals to 1 so the browser will render true, if we change it to some other value it will render false.
This is explained on React official page −
- JSX is faster because it performs optimization while compiling code to JavaScript.
- It is also type-safe and most of the errors can be caught during compilation.
- JSX makes it easier and faster to write templates if you are familiar with HTML.
Using JSX
JSX looks like regular HTML in most cases. We already used it in environment setup tutorial. Look at the code from App.jsx where we are returning div.App.jsx
import React from 'react';

class App extends React.Component {
   render() {
      return (
         <div>
            Hello World!!!
         </div>
      );
   }
}

export default App;
Even though it's similar to HTML, there are a couple of things you need to keep in mind when working with JSX.
Nested Elements
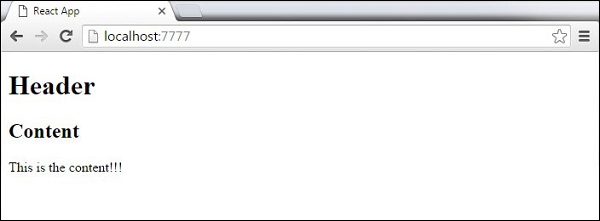
If you want to return more elements, you need to wrap it with one container element. Notice how we are using div as a wrapper for h1, h2 and p elements.App.jsx
import React from 'react';

class App extends React.Component {
   render() {
      return (
         <div>
            <h1>Header</h1>
            <h2>Content</h2>
            <p>This is the content!!!</p>
         </div>
      );
   }
}

export default App;
Attributes
You can use your own custom attributes in addition to regular HTML properties and attributes. When you want to add custom attribute, you need to use data- prefix. In example below we added data-myattribute as an attribute of p element.import React from 'react'; class App extends React.Component { render() { return ( <div> <h1>Header</h1> <h2>Content</h2> <p data-myattribute = "somevalue">This is the content!!!</p> </div> ); } } export default App;
JavaScript Expressions
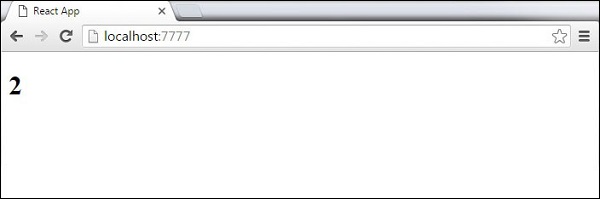
JavaScript expressions can be used inside of JSX. You just need to wrap it with curly brackets {}. Example below will render 2.import React from 'react'; class App extends React.Component { render() { return ( <div> <h1>{1+1}</h1> </div> ); } } export default App;
You can not use if else statements inside JSX but you can use conditional (ternary) expressions instead. In example below variable i equals to 1 so the browser will render true, if we change it to some other value it will render false.import React from 'react'; class App extends React.Component { render() { var i = 1; return ( <div> <h1>{i == 1 ? 'True!' : 'False'}</h1> </div> ); } } export default App;
Styling
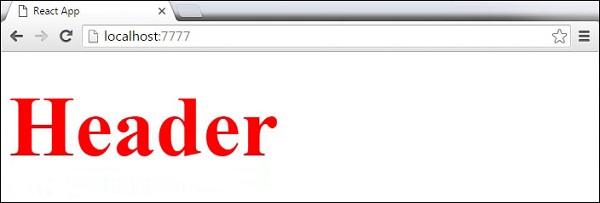
React recommends using inline styles. When you want to set inline styles, you need to use camelCase syntax. React will also automatically append px after the number value on specific elements. You can see below how to add myStyle inline to h1 element.import React from 'react'; class App extends React.Component { render() { var myStyle = { fontSize: 100, color: '#FF0000' } return ( <div> <h1 style = {myStyle}>Header</h1> </div> ); } } export default App;
Comments
When writing comments you need to put curly brackets {} when you want to write comment within children section of a tag. It is good practice to always use {} when writing comments since you want to be consistent when writing the app.import React from 'react'; class App extends React.Component { render() { return ( <div> <h1>Header</h1> {//End of the line Comment...} {/*Multi line comment...*/} </div> ); } } export default App;
Naming Convention
HTML tags are always using lowercase tag names, while React components starts with Uppercase.NOTE
You should use className and htmlFor as XML attribute names instead of class and for.This is explained on React official page −
Since JSX is JavaScript, identifiers such as class and for are discouraged as XML attribute names. Instead, React DOM components expect DOM property names like className and htmlFor, respectively.
No comments:
Post a Comment