- XHTML for the markup of web pages
- CSS for the styling
- Dynamic display and interaction using the DOM
- Data manipulation and interchange using XML
- Data retrieval using XMLHttpRequest
- JavaScript as the glue that meshes all this together
When you interact with an Ajax-powered web page, it loads an Ajax engine in the background. The engine is written in JavaScript and its responsibility is to both communicate with the web server and display the results to the user. When you submit data using an Ajax-powered form, the server returns an HTML fragment that contains the server's response and displays only the data that is new or changed as opposed to refreshing the entire page.
For a complete detail on AJAX you can go through our AJAX Tutorial
How Rails Implements Ajax
Rails has a simple, consistent model for how it implements Ajax operations. Once the browser has rendered and displayed the initial web page, different user actions cause it to display a new web page (like any traditional web application) or trigger an Ajax operation.Here is a typical sequence of activities −
- Some trigger fires −This trigger could be the user clicking on a button or link, or a user making changes to the data on a form or in a field, or just a periodic trigger (based on a timer)
- The web client calls the server: A JavaScript method, XMLHttpRequest, sends data associated with the trigger to an action handler on the server. The data might be either the ID of a checkbox, the text in an entry field, or a whole form.
- The server does processing: The server-side action handler ( Rails controller action ) -- does something with the data and returns an HTML fragment to the web client.
- The client receives the response: The client-side JavaScript, which Rails creates automatically, receives the HTML fragment and uses it to update a specified part of the current page's HTML, often the content of a <div> tag.
AJAX on Rails Example
While discussing rest of the Rails concepts, we have taken an example of Library. There we have a table called subject and we had added few subjects at the time of Migration. Till now we have not provided any procedure to add and delete subjects in this table.In this example we will provide, list, show and create operations on subject table. If you don't have any understanding on Library Info System explained in previous chapters then I would suggest you to complete previous chapters first and then continue with AJAX on Rails.
Creating Controllers
So lets start with creation of a controller for subject, this will be done as followsC:\ruby\library> ruby script/generate controller SubjectThis command creates a controller file app/controllers/subject_controller.rb. Open this file in any text editor and modify it to have following content.
class SubjectController < ApplicationController
   layout 'standard'
   def list
   end
   def show
   end
   def create
   end
end
Now we will give implementation for all these functions in the same way we had given in previous chapters.
The list method implementation
def list
   @subjects = Subject.find(:all)
end
This is similar to the example explained earlier and will be used to list down all the subjects available in our database.
The show method implementation
def show
   @subject = Subject.find(params[:id])
end
This is also similar to the example explained earlier and will be used to display a particular subject corresponding to passed ID.
The create method implementation
def create
   @subject = Subject.new(params[:subject])

   if @subject.save
      render :partial => 'subject', :object => @subject
   end
end
This is bit new here. Here we are not redirecting page to any other page but just rendering only changed part instead of whole page.
This happens possible only when using partial. We don't write complete view file, instead we will write a partial in /app/view/subject directory.
So we would have our final controller file /app/controllers/subject_controller.rb something like this −
class SubjectController < ApplicationController
   layout 'standard'
   def list
      @subjects = Subject.find(:all)
   end
   def show
      @subject = Subject.find(params[:id])
   end
   def create
      @subject = Subject.new(params[:subject])
      if @subject.save
         render :partial => 'subject', :object => @subject
      end
   end
end
We will action see it in a moment. First let's create view files for other methods.
Creating Views
Now we will create view files for all the methods except for create method for which we will create a partial.Creating view for list method
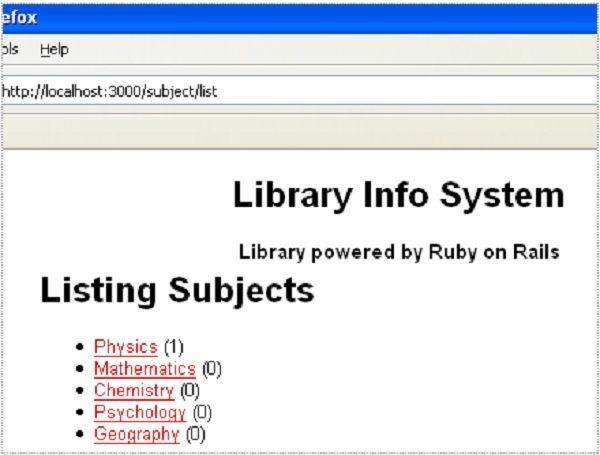
Create a file list.html.erb in /app/view/subject and populate it with the following code.<h1>Listing Subjects</h1> <ul id="subject_list"> <% @subjects.each do |c| %> <li><%= link_to c.name, :action => 'show', :id => c.id %> <%= "(#{c.books.count})" -%></li> <% end %> </ul>Here you are iterating through the @subjects array and outputting a <li> element containing a link to the subject it is referencing for each item in the array. Additionally, you are outputting the number of books in that specific subject inside parentheses. Rails' associations make it easy to step through a relationship and get information like this.
Now try browsing your Subject list using http://localhost:3000/subject/list. It will show you following screen. ( Before testing this, make sure your Web Server is up and running )

Creating view for show method
Create a file show.html.erb in /app/view/subject and populate it with the following code.<h1><%= @subject.name -%></h1> <ul> <% @subject.books.each do |c| %> <%= link_to c.title, :controller => "book", :action => "show",:id => c.id -%> <% end %> </ul>Now try clicking on any subject and you will find a listing of all the books available under that subject.
Creating view for create method
We would not create any view for create method because we are using partial instead of view. So in the next section we will create a partial for create method.Adding Ajax Support
To get Ajax support in the Rails application, you need to include the necessary JavaScript files in the layout. Rails is bundled with several libraries that make using Ajax very easy. Two libraries prototype and script.aculo.us are very popular.To add Prototype and script.aculo.us support to the application, open up the standard.html.erb layout file in app/views/layouts, add the following line just before the </head> tag, and save your changes −
<%= javascript_include_tag :defaults %>This includes both the Prototype and script.aculo.us libraries in the template so their effects will be accessible from any of the views.
Now add the following code at the bottom of app/views/subject/list.html.erb
<p id="add_link"><%= link_to_function("Add a Subject",
   "Element.remove('add_link'); Element.show('add_subject')")%></p>
<div id="add_subject" style="display:none;">
   <% form_remote_tag(:url => {:action => 'create'},
      :update => "subject_list", :position => :bottom,
      :html => {:id => 'subject_form'}) do %>
      Name: <%= text_field "subject", "name" %>
   <%= submit_tag 'Add' %>
   <% end %>
</div>
We are using link_to_function instead of link_to method because the link_to_function method enables you to harness the power of the Prototype JavaScript library to do some neat DOM manipulations.
The second section is the creation of the add_subject <div>. Notice that you set its visibility to be hidden by default using the CSS display property. The preceding link_to_function is what will change this property and show the <div> to the user to take input required to add a new subject.
Next, you are creating the Ajax form using the form_remote_tag. This Rails helper is similar to the form_tag tag, but it is used here to let the Rails framework know that it needs to trigger an Ajax action for this method. The form_remote_tag takes the :action parameter just like form_tag.
You also have two additional parameters :update and :position.
- The :update parameter tells Rails' Ajax engine which element to update based on its id. In this case, it's the <ul> tag.
- The :position parameter tells the engine where to place the newly added object in the DOM. You can set it to be at the bottom of the unordered list (:bottom) or at the top (:top).
Creating partial for create method
As we are calling create method while adding a subject and inside this create method we are using one partial. So lets implement this partial before going for actual practical.Under app/views/subject, create a new file called _subject.html.erb. Notice that all the partials are named with an underscore (_) at the beginning.
Add the following code into this file:
<li id="subject_<%= subject.id %>">
   <%= link_to subject.name, :action => 'show', :id => subject.id %>
   <%= "(#{subject.books.count})" -%>
</li>
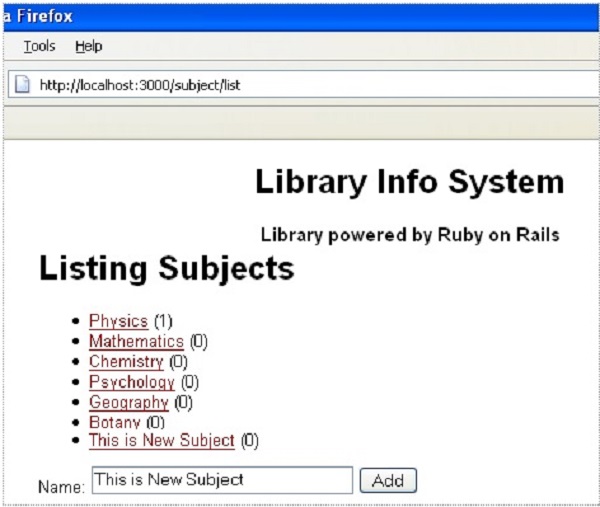
You are done now....you can now easily add several subjects without having to wait for the page to refresh after each subject is added. Now try browsing your Subject list using http://localhost:3000/subject/list. It will show you following screen. Try to add some subject.
 When you press Add button, subject would be added at the bottom of all available subjects and you would not have a feel of page refresh.
No comments:
Post a Comment