
In this chapter we will show you how to animate elements using React.
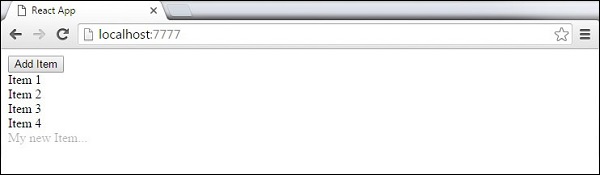
 Once we enter the name and press OK, the new element will fade in.
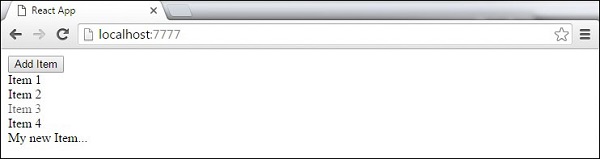
 Now we can delete some of the items (Item 3...) by clicking on it. This item will fade out from the list.
Step 1 - Install React CSS Transitions Group
This is React add-on used for creating basic CSS transitions and animations. We will install it from command prompt window −C:\Users\username\Desktop\reactApp>npm install react-addons-css-transition-group
Step 2 - Add CSS file
Let's create new folder css and file style.css inside. To be able to use it in our app, we need to link it to the head element in index.html.<link rel = "stylesheet" type = "text/css" href = "css/style.css">
Step 2A - Appear Animation
We will create basic React component. The ReactCSSTransitionGroup element will be used as a wrapper of the component we want to animate. You can see it is using transitionAppear and transitionAppearTimeout while transitionEnter and transitionLeave are false.App.jsx
import React from 'react';
var ReactCSSTransitionGroup = require('react-addons-css-transition-group');

class App extends React.Component {

   render() {
      return (
         <div>
            <ReactCSSTransitionGroup transitionName = "example"
               transitionAppear = {true} transitionAppearTimeout = {500}
               transitionEnter = {false} transitionLeave = {false}>

               <h1>My Element...</h1>
            </ReactCSSTransitionGroup>
         </div>
      );
   }
}

export default App;
main.js
import React from 'react'
import ReactDOM from 'react-dom';
import App from './App.jsx';

ReactDOM.render(<App />, document.getElementById('app'));
The CSS animation is very simple.
css/style.css
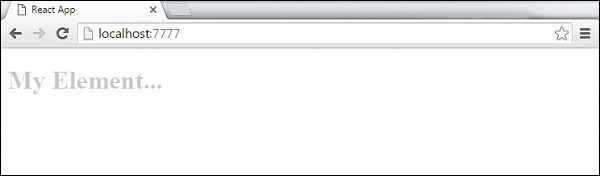
.example-appear {
   opacity: 0.01;
}

.example-appear.example-appear-active {
   opacity: 1;
   transition: opacity 500ms ease-in;
}
Once we start the app, our element will fade in.
Step 2B - Enter and Leave Animations
Enter and leave animations can be used when we want to add or remove elements from the list.App.jsx
import React from 'react';
var ReactCSSTransitionGroup = require('react-addons-css-transition-group');

class App extends React.Component {

   constructor(props) {
      super(props);

      this.state = {
         items: ['Item 1...', 'Item 2...', 'Item 3...', 'Item 4...']
      }

      this.handleAdd = this.handleAdd.bind(this);
   };

   handleAdd() {
      var newItems = this.state.items.concat([prompt('Create New Item')]);
      this.setState({items: newItems});
   }

   handleRemove(i) {
      var newItems = this.state.items.slice();
      newItems.splice(i, 1);
      this.setState({items: newItems});
   }

   render() {
      var items = this.state.items.map(function(item, i) {
         return (
            <div key = {item} onClick = {this.handleRemove.bind(this, i)}>
               {item}
            </div>
         );

      }.bind(this));

      return (
         <div>
            <button onClick = {this.handleAdd}>Add Item</button>

            <ReactCSSTransitionGroup transitionName = "example"
               transitionEnterTimeout = {500} transitionLeaveTimeout = {500}>
               {items}
            </ReactCSSTransitionGroup>
         </div>
      );
   }
}

export default App;
main.js
import React from 'react'
import ReactDOM from 'react-dom';
import App from './App.jsx';

ReactDOM.render(<App />, document.getElementById('app'));
css/style.css
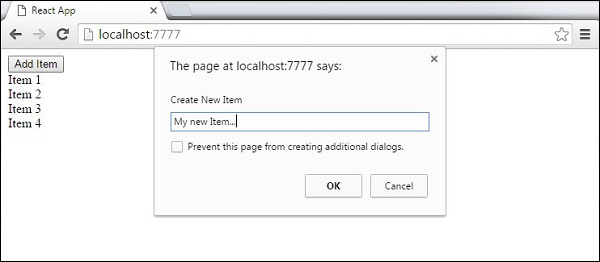
.example-enter {
   opacity: 0.01;
}

.example-enter.example-enter-active {
   opacity: 1;
   transition: opacity 500ms ease-in;
}

.example-leave {
   opacity: 1;
}

.example-leave.example-leave-active {
   opacity: 0.01;
   transition: opacity 500ms ease-in;
}
When we start the app and click Add Item button, the prompt will appear.
Once we enter the name and press OK, the new element will fade in.
Now we can delete some of the items (Item 3...) by clicking on it. This item will fade out from the list.
No comments:
Post a Comment