
In this tutorial we will show you how to implement flux pattern in React applications. We will use Redux framework. The goal of the article is to present you the simplest example of every piece needed for connecting Redux and React.
Step 1 - Installing Redux
We will install Redux via command prompt window.C:\Users\username\Desktop\reactApp>npm install --save react-redux
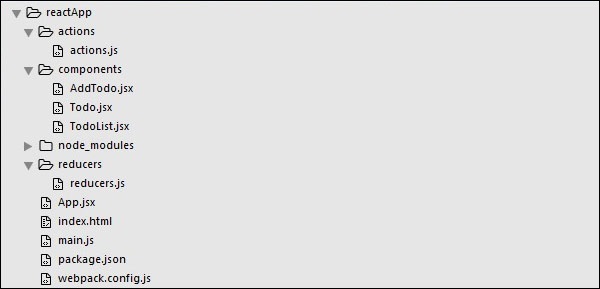
Step 2 - Create Files and Folders
In this step we will create folders and files for our actions, reducers and components. After we are done with it, this is how the folder structure will look like.
Step 3 - Actions
Actions are JavaScript objects that use type property to inform about the data that should be sent to the store. We are defining ADD_TODO action that will be used for adding new item to our list. The addTodo function is action creator that returns our action and sets an id for every created item.actions/actions.js
export const ADD_TODO = 'ADD_TODO'

let nextTodoId = 0;

export function addTodo(text) {
   return {
      type: ADD_TODO,
      id: nextTodoId++,
      text
   };
}
Step 4 - Reducers
While actions only trigger changes in the app, the reducers specify those changes. We are using switch statement to search for a ADD_TODO action. The reducer is a function that takes two parameters (state and action) to calculate and return updated state. The first function will be used to create new item, while the second one will push that item to the list. At the end we are using combineReducers helper function where we can add any new reducers we might use in the future.reducers/reducers.js
import { combineReducers } from 'redux'
import { ADD_TODO } from '../actions/actions'

function todo(state, action) {
   switch (action.type) {

      case ADD_TODO:
         return {
            id: action.id,
            text: action.text,
         }

      default:
      return state
   }
}

function todos(state = [], action) {
   switch (action.type) {

      case ADD_TODO:
         return [
            ...state,
            todo(undefined, action)
         ]

      default:
      return state
   }
}

const todoApp = combineReducers({
   todos
})

export default todoApp
Step 5 - Store
The store is the place that holds the app's state. It is very easy to create store once you have reducers. We are passing store property to the provider element which wraps our route component.main.js
import React from 'react'

import { render } from 'react-dom'
import { createStore } from 'redux'
import { Provider } from 'react-redux'

import App from './App.jsx'
import todoApp from './reducers/reducers'

let store = createStore(todoApp)

let rootElement = document.getElementById('app')

render(

   <Provider store = {store}>
      <App />
   </Provider>,

   rootElement
)
Step 6 - Root Component
The App component is the root component of the app. Only root component should be aware of a redux. The important part to notice is the connect function which is used for connecting our root component App to the store. This function takes select function as an argument. The select function takes state from the store and returns the props (visibleTodos) that we can use in our components.App.js
import React, { Component } from 'react'
import { connect } from 'react-redux'
import { addTodo } from './actions/actions'

import AddTodo from './components/AddTodo.jsx'
import TodoList from './components/TodoList.jsx'

class App extends Component {
   render() {
      const { dispatch, visibleTodos } = this.props

      return (
         <div>

            <AddTodo
               onAddClick = {text ⇒
               dispatch(addTodo(text))}
            />

            <TodoList todos = {visibleTodos}/>

         </div>
      )
   }
}

function select(state) {
   return {
      visibleTodos: state.todos
   }
}

export default connect(select)(App)
Step 7 - Other Components
These components shouldn't be aware of the redux.components/AddTodo.js
import React, { Component, PropTypes } from 'react'

export default class AddTodo extends Component {
   render() {
      return (
         <div>
            <input type = 'text' ref = 'input' />

            <button onClick = {(e) ⇒ this.handleClick(e)}>
               Add
            </button>

         </div>
      )
   }

   handleClick(e) {
      const node = this.refs.input
      const text = node.value.trim()
      this.props.onAddClick(text)
      node.value = ''
   }
}
components/Todo.js
import React, { Component, PropTypes } from 'react'

export default class Todo extends Component {
   render() {
      return (
         <li>
            {this.props.text}
         </li>
      )
   }
}
components/TodoList.js
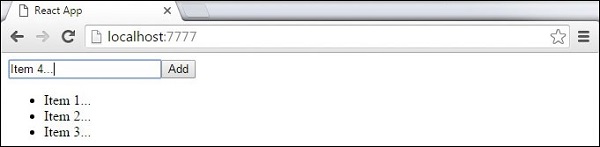
import React, { Component, PropTypes } from 'react'
import Todo from './Todo.jsx'

export default class TodoList extends Component {
   render() {
      return (
         <ul>
            {this.props.todos.map(todo ⇒
               <Todo
               key = {todo.id}
               {...todo}
               />
            )}
         </ul>
      )
   }
}
When we start our app we will be able to add items to our list.
thanks
ReplyDelete