
Introduction
A view in an Ember.js is used for to handle user events and also creates the re-usable component. The UI will be developed by using the views.The below figure shows how event handling occurs:
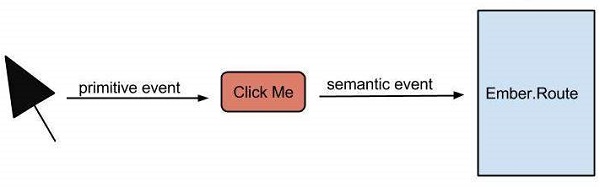 When user clicks on the event the view turns a primitive event (a click) into a semantic event (Event Handling) and transferred to the Ember.Route for to get the event action.
Defining a View
Handlebars templates in Ember.js are powerful and can be rendered by using Ember.View and inserted into DOM. You can set templateName property of a view to indicate which template to use.Ember.View.create({ templateName: 'NameOfTemplate', //do the logic });In the above code, the templateName determines which template should be rendered when an application request for a view.
Example
<!DOCTYPE html>
<html>
   <head>
      <title>Emberjs Defining a View</title>
      <!-- CDN's-->
      <script src="https://cdnjs.cloudflare.com/ajax/libs/handlebars.js/3.0.1/handlebars.min.js"></script>
      <script src="https://code.jquery.com/jquery-2.1.3.min.js"></script>
      <script src="https://cdnjs.cloudflare.com/ajax/libs/ember.js/1.10.0/ember.min.js"></script>
      <script src="https://builds.emberjs.com/tags/v1.10.0-beta.3/ember-template-compiler.js"></script>
      <script src="https://builds.emberjs.com/release/ember.debug.js"></script>
      <script src="https://builds.emberjs.com/beta/ember-data.js"></script>
   </head>
   <body>
      <script type="text/x-handlebars">
         <!-- defining the view name -->
         {{view "hello"}}
      </script>

      <script type="text/x-handlebars" data-template-name="hello">
         <!-- accessing the 'name' value defined in the 'View' -->
         Hello, <b>{{view.name}}</b>
      </script>

      <script type="text/javascript">
         App = Ember.Application.create();

         //extending View class
         App.HelloView = Ember.View.create({
            //template name 'hello'
            templateName: 'hello',
            //define the value for name property
            name: "Welcome to Tutorialspoint"
         });
      </script>
   </body>
</html>
Output
Let's carry out the following steps to see how above code works:- Save above code in view.htm file
- Open this HTML file in a browser.
No comments:
Post a Comment