Flex provides a special class
FlexPrintJob to print flex objects.
- FlexPrintJob can be used to print one or more Flex objects, such as a Form or VBox container.
- FlexPrintJob prints the object and all objects that it contains.
- The objects can be all or part of the displayed interface.
- The objects can be components that format data specifically for printing.
- The FlexPrintJob class lets you scale the output to fit the page.
- The FlexPrintJob class automatically uses multiple pages to print an object that does not fit on a single page.
- The FlexPrintJob class causes the operating system to display a Print dialog box. You cannot print without some user action.
Prepare and send a print job
You print output by preparing and sending a print job. Let's create an instance of the FlexPrintJob class
var printJob:FlexPrintJob = new FlexPrintJob();
Start the print job
printJob.start();
Flex will cause the operating system to display a Print dialog box.
Add one or more objects to the print job and specify how to scale them
printJob.addObject(myObject, FlexPrintJobScaleType.MATCH_WIDTH);
Each object starts on a new page. Send the print job to the printer
printJob.send();
Printing Example
| Step | Description |
|---|
| 1 | Create a project with a name HelloWorld under a package com.tutorialspoint.client as explained in the Flex - Create Application chapter. |
| 2 | Modify HelloWorld.mxml as explained below. Keep rest of the files unchanged. |
| 3 | Compile and run the application to make sure business logic is working as per the requirements. |
Following is the content of the modified mxml file
src/com.tutorialspoint/HelloWorld.mxml.
<?xml version="1.0" encoding="utf-8"?>
<s:Application xmlns:fx="http://ns.adobe.com/mxml/2009"
   xmlns:s="library://ns.adobe.com/flex/spark"
   xmlns:mx="library://ns.adobe.com/flex/mx"
   width="100%" height="100%"
   minWidth="500" minHeight="500"
   initialize="application_initializeHandler(event)">
   <fx:Style source="/com/tutorialspoint/client/Style.css"/>
   <fx:Script>
     <![CDATA[
        import mx.controls.Alert;
        import mx.events.FlexEvent;
        import mx.printing.FlexPrintJob;
        import mx.printing.FlexPrintJobScaleType;
        protected function btnClickMe_clickHandler(event:MouseEvent):void
        {
            // Create an instance of the FlexPrintJob class.
            var printJob:FlexPrintJob = new FlexPrintJob();

            // Start the print job.
            if (printJob.start() != true) return;

            // Add the object to print. Do not scale it.
            printJob.addObject(myDataGrid, FlexPrintJobScaleType.NONE);

            // Send the job to the printer.
            printJob.send();
        }

        protected function application_initializeHandler(event:FlexEvent):void
        {
            lblHeader.text = "My Hello World Application";
        }
     ]]>
   </fx:Script>
   <s:BorderContainer width="500" height="500" id="mainContainer"
      styleName="container">
      <s:VGroup width="100%" height="100%" gap="50"
         horizontalAlign="center"
         verticalAlign="middle">
         <s:Label id="lblHeader" fontSize="40" color="0x777777"
            styleName="heading"/>
         <mx:DataGrid id="myDataGrid" width="300">
            <mx:dataProvider>
               <fx:Object Product="Flex" Code="1000"/>
               <fx:Object Product="GWT" Code="2000"/>
               <fx:Object Product="JAVA" Code="3000"/>
               <fx:Object Product="JUnit" Code="4000"/>
            </mx:dataProvider>
         </mx:DataGrid>
         <s:Button label="Print Me!" id="btnClickMe"
            click="btnClickMe_clickHandler(event)"
            styleName="button" />
      </s:VGroup>
   </s:BorderContainer>
</s:Application>
Once you are ready with all the changes done, let us compile and run the application in normal mode as we did in
Flex - Create Application chapter. If everything is fine with your application, this will produce following result: [
Try it online ]
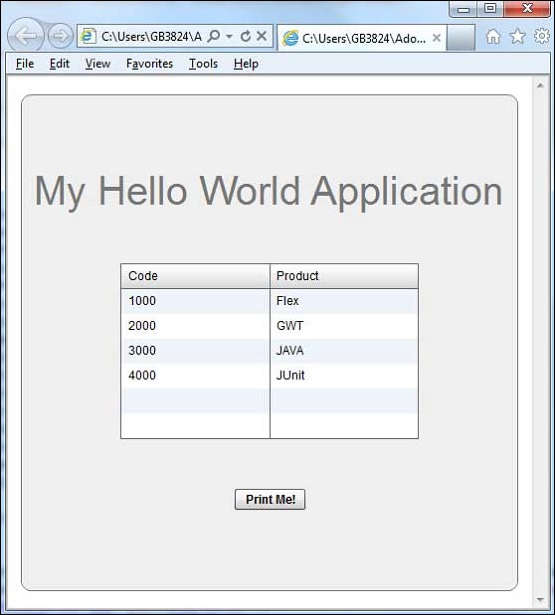
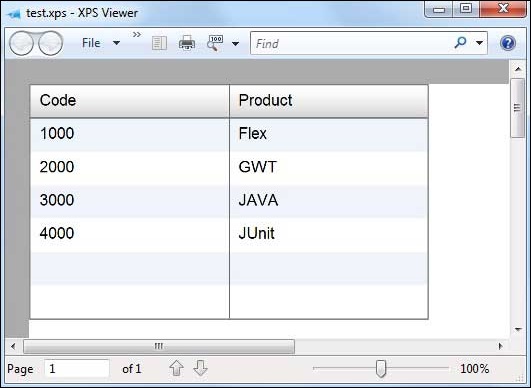
Click on print me button and you can see the printout of the data grid shown below.

No comments:
Post a Comment