
What is Skining?
- Skinning in Flex, is a process of customizing look and feel of a UI Component completely.
- A Skin can define text, image, filters , transitions and states of a compoent.
- A Skin can be created as a seperate mxml or ActionScript component.
- Using skin, we can control all visual aspects of a UI component.
- The process of defining skin is same for all the UI component.
Step 1: Create a skin
Launch Create MXML Skin wizard using the option File > New > MXML Skin.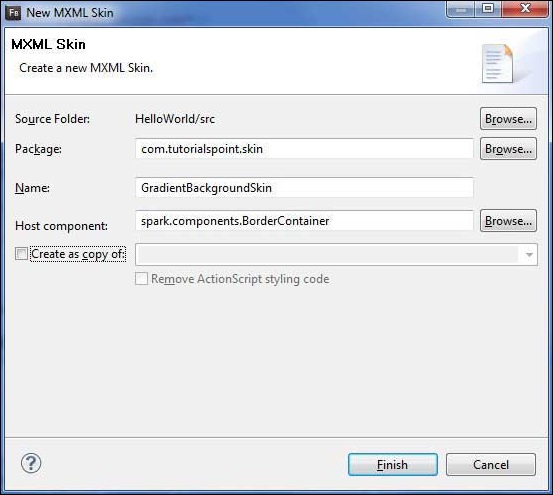 Enter Package as com.tutorialspoint.skin, name as GradientBackgroundSkin and choose host component as existing flex BorderContainer control spark.component.BorderContainer.
Now you've created a skin for a BorderContainer. Modify content of the mxml skin file src/com.tutorialspoint/skin/GradientBackgroundSkin.mxml. Update fill layer as follows:
<!-- fill -->
<s:Rect id="backgroundRect" left="0" right="0" height="100%" top="0">
   <s:fill>
      <s:LinearGradient rotation="90">
         <s:GradientEntry color="0x888888" ratio="0.2"/>
         <s:GradientEntry color="0x111111" ratio="1"/>
      </s:LinearGradient>
   </s:fill>
</s:Rect>
Step 2: Apply skin
You can apply skin over a component using two waysApply skin in MXML script (statically)
Apply GradientBackgroundSkin to a BorderContainer with id mainContainer using its skinClass attribute.<s:BorderContainer width="560" height="500" id="mainContainer" styleName="container"> <s:VGroup width="100%" height="100%" gap="50" horizontalAlign="center" verticalAlign="middle" skinClass="com.tutorialspoint.skin.GradientBackgroundSkin">
Apply skin in ActionScript (dynamically)
Apply GradientBackgroundSkin to a BorderContainer with id mainContainer using its skinClass property.protected function gradientBackground_clickHandler(event:MouseEvent):void { mainContainer.setStyle("skinClass", GradientBackgroundSkin ); }
Flex Style with Skin Example
Let us follow the following steps to see skinning in action in a Flex application by creating a test application:| Step | Description |
|---|---|
| 1 | Create a project with a name HelloWorld under a package com.tutorialspoint.client as explained in the Flex - Create Application chapter. |
| 2 | Create skin GradientBackgroundSkin.mxml under a package com.tutorialspoint.skin as explained above. Keep rest of the files unchanged. |
| 3 | Modify HelloWorld.mxml as explained below. Keep rest of the files unchanged. |
| 4 | Compile and run the application to make sure business logic is working as per the requirements. |
<?xml version="1.0" encoding="utf-8"?>
<s:Skin xmlns:fx="http://ns.adobe.com/mxml/2009"
   xmlns:s="library://ns.adobe.com/flex/spark"
   xmlns:mx="library://ns.adobe.com/flex/mx">
   <!-- host component -->
   <fx:Metadata>
      [HostComponent("spark.components.BorderContainer")]
   </fx:Metadata>

   <!-- states -->
   <s:states>
      <s:State name="disabled" />
      <s:State name="disabled" />
      <s:State name="normal" />
   </s:states>

   <!-- SkinParts
   name=contentGroup, type=spark.components.Group, required=false
   -->
   <!-- fill -->
   <s:Rect id="backgroundRect" left="0" right="0" height="100%" top="0">
      <s:fill>
         <s:LinearGradient rotation="90">
            <s:GradientEntry color="0x111111" ratio="0.2"/>
            <s:GradientEntry color="0x888888" ratio="1"/>
         </s:LinearGradient>
      </s:fill>
   </s:Rect>
   <!-- must specify this for the host component -->
   <s:Group id="contentGroup" left="0" right="0" top="0" bottom="0" />
</s:Skin>
Following is the content of the modified HelloWorld.mxml file src/com/tutorialspoint/client/HelloWorld.mxml.
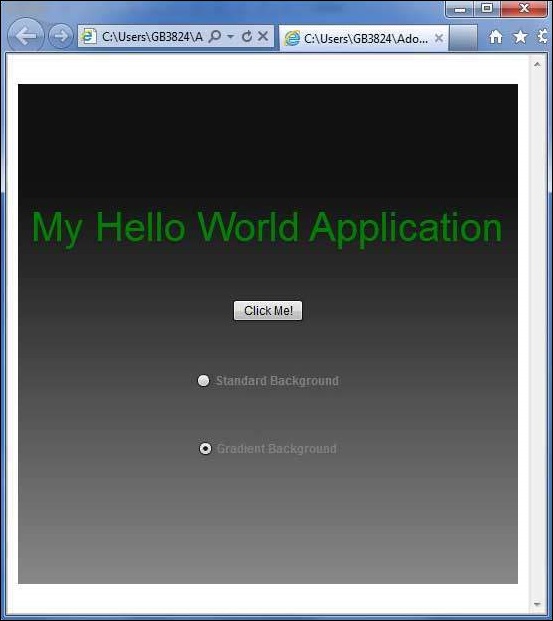
<?xml version="1.0" encoding="utf-8"?>
<s:Application xmlns:fx="http://ns.adobe.com/mxml/2009"
   xmlns:s="library://ns.adobe.com/flex/spark"
   xmlns:mx="library://ns.adobe.com/flex/mx"
   width="100%" height="100%" minWidth="500" minHeight="500"
   initialize="application_initializeHandler(event)">

  <fx:Style source="/com/tutorialspoint/client/Style.css"/>

  <fx:Script>
  <![CDATA[
     import com.tutorialspoint.skin.GradientBackgroundSkin;
     import mx.controls.Alert;
     import mx.events.FlexEvent;
     import spark.skins.spark.BorderContainerSkin;

     protected function btnClickMe_clickHandler(event:MouseEvent):void
     {
        Alert.show("Hello World!");
     }

     protected function application_initializeHandler(event:FlexEvent):void
     {
        lblHeader.text = "My Hello World Application";
     }

     protected function gradientBackground_clickHandler(event:MouseEvent):void
     {
         mainContainer.setStyle("skinClass", GradientBackgroundSkin );
     }

     protected function standardBackground_clickHandler(event:MouseEvent):void
     {
        mainContainer.setStyle("skinClass", BorderContainerSkin );
     }
   ]]>
   </fx:Script>
   <fx:Declarations>
      <s:RadioButtonGroup id="selectorGroup" />
   </fx:Declarations>
   <s:BorderContainer width="500" height="500" id="mainContainer"
      skinClass="spark.skins.spark.BorderContainerSkin"
      horizontalCenter="0" verticalCenter="0" cornerRadius="10">
      <s:VGroup width="100%" height="100%" gap="50" horizontalAlign="center"
      verticalAlign="middle">
         <s:Label id="lblHeader" fontSize="40" color="green"
         styleName="heading"/>
         <s:Button label="Click Me!" id="btnClickMe"
            click="btnClickMe_clickHandler(event)"/>
         <s:RadioButton color="gray" fontWeight="bold"
            group="{selectorGroup}" label="Standard Background"
            click="standardBackground_clickHandler(event)" selected="true"/>
         <s:RadioButton color="gray" fontWeight="bold"
            group="{selectorGroup}" label="Gradient Background"
            click="gradientBackground_clickHandler(event)"/>
      </s:VGroup>
   </s:BorderContainer>
</s:Application>
Once you are ready with all the changes done, let us compile and run the application in normal mode as we did in Flex - Create Application chapter. If everything is fine with your application, this will produce following result: [ Try it online ]

No comments:
Post a Comment