Testing is the process of checking the functionality of an
application to ensure it works as per requirements.Unit testing comes
into picture at the developer level where adequate measures are taken to
test every single entity (class or method) to ensure the final product
meets the requirements.

Tuesday, January 24, 2017
TestNG - Environment
TestNG is a framework for Java, so the very first requirement is to have JDK installed in your machine.
System Requirement
| JDK | 1.5 or above. |
|---|
TestNG - Writing Tests
Writing a test in TestNG basically involves the following steps:
- Write the business logic of your test and insert TestNG annotations in your code.
- Add the information about your test (e.g. the class name, the groups you wish to run, etc.) in a testng.xml file or in build.xml.
- Run TestNG.
TestNG - Basic Annotations
The traditional way to indicate test methods in JUnit 3 is by
prefixing their names with test. This is a very effective method for
tagging certain methods in a class as having a special meaning, but the
naming doesn’t scale very well (what if we want to add more tags for
different frameworks?) and is rather inflexible (what if we want to pass
additional parameters to the testing framework?).
TestNG - Execution Procedure
This chapter explains the execution procedure of methods in TestNG.
It explains the order of the methods called. Here is the execution
procedure of the TestNG test API methods with an example.
TestNG - Executing Tests
The test cases are executed using TestNG class. This class is
the main entry point for running tests in the TestNG framework. Users
can create their own TestNG object and invoke it in many different ways
such as:
TestNG - Suite Test
A test suite is a collection of test cases intended to test a
behavior or a set of behaviors of software program. In TestNG, we cannot
define a suite in testing source code, but it is represented by one XML
file, as suite is the feature of execution. It also allows flexible
configuration of the tests to be run.
TestNG - Ignore Test
Sometimes, it happens that our code is not ready and the test case
written to test that method/code fails. In such cases, annotation @Test(enabled = false) helps to disable this test case.
If a test method is annotated with @Test(enabled = false), then the test case that is not ready to test is bypassed.
Now, let's see @Test(enabled = false) in action.
If a test method is annotated with @Test(enabled = false), then the test case that is not ready to test is bypassed.
Now, let's see @Test(enabled = false) in action.
TestNG - Group Test
Group test is a new innovative feature in TestNG, which doesn’t exist
in JUnit framework. It permits you to dispatch methods into proper
portions and perform sophisticated groupings of test methods.
TestNG - Exception Test
TestNG provides an option of tracing the exception handling of code.
You can test whether a code throws a desired exception or not. Here the expectedExceptions parameter is used along with the @Test annotation. Now, let's see @Test(expectedExceptions) in action.
TestNG - Dependency Test
Sometimes, you may need to invoke methods in a test case in a
particular order, or you may want to share some data and state between
methods. This kind of dependency is supported by TestNG, as it supports
the declaration of explicit dependencies between test methods.
TestNG allows you to specify dependencies either with:
TestNG allows you to specify dependencies either with:
TestNG - Parameterized Test
Another interesting feature available in TestNG is parametric testing. In most cases, you'll come across a scenario where the business logic requires a hugely varying number of tests. Parameterized tests allow developers to run the same test over and over again using different values.
TestNG - Run JUnit Tests
Now that you have understood TestNG and its various tests, you must
be worried by now as to how to refactor your existing JUnit code.
There's no need to worry, as TestNG provides a way to shift from JUnit
to TestNG at your own pace. You can execute your existing JUnit test
cases using TestNG.
TestNG - Test Results
Reporting is the most important part of any test execution, as it
helps the user understand the result of the test execution, point of
failure, and the reasons for failure. Logging, on the other hand, is
important to keep an eye on the execution flow or for debugging in case
of any failures.
TestNG - Plug with ANT
In this chapter, we will demonstrate how to run TestNG using ANT. Let's follow the steps given below:
Step 1: Download Apache Ant
Download the latest version of Apache AntTestNG - Plug with Eclipse
To set up TestNG with Eclipse, follow the steps given below:
Step 1: Download TestNG Archive
Download the latest version of TestNG jar file from www.testng.org. http://www.testng.orgTestNG - Quick Guide
Testing is the process of checking the functionality of the
application whether it is working as per requirements and to ensure that
at developer level, unit testing comes into picture. Unit testing is
the testing of single entity (class or method).
TestNG - Useful Resources
The following resources contain additional information on TestNG. Please use them to get more in-depth knowledge on this topic.
Discuss TestNG
TestNG is a testing framework developed in the lines of JUnit and
NUnit, however it introduces some new functionalities that make it more
powerful and easier to use.
SWING - Overview
Swing API is set of extensible GUI Components to ease developer's
life to create JAVA based Front End/ GUI Applications. It is build upon
top of AWT API and acts as replacement of AWT API as it has almost every
control corresponding to AWT controls. Swing component follows a
Model-View-Controller architecture to fulfill the following criterias.
SWING - Environment Setup
This section guides you on how to download and set up Java on your
machine. Please follow the following steps to set up the environment.
SWING - Controls
Every user interface considers the following three main aspects:
- UI elements : These are the core visual elements the user
eventually sees and interacts with. GWT provides a huge list of widely
used and common elements varying from basic to complex which we will
cover in this tutorial.
Event Handling
What is an Event?
Change in the state of an object is known as event i.e. event describes the change in state of source. Events are generated as result of user interaction with the graphical user interface components.SWING - Event Classes
The Event classes represent the event. Java provides us various Event
classes but we will discuss those which are more frequently used.
SWING - Event Listeners
The Event listener represent the interfaces responsible to handle
events. Java provides us various Event listener classes but we will
discuss those which are more frequently used. Every method of an event
listener method has a single argument as an object which is subclass of
EventObject class.
SWING - Event Adapters
Adapters are abstract classes for receiving various events. The
methods in these classes are empty. These classes exists as convenience
for creating listener objects.
SWING - Layouts
Introduction
Layout means the arrangement of components within the container. In other way we can say that placing the components at a particular position within the container. The task of layouting the controls is done automatically by the Layout Manager.SWING - Menu Classes
As we know that every top-level window has a menu bar associated with
it. This menu bar consist of various menu choices available to the end
user. Further each choice contains list of options which is called drop
down menus. Menu and MenuItem controls are subclass of MenuComponent
class.
SWING - Containers
Containers are integral part of SWING GUI components. A container
provides a space where a component can be located. A Container in AWT is
a component itself and it adds the capability to add component to
itself. Following are noticable points to be considered.
SWING - Quick Guide
SWING - Overview
Swing API is set of extensible GUI Components to ease developer's life to create JAVA based Front End/ GUI Applications. It is build upon top of AWT API and acts as replacement of AWT API as it has almost every control corresponding to AWT controls.SWING - Useful Resources
The following resources contain additional information on SWING. Please use them to get more in-depth knowledge on this topic.
Discuss SWING
JAVA provides a rich set of libraries to create Graphical User Interface
in platform independent way. In this article we'll look in SWING GUI
controls.
Struts 2 Overview
Struts2 is popular and mature web application framework based on the
MVC design pattern. Struts2 is not just the next version of Struts 1,
but it is a complete rewrite of the Struts architecture.
Struts 2 - Environment Setup
Our first task is to get a minimal Struts 2 application running. This
chapter will guide you on how to prepare a development environment to
start your work with Struts 2. I assume that you already have have JDK
(5+), Tomcat and Eclipse installed on your machine.
Struts 2 - Architecture
From a high level, Struts2 is a pull-MVC (or MVC2) framework. The
Model-View-Controller pattern in Struts2 is realized with following five
core components:
Struts 2 - Hello World Example
As you learnt from the Struts 2 architecture, when you click on a
hyperlink or submit an HTML form in a Struts 2 web application, the
input is collected by the Controller which is sent to a Java class
called Actions. After the Action is executed, a Result selects a
resource to render the response.
Struts 2 - Configuration Files
This chapter will take you through basic configuration required for a
Struts 2 application. Here we will see what will be configured in few
important configuration files : web.xml, struts.xml, struts-config.xml and struts.properties
Struts 2 - Actions
Actions are the core of the Struts2 framework, as they are for any
MVC (Model View Controller) framework. Each URL is mapped to a specific
action, which provides the processing logic necessary to service the
request from the user.
Struts 2 - Interceptors
Interceptors are conceptually the same as servlet filters or the JDKs
Proxy class. Interceptors allow for crosscutting functionality to be
implemented separately from the action as well as the framework. You can
achieve the following using interceptors:
Struts 2 - Results & Result Types
As mentioned previously, the <results> tag plays the role of a view
in the Struts2 MVC framework. The action is responsible for executing
the business logic. The next step after executing the business logic is
to display the view using the <results> tag.
Struts 2 - Value Stack/OGNL
The Value Stack
The value stack is a set of several objects which keeps the following objects in the provided order:| SN | Objects & Description |
|---|---|
| 1 | Temporary Objects
There are various temporary objects which are created during
execution of a page. For example the current iteration value for a
collection being looped over in a JSP tag. |
Struts 2 - File Uploads
The Struts 2 framework provides built-in support for processing file
uploads using "Form-based File Upload in HTML". When a file is uploaded
it will typically be stored in a temporary directory and they should be
processed or moved by your Action class to a permanent directory to
ensure the data is not lost.
Struts 2 - Database Access
This chapter will teah you how to access a database using Struts 2 in
simple steps. Struts is a MVC framework and not a database framework
but it provides excellent support for JPA/Hibernate integration. We
shall look at the hibernate integration in a later chapter, but in this
chapter we shall use plain old JDBC to access the database.
Struts 2 - Sending Email
This chapter will teach you how you can send an email using your
Struts 2 application. For this exercise, you need to download and
install the mail.jar from JavaMail API 1.4.4 and place the mail.jar file in your WEB-INF\lib folder and then proceed to follow the standard steps of creating action, view and configuration files.
Struts 2 - Validations Framework
Now we will look into how Struts's validation framework. At Struts's
core, we have the validation framework that assists the application to
run the rules to perform validation before the action method is
executed.
Localization, internationalization (i18n)
Internationalization (i18n) is the process of planning and
implementing products and services so that they can easily be adapted to
specific local languages and cultures, a process called localization.
The internationalization process is sometimes called translation or
localization enablement.
Struts 2 - Type Conversion
Everything on a HTTP request is treated as a String by the
protocol. This includes numbers, booleans, integers, dates, decimals and
everything else. Every thing is a string according to HTTP.
Struts2 - Themes & Templates
Before starting actual tutorial for this chapter, let us look into few definition as given by http://struts.apache.org:
Struts 2 - Exception Handling
Struts provides an easier way to handle uncaught exception and
redirect users to a dedicated error page. You can easily configure
Struts to have different error pages for different execeptions.
Struts 2 - Annotations
As mentioned previously, Struts provides two forms of configuration. The traditional way is to use the struts.xml
file for all the configurations. We have seen so many examples of that
in the tutorail so far.
Struts 2 - Control Tags
The Struts 2 tags have a set of tags that make it easy to control the
flow of page execution. Following is the list of important Struts 2
Control Tags:
Struts 2 - Data Tags
The Struts 2 data tags are primarily used to manipulate the data displayed on a page. Listed below are the important data tags:
Struts 2 - The Form Tags
The list of form tags is a subset of Struts UI Tags. These
tags help in the rendering of the user interface required for the Struts
web applications and can be categorised into three categories. This
chapter will take you thorugh all the three types of UI tags:
Struts 2 - The Ajax Tags
Struts uses the DOJO framework for the AJAX tag implementation. First
of all, to proceed with this example, you need to add
struts2-dojo-plugin-2.2.3.jar to your classpath.
Struts 2 & Spring Integration
Spring is a popular web framework that provides easy integration with
lots of common web tasks. So the question is, why do we need Spring
when we have Struts2? Well, Spring is more than a MVC framework - it
offers many other goodies which are not available in Struts.
Struts 2 & Tiles Integration
In this chapter, let us go through the steps involved in integrating
the Tiles framework with Struts2. Apache Tiles is a templating framework
built to simplify the development of web application user interfaces.
Struts 2 & Hibernate Integration
Hibernate is a high-performance Object/Relational persistence and
query service which is licensed under the open source GNU Lesser General
Public License (LGPL) and is free to download.
Struts2 Questions and Answers
Struts2 Questions and Answers has been designed with a special intention of helping students and professionals preparing for various Certification Exams and Job Interviews.
This section provides a useful collection of sample Interview Questions
and Multiple Choice Questions (MCQs) and their answers with
appropriate explanations.
Struts 2 - Quick Guide
Struts2 is popular and mature web application framework based on the
MVC design pattern. Struts2 is not just the next version of Struts 1,
but it is a complete rewrite of the Struts architecture.
Struts 2 - Useful Resources
The following resources contain additional information on Struts2. Please use them to get more in-depth knowledge on this topic.
Discuss Struts 2
Apache Struts 2 is an elegant, extensible framework for creating
enterprise-ready Java web applications. The framework is designed to
streamline the full development cycle, from building, to deploying, to
maintaining applications over time. Apache Struts 2 was originally known
as WebWork 2. This tutorial will teach you how to use Apache Struts for
creating enterprise-ready Java web applications in simple and easy
steps.
Spring - MVC Framework Overview
The Spring web MVC framework provides model-view-controller
architecture and ready components that can be used to develop flexible
and loosely coupled web applications. The MVC pattern results in
separating the different aspects of the application (input logic,
business logic, and UI logic), while providing a loose coupling between
these elements.
Spring MVC - Environment Setup
This tutorial will guide you on how to prepare a development
environment to start your work with Spring Framework. This tutorial will
also teach you how to setup JDK, Tomcat and Eclipse on your machine
before you setup Spring Framework:
If you are running Windows and installed the JDK in C:\jdk1.6.0_15, you would have to put the following line in your C:\autoexec.bat file.
On Unix (Solaris, Linux, etc.), if the SDK is installed in /usr/local/jdk1.6.0_15 and you use the C shell, you would put the following into your .cshrc file.
 Make sure you set your CLASSPATH variable on this directory properly
otherwise you will face problem while running your application.
Make sure you set your CLASSPATH variable on this directory properly
otherwise you will face problem while running your application.
To install Eclipse IDE, download the latest Eclipse binaries from http://www.eclipse.org/downloads/. Once you downloaded the installation, unpack the binary distribution into a convenient location. For example in C:\eclipse on windows, or /usr/local/eclipse on Linux/Unix and finally set PATH variable appropriately.
Eclipse can be started by executing the following commands on windows machine, or you can simply double click on eclipse.exe
Step 1 - Setup Java Development Kit (JDK):
You can download the latest version of SDK from Oracle's Java site: Java SE Downloads. You will find instructions for installing JDK in downloaded files, follow the given instructions to install and configure the setup. Finally set PATH and JAVA_HOME environment variables to refer to the directory that contains java and javac, typically java_install_dir/bin and java_install_dir respectively.If you are running Windows and installed the JDK in C:\jdk1.6.0_15, you would have to put the following line in your C:\autoexec.bat file.
set PATH=C:\jdk1.6.0_15\bin;%PATH%
set JAVA_HOME=C:\jdk1.6.0_15
Alternatively, on Windows NT/2000/XP, you could also right-click on My Computer, select Properties, then Advanced, then Environment Variables. Then, you would update the PATH value and press the OK button.
On Unix (Solaris, Linux, etc.), if the SDK is installed in /usr/local/jdk1.6.0_15 and you use the C shell, you would put the following into your .cshrc file.
setenv PATH /usr/local/jdk1.6.0_15/bin:$PATH
setenv JAVA_HOME /usr/local/jdk1.6.0_15
Alternatively, if you use an Integrated Development Environment (IDE) like Borland JBuilder, Eclipse, IntelliJ IDEA, or Sun ONE Studio, compile and run a simple program to confirm that the IDE knows where you installed Java, otherwise do proper setup as given document of the IDE.
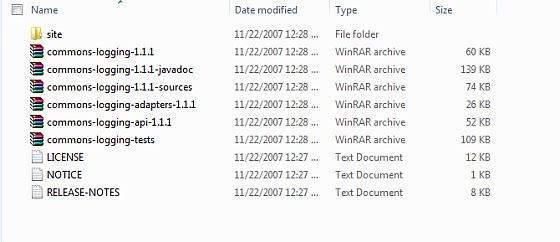
Step 2 - Install Apache Common Logging API:
You can download the latest version of Apache Commons Logging API from http://commons.apache.org/logging/. Once you downloaded the installation, unpack the binary distribution into a convenient location. For example in C:\commons-logging-1.1.1 on windows, or /usr/local/commons-logging-1.1.1 on Linux/Unix. This directory will have following jar files and other supporting documents etc.
Make sure you set your CLASSPATH variable on this directory properly
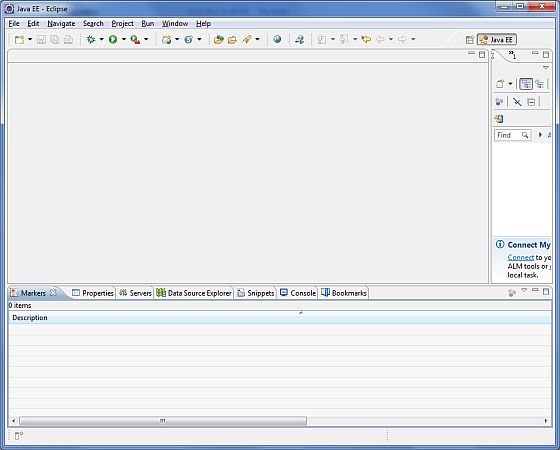
otherwise you will face problem while running your application.Step 3 - Setup Eclipse IDE
All the examples in this tutorial have been written using Eclipse IDE. So I would suggest you should have latest version of Eclipse installed on your machine.To install Eclipse IDE, download the latest Eclipse binaries from http://www.eclipse.org/downloads/. Once you downloaded the installation, unpack the binary distribution into a convenient location. For example in C:\eclipse on windows, or /usr/local/eclipse on Linux/Unix and finally set PATH variable appropriately.
Eclipse can be started by executing the following commands on windows machine, or you can simply double click on eclipse.exe
%C:\eclipse\eclipse.exeEclipse can be started by executing the following commands on Unix (Solaris, Linux, etc.) machine:
$/usr/local/eclipse/eclipseAfter a successful startup, if everything is fine then it should display following result:
Step 4 - Setup Spring Framework Libraries
Now if everything is fine, then you can proceed to setup your Spring framework. Following are the simple steps to download and install the framework on your machine.Spring MVC - Hello World Example
The following example show how to write a simple web based Hello
World application using Spring MVC framework. To start with it, let us
have working Eclipse IDE in place and follow the following steps to
develope a Dynamic Web Application using Spring Web Framework:
Spring MVC - Form Handling Example
The following example show how to write a simple web based
application which makes use of HTML forms using Spring Web MVC
framework. To start with it, let us have working Eclipse IDE in place
and follow the following steps to develop a Dynamic Form based Web
Application using Spring Web Framework:
Spring MVC - Page Redirection Example
The following example show how to write a simple web based application which makes use of redirect
to transfer a http request to another another page. To start with it,
let us have working Eclipse IDE in place and follow the following steps
to develop a Dynamic Form based Web Application using Spring Web
Framework:
Spring MVC - Static Pages Example
The following example show how to write a simple web based
application using Spring MVC Framework, which can access static pages
along with dynamic pages with the help of <mvc:resources> tag. To
start with it, let us have working Eclipse IDE in place and follow the
following steps to develop a Dynamic Form based Web Application using
Spring Web Framework:
Spring MVC - Text Box Example
The following example show how to use Text boxes in forms using
Spring Web MVC framework. To start with it, let us have working Eclipse
IDE in place and follow the following steps to develop a Dynamic Form
based Web Application using Spring Web Framework:
Spring MVC - Password Example
The following example show how to use Password in forms using Spring
Web MVC framework. To start with it, let us have working Eclipse IDE in
place and follow the following steps to develop a Dynamic Form based Web
Application using Spring Web Framework:
Spring MVC - TextArea Example
The following example show how to use TextArea in forms using Spring
Web MVC framework. To start with it, let us have working Eclipse IDE in
place and follow the following steps to develop a Dynamic Form based Web
Application using Spring Web Framework:
Spring MVC - Checkbox Example
The following example show how to use Single Checkbox in forms using
Spring Web MVC framework. To start with it, let us have working Eclipse
IDE in place and follow the following steps to develop a Dynamic Form
based Web Application using Spring Web Framework:
Spring MVC - Checkboxes Example
The following example show how to use Multiple Checkboxes in forms
using Spring Web MVC framework. To start with it, let us have working
Eclipse IDE in place and follow the following steps to develop a Dynamic
Form based Web Application using Spring Web Framework:
Spring MVC - RadioButton Example
The following example show how to use RadioButton in forms using
Spring Web MVC framework. To start with it, let us have working Eclipse
IDE in place and follow the following steps to develop a Dynamic Form
based Web Application using Spring Web Framework:
Spring MVC - RadioButtons Example
The following example show how to use RadioButtons in forms using
Spring Web MVC framework. To start with it, let us have working Eclipse
IDE in place and follow the following steps to develop a Dynamic Form
based Web Application using Spring Web Framework:
Spring MVC - Dropdown Example
The following example show how to use Dropdown in forms using Spring
Web MVC framework. To start with it, let us have working Eclipse IDE in
place and follow the following steps to develop a Dynamic Form based Web
Application using Spring Web Framework:
Spring MVC - Listbox Example
The following example show how to use Listbox in forms using Spring
Web MVC framework. To start with it, let us have working Eclipse IDE in
place and follow the following steps to develop a Dynamic Form based Web
Application using Spring Web Framework:
Spring MVC - Hidden Field Example
The following example show how to use Hidden field in forms using
Spring Web MVC framework. To start with it, let us have working Eclipse
IDE in place and follow the following steps to develop a Dynamic Form
based Web Application using Spring Web Framework:
Spring MVC - Error Handling Example
The following example show how to use Error Handling and Validators
in forms using Spring Web MVC framework. To start with it, let us have
working Eclipse IDE in place and follow the following steps to develop a
Dynamic Form based Web Application using Spring Web Framework:
Spring MVC - File Upload Example
The following example show how to use File Upload Control in forms
using Spring Web MVC framework. To start with it, let us have working
Eclipse IDE in place and follow the following steps to develop a Dynamic
Form based Web Application using Spring Web Framework:
Spring MVC - Bean Name Url Handler Mapping Example
The following example show how to use Bean Name Url Handler Mapping
using Spring Web MVC framework.
BeanNameUrlHandlerMapping class is the default handler mapping class
which maps URL request(s) to the name of the beans mentioned in the
configuration.
Spring MVC - Controller Class Name Handler Mapping Example
The following example show how to use Controller Class Name Handler
Mapping using Spring Web MVC framework.
ControllerClassNameHandlerMapping class is the convention based handler
mapping class which maps URL request(s) to the name of the controllers
mentioned in the configuration.
Spring MVC - Simple Url Handler Mapping Example
The following example show how to use Simple Url Handler Mapping using Spring Web MVC framework.
SimpleUrlHandlerMapping class helps to explicitly map URLs with their controllers respectively.
<beans>Spring MVC - Multi Action Controller Example
The following example show how to use Multi Action Controller using Spring Web MVC framework.
MultiActionController class helps to map multiple URLs with their methods in a single controller respectively.
package com.tutorialspoint;
Spring MVC - Properties Method Name Resolver Example
The following example show how to use Properties Method Name Resolver
method of a Multi Action Controller using Spring Web MVC framework.
MultiActionController class helps to map multiple URLs with their
methods in a single controller respectively.
Spring MVC - Parameter Method Name Resolver Example
The following example show how to use Parameter Method Name Resolver method of a Multi Action Controller using Spring Web MVC framework. MultiActionController class helps to map multiple URLs with their methods in a single controller respectively.
Spring MVC - Parameterizable View Controller Example
The following example show how to use Parameterizable View Controller
method of a Multi Action Controller using Spring Web MVC framework.
Parameterizable View allows to map a web-page with a request.
package com.tutorialspoint;
Spring MVC - Internal Resource View Resolver Example
InternalResourceViewResolver is used to resolve the provided URI to
actual URI. The following example show how to use
InternalResourceViewResolver using Spring Web MVC framework.
InternalResourceViewResolver allows to map web-pages with requests.
Spring MVC - Xml View Resolver Example
XmlViewResolver is used to resolve the view names using view beans
defined in xml file. The following example show how to use
XmlViewResolver using Spring Web MVC framework.
TestWeb-servlet.xml
TestWeb-servlet.xml
Spring MVC - Resource Bundle View Resolver Example
ResourceBundleViewResolver is used to resolve the view names using
view beans defined in properties file. The following example show how to
use ResourceBundleViewResolver using Spring Web MVC framework.
TestWeb-servlet.xml
TestWeb-servlet.xml
Spring MVC - Multiple Resolver Mapping Example
In case you want to use multiple view resolver in a spring mvc
application then priority order can be set using order property. The
following example show how to use ResourceBundleViewResolver and
InternalResourceViewResolver both in Spring Web MVC framework.
Spring MVC - Hibernate Validator Example
The following example show how to use Error Handling and Validators in forms using Spring Web MVC framework. To start with it, let us have working Eclipse IDE in place and follow the following steps to develop a Dynamic Form based Web Application using Spring Web Framework:
Spring MVC - Generate RSS Feed Example
The following example show how to generate RSS Feed using Spring Web MVC framework. To start with it, let us have working Eclipse IDE in place and follow the following steps to develop a Dynamic Form based Web Application using Spring Web Framework:
Spring MVC - Generate XML Example
The following example show how to generate XML using Spring Web MVC framework. To start with it, let us have working Eclipse IDE in place and follow the following steps to develop a Dynamic Form based Web Application using Spring Web Framework:
Spring MVC - Generate JSON Example
The following example show how to generate JSON using Spring Web MVC framework. To start with it, let us have working Eclipse IDE in place and follow the following steps to develop a Dynamic Form based Web Application using Spring Web Framework:
Spring MVC - Generate Excel Example
The following example show how to generate Excel using Spring Web MVC framework. To start with it, let us have working Eclipse IDE in place and follow the following steps to develop a Dynamic Form based Web Application using Spring Web Framework:
Spring MVC - Generate PDF Example
The following example show how to generate PDF using Spring Web MVC framework. To start with it, let us have working Eclipse IDE in place and follow the following steps to develop a Dynamic Form based Web Application using Spring Web Framework:
Spring MVC - Integrate LOG4J Example
The following example show how to intigrate LOG4J using Spring Web MVC framework. To start with it, let us have working Eclipse IDE in place and follow the following steps to develop a Dynamic Form based Web Application using Spring Web Framework:
Spring Questions and Answers
Spring Questions and Answers has been designed with a special intention of helping students and professionals preparing for various Certification Exams and Job Interviews. This section provides a useful collection of sample Interview Questions and Multiple Choice Questions (MCQs) and their answers with appropriate explanations.
Spring MVC - Quick Guide
Spring - MVC Framework Overview
The Spring web MVC framework provides model-view-controller architecture and ready components that can be used to develop flexible and loosely coupled web applications. The MVC pattern results in separating the different aspects of the application (input logic, business logic, and UI logic), while providing a loose coupling between these elements.- The Model encapsulates the application data and in general they will consist of POJO.
- The View is responsible for rendering the model data and in general it generates HTML output that the client's browser can interpret.
- The Controller is responsible for processing user requests and building appropriate model and passes it to the view for rendering.
The DispatcherServlet
The Spring Web model-view-controller (MVC) framework is designed around a DispatcherServlet that handles all the HTTP requests and responses. The request processing workflow of the Spring Web MVC DispatcherServlet is illustrated in the following diagram: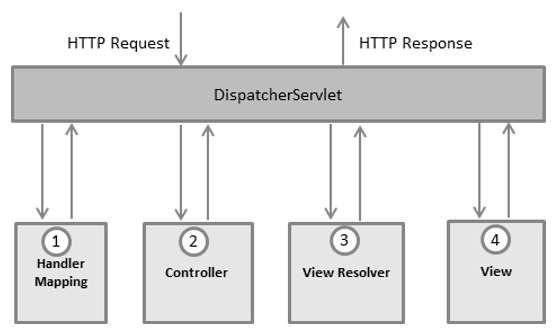 Following is the sequence of events corresponding to an incoming HTTP request to DispatcherServlet:
- After receiving an HTTP request, DispatcherServlet consults the HandlerMapping to call the appropriate Controller.
- The Controller takes the request and calls the appropriate service methods based on used GET or POST method. The service method will set model data based on defined business logic and returns view name to the DispatcherServlet.
- The DispatcherServlet will take help from ViewResolver to pickup the defined view for the request.
- Once view is finalized, The DispatcherServlet passes the model data to the view which is finally rendered on the browser.
Required Configuration
You need to map requests that you want the DispatcherServlet to handle, by using a URL mapping in the web.xml file. The following is an example to show declaration and mapping for HelloWeb DispatcherServlet example:Spring MVC - Useful Resources
The following resources contain additional information on Spring. Please use them to get more in-depth knowledge on this topic.
Discuss Spring MVC
Spring framework is an open source Java platform that provides
comprehensive infrastructure support for developing robust Java
applications very easily and very rapidly.
Subscribe to:
Posts (Atom)