
Using File Uploading class, we can upload files and we can also,
restrict the type and size of the file to be uploaded. Follow the steps
shown in the given example to understand the file uploading process in
CodeIgniter.
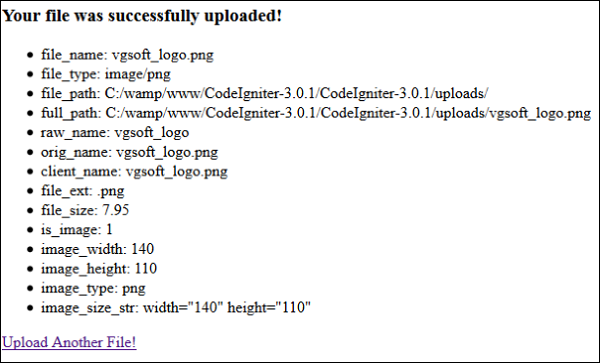
 After successfully uploading a file, you will see the following screen −
Example
Copy the following code and store it at application/view/Upload_form.php.<html> <head> <title>Upload Form</title> </head> <body> <?php echo $error;?> <?php echo form_open_multipart('upload/do_upload');?> <form action = "" method = ""> <input type = "file" name = "userfile" size = "20" /> <br /><br /> <input type = "submit" value = "upload" /> </form> </body> </html>Copy the code given below and store it at application/view/Upload_success.php
<html>

   <head>
      <title>Upload Form</title>
   </head>

   <body>
      <h3>Your file was successfully uploaded!</h3>

      <ul>
         <?phpforeach ($upload_data as $item => $value):?>
         <li><?php echo $item;?>: <?php echo $value;?></li>
         <?phpendforeach; ?>
      </ul>

      <p><?php echo anchor('upload', 'Upload Another File!'); ?></p>
   </body>

</html>
Copy the code given below and store it at application/controllers/Upload.php. Create “uploads” folder at the root of CodeIgniter i.e. at the parent directory of application folder.
<?php

   class Upload extends CI_Controller {

      public function __construct() {
         parent::__construct();
         $this->load->helper(array('form', 'url'));
      }

      public function index() {
         $this->load->view('upload_form', array('error' => ' ' ));
      }

      public function do_upload() {
         $config['upload_path']   = './uploads/';
         $config['allowed_types'] = 'gif|jpg|png';
         $config['max_size']      = 100;
         $config['max_width']     = 1024;
         $config['max_height']    = 768;
         $this->load->library('upload', $config);

         if ( ! $this->upload->do_upload('userfile')) {
            $error = array('error' => $this->upload->display_errors());
            $this->load->view('upload_form', $error);
         }

         else {
            $data = array('upload_data' => $this->upload->data());
            $this->load->view('upload_success', $data);
         }
      }
   }
?>
Make the following change in the route file in application/config/routes.php and add the following line at the end of file.
$route['upload'] = 'Upload';Now let us execute this example by visiting the following URL in the browser. Replace the yoursite.com with your URL.
http://yoursite.com/index.php/uploadIt will produce the following screen −
After successfully uploading a file, you will see the following screen −
No comments:
Post a Comment