
The navbar is one of the prominent features of Bootstrap sites.
Navbars are responsive 'meta' components that serve as navigation
headers for your application or site. Navbars collapse in mobile views
and become horizontal as the available viewport width increases. At its
core, the navbar includes styling for site names and basic navigation.

The following example demonstrates this −
The following example demonstrates this −


If you want the navbar fixed to the top, add class .navbar-fixed-top to the .navbar class. The following example demonstrates this −


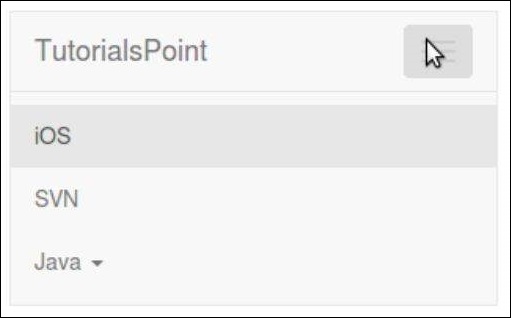
Default Navbar
To create a default navbar −- Add the classes .navbar, .navbar-default to the <nav> tag.
- Add role = "navigation" to the above element, to help with accessibility.
- Add a header class .navbar-header to the <div> element. Include an <a> element with class navbar-brand. This will give the text a slightly larger size.
- To add links to the navbar, simply add an unordered list with the classes of .nav, .navbar-nav.
<nav class = "navbar navbar-default" role = "navigation">

   <div class = "navbar-header">
      <a class = "navbar-brand" href = "#">TutorialsPoint</a>
   </div>

   <div>
      <ul class = "nav navbar-nav">
         <li class = "active"><a href = "#">iOS</a></li>
         <li><a href = "#">SVN</a></li>

         <li class = "dropdown">
            <a href = "#" class = "dropdown-toggle" data-toggle = "dropdown">
               Java
               <b class = "caret"></b>
            </a>

            <ul class = "dropdown-menu">
               <li><a href = "#">jmeter</a></li>
               <li><a href = "#">EJB</a></li>
               <li><a href = "#">Jasper Report</a></li>

               <li class = "divider"></li>
               <li><a href = "#">Separated link</a></li>

               <li class = "divider"></li>
               <li><a href = "#">One more separated link</a></li>
            </ul>

         </li>

      </ul>
   </div>

</nav>
Responsive Navbar
To add responsive features to the navbar, the content that you want to be collapsed needs to be wrapped in a <div> with classes .collapse, .navbar-collapse. The collapsing nature is tripped by a button that has the class of .navbar-toggle and then features two data- elements. The first, data-toggle, is used to tell the JavaScript what to do with the button, and the second, data-target, indicates which element to toggle. Then with a class .icon-bar create what we like to call the hamburger button. This will toggle the elements that are in the .nav-collapse <div>. For this feature to work, you need to include the Bootstrap Collapse Plugin.The following example demonstrates this −
<nav class = "navbar navbar-default" role = "navigation">

   <div class = "navbar-header">
      <button type = "button" class = "navbar-toggle"
         data-toggle = "collapse" data-target = "#example-navbar-collapse">
         <span class = "sr-only">Toggle navigation</span>
         <span class = "icon-bar"></span>
         <span class = "icon-bar"></span>
         <span class = "icon-bar"></span>
      </button>

      <a class = "navbar-brand" href = "#">TutorialsPoint</a>
   </div>

   <div class = "collapse navbar-collapse" id = "example-navbar-collapse">

      <ul class = "nav navbar-nav">
         <li class = "active"><a href = "#">iOS</a></li>
         <li><a href = "#">SVN</a></li>

         <li class = "dropdown">
            <a href = "#" class = "dropdown-toggle" data-toggle = "dropdown">
               Java
               <b class = "caret"></b>
            </a>

            <ul class = "dropdown-menu">
               <li><a href = "#">jmeter</a></li>
               <li><a href = "#">EJB</a></li>
               <li><a href = "#">Jasper Report</a></li>

               <li class = "divider"></li>
               <li><a href = "#">Separated link</a></li>

               <li class = "divider"></li>
               <li><a href = "#">One more separated link</a></li>
            </ul>

         </li>

      </ul>
   </div>

</nav>
Forms in Navbar
Instead of using the default class-based forms from Chapter Bootstrap Forms, forms that are in the navbar, use the .navbar-form class. This ensures that the form’s proper vertical alignment and collapsed behavior in narrow viewports. Use the alignment options (explained in Component alignment section) to decide where it resides within the navbar content.The following example demonstrates this −
<nav class = "navbar navbar-default" role = "navigation">

   <div class = "navbar-header">
      <a class = "navbar-brand" href = "#">TutorialsPoint</a>
   </div>

   <div>
      <form class = "navbar-form navbar-left" role = "search">

         <div class = "form-group">
            <input type = "text" class = "form-control" placeholder = "Search">
         </div>
         <button type = "submit" class = "btn btn-default">Submit</button>

      </form>
   </div>

</nav>
Buttons in Navbar
You can add buttons using class .navbar-btn to <button> elements not residing in a <form> to vertically center them in the navbar. .navbar-btn can be used on <a> and <input> elements.Do not use .navbar-btn nor the standard button classes on <a> elements within .navbar-nav.The following example demonstrates this −
<nav class = "navbar navbar-default" role = "navigation">

   <div class = "navbar-header">
      <a class = "navbar-brand" href = "#">TutorialsPoint</a>
   </div>

   <div>
      <form class = "navbar-form navbar-left" role = "search">

         <div class = "form-group">
            <input type = "text" class = "form-control" placeholder = "Search">
         </div>

         <button type = "submit" class = "btn btn-default">Submit Button</button>

      </form>

      <button type = "button" class = "btn btn-default navbar-btn">Navbar Button</button>
   </div>

</nav>
Text in Navbar
To wrap strings of text in an element use the class .navbar-text. This is usually used with <p> tag for proper leading and color. The following example demonstrates this −<nav class = "navbar navbar-default" role = "navigation"> <div class = "navbar-header"> <a class = "navbar-brand" href = "#">TutorialsPoint</a> </div> <div> <p class = "navbar-text">Signed in as Thomas</p> </div> </nav>
Non-nav Links
If you want to use the standard links that are not within the regular navbar navigation component, then use the class navbar-link to add proper colors for the default and inverse navbar options as shown in the following example −<nav class = "navbar navbar-default" role = "navigation"> <div class = "navbar-header"> <a class = "navbar-brand" href = "#">TutorialsPoint</a> </div> <div> <p class = "navbar-text navbar-right"> Signed in as <a href = "#" class = "navbar-link">Thomas</a> </p> </div> </nav>
Component Alignment
You can align the components like nav links, forms, buttons, or text to left or right in a navbar using the utility classes .navbar-left or .navbar-right. Both classes will add a CSS float in the specified direction. The following example demonstrates this −<nav class = "navbar navbar-default" role = "navigation"> <div class = "navbar-header"> <a class = "navbar-brand" href = "#">TutorialsPoint</a> </div> <div> <!--Left Align--> <ul class = "nav navbar-nav navbar-left"> <li class = "dropdown"> <a href = "#" class = "dropdown-toggle" data-toggle = "dropdown"> Java <b class = "caret"></b> </a> <ul class = "dropdown-menu"> <li><a href = "#">jmeter</a></li> <li><a href = "#">EJB</a></li> <li><a href = "#">Jasper Report</a></li> <li class = "divider"></li> <li><a href = "#">Separated link</a></li> <li class = "divider"></li> <li><a href = "#">One more separated link</a></li> </ul> </li> </ul> <form class = "navbar-form navbar-left" role = "search"> <button type = "submit" class = "btn btn-default">Left align-Submit Button</button> </form> <p class = "navbar-text navbar-left">Left align-Text</p> <!--Right Align--> <ul class = "nav navbar-nav navbar-right"> <li class = "dropdown"> <a href = "#" class = "dropdown-toggle" data-toggle = "dropdown"> Java <b class = "caret"></b> </a> <ul class = "dropdown-menu"> <li><a href = "#">jmeter</a></li> <li><a href = "#">EJB</a></li> <li><a href = "#">Jasper Report</a></li> <li class = "divider"></li> <li><a href = "#">Separated link</a></li> <li class = "divider"></li> <li><a href = "#">One more separated link</a></li> </ul> </li> </ul> <form class = "navbar-form navbar-right" role = "search"> <button type = "submit" class = "btn btn-default"> Right align-Submit Button </button> </form> <p class = "navbar-text navbar-right">Right align-Text</p> </div> </nav>
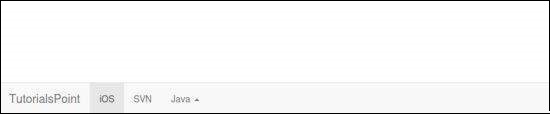
Fixed to Top
The Bootstrap navbar can be dynamic in its positioning. By default, it is a block-level element that takes its positioning based on its placement in the HTML. With a few helper classes, you can place it either on the top or bottom of the page, or you can make it scroll statically with the page.If you want the navbar fixed to the top, add class .navbar-fixed-top to the .navbar class. The following example demonstrates this −
To prevent the navbar from sitting on top of other content in the body of the page, add at least 50 pixels of padding to the <body> tag or try your own values.
<nav class = "navbar navbar-default navbar-fixed-top" role = "navigation">

   <div class = "navbar-header">
      <a class = "navbar-brand" href = "#">TutorialsPoint</a>
   </div>

   <div>
      <ul class = "nav navbar-nav">
         <li class = "active"><a href = "#">iOS</a></li>
         <li><a href = "#">SVN</a></li>

         <li class = "dropdown">
            <a href = "#" class = "dropdown-toggle" data-toggle = "dropdown">
               Java
               <b class = "caret"></b>
            </a>

            <ul class = "dropdown-menu">
               <li><a href = "#">jmeter</a></li>
               <li><a href = "#">EJB</a></li>
               <li><a href = "#">Jasper Report</a></li>

               <li class = "divider"></li>
               <li><a href = "#">Separated link</a></li>

               <li class = "divider"></li>
               <li><a href = "#">One more separated link</a></li>
            </ul>

         </li>
      </ul>
   </div>

</nav>
Fixed to Bottom
If you want the navbar fixed to the bottom of the page, add class .navbar-fixed-bottom to the .navbar class. The following example demonstrates this −<nav class = "navbar navbar-default navbar-fixed-bottom" role = "navigation"> <div class = "navbar-header"> <a class = "navbar-brand" href = "#">TutorialsPoint</a> </div> <div> <ul class = "nav navbar-nav"> <li class = "active"><a href = "#">iOS</a></li> <li><a href="#">SVN</a></li> <li class = "dropdown"> <a href = "#" class = "dropdown-toggle" data-toggle = "dropdown"> Java <b class ="caret"></b> </a> <ul class = "dropdown-menu"> <li><a href = "#">jmeter</a></li> <li><a href = "#">EJB</a></li> <li><a href = "#">Jasper Report</a></li> <li class = "divider"></li> <li><a href = "#">Separated link</a></li> <li class = "divider"></li> <li><a href = "#">One more separated link</a></li> </ul> </li> </ul> </div> </nav>
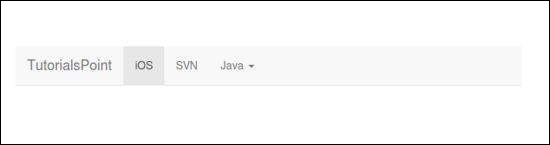
Static Top
To create a navbar that scrolls with the page, add the .navbar-static-top class. This class does not require adding the padding to the <body>.<nav class = "navbar navbar-default navbar-static-top" role = "navigation"> <div class = "navbar-header"> <a class = "navbar-brand" href = "#">TutorialsPoint</a> </div> <div> <ul class = "nav navbar-nav"> <li class = "active"><a href = "#">iOS</a></li> <li><a href = "#">SVN</a></li> <li class = "dropdown"> <a href = "#" class = "dropdown-toggle" data-toggle = "dropdown"> Java <b class = "caret"></b> </a> <ul class = "dropdown-menu"> <li><a href = "#">jmeter</a></li> <li><a href = "#">EJB</a></li> <li><a href = "#">Jasper Report</a></li> <li class = "divider"></li> <li><a href = "#">Separated link</a></li> <li class = "divider"></li> <li><a href = "#">One more separated link</a></li> </ul> </li> </ul> </div> </nav>
Inverted Navbar
To create an inverted navbar with a black background and with white text, simply add the .navbar-inverse class to the .navbar class as demonstrated in the following example −To prevent the navbar from sitting on top of other content in the body of the page, add at least 50 pixels of padding to the <body> tag or try your own values.
<nav class = "navbar navbar-inverse" role = "navigation">

   <div class = "navbar-header">
      <a class = "navbar-brand" href = "#">TutorialsPoint</a>
   </div>

   <div>
      <ul class = "nav navbar-nav">
         <li class = "active"><a href = "#">iOS</a></li>
         <li><a href = "#">SVN</a></li>
         <li class = "dropdown">
            <a href = "#" class = "dropdown-toggle" data-toggle = "dropdown">
               Java
               <b class = "caret"></b>
            </a>

            <ul class = "dropdown-menu">
               <li><a href = "#">jmeter</a></li>
               <li><a href = "#">EJB</a></li>
               <li><a href = "#">Jasper Report</a></li>

               <li class = "divider"></li>
               <li><a href = "#">Separated link</a></li>

               <li class = "divider"></li>
               <li><a href = "#">One more separated link</a></li>
            </ul>

         </li>
      </ul>
   </div>

</nav>
No comments:
Post a Comment