
Genshi is a XML based template language. It is similar to Kid,
which used to be the template engine for earlier versions of
TurboGears. Genshi as well as Kid are inspired by other well-known
template languages like HSLT, TAL and PHP.
A Genshi template consists of processing directives. These Directives are elements and attributes in a template. Genshi directives are defined in a namespace http://genshi.edgewall.org/ . Hence this namespace needs to be declared in the root element of template.
This directive can also be used as element. In this case <py:if> must be closed by corresponding </py:if>
Expression in py:choose directive is checked with different values identified with py:when alternatives and corresponding contents will be rendered. A default alternative can be provided in the form of py:otherwise directive.
HTML script of entering marks (marks.html) is as follows −
 The total.html will render following output −
 The following output will be displayed in the browser when the above form is submitted.
The py:def directive follows the following syntax −
http://localhost:8080/macro
Following output will be rendered in the browser −
Assuming that x = 50 is given in context data for a template, following will be the py:with directive −
A Genshi template consists of processing directives. These Directives are elements and attributes in a template. Genshi directives are defined in a namespace http://genshi.edgewall.org/ . Hence this namespace needs to be declared in the root element of template.
<html xmlns = "http://www.w3.org/1999/xhtml"
   xmlns:py = "http://genshi.edgewall.org/"
   lang = "en">
...
</html>
Above declaration means that default namespace is set to XHTML and Genshi directives have ‘py’ prefix.
Genshi Directives
A number of directives are defined in Genshi. Following list enumerates Genshi directives −- py:if
- py:choose
- py:for
- py:def
- py:match
- py:with
- py:replace
- py:content
- py:attrs
- py:strip
Conditional Sections
Genshi provides two directives for conditional rendering of content− py:if and py:choose.py:if
The contents of this directive’s element will be rendered only if the expression in if clause evaluates to true. Assuming that data in the template context is {‘foo’:True, ‘bar’:’Hello’}, the following directive −<div> <b py:if = "foo">${bar}</b> </div>will result in
HelloThis output, however would not be rendered if ‘foo’ is set to False.
This directive can also be used as element. In this case <py:if> must be closed by corresponding </py:if>
<div>
   <py:if test = "foo">
      <b>${bar}</b>
   </py:if>
</div>
py:choose
The advanced conditional processing is possible with the use of py:choose in combination with py:when and py:otherwise directives. This feature is similar to switch – case construct in C/C++.Expression in py:choose directive is checked with different values identified with py:when alternatives and corresponding contents will be rendered. A default alternative can be provided in the form of py:otherwise directive.
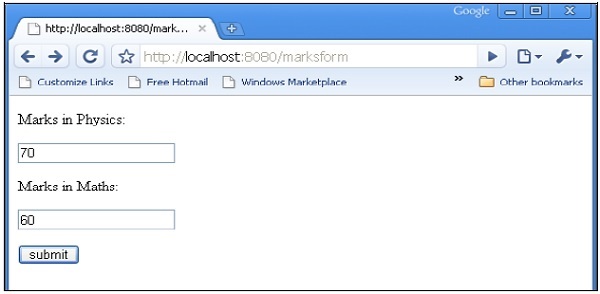
<div py:choose = "foo”>
   <span py:when = "0">0</span>
   <span py:when = "1">1</span>
   <span py:otherwise = "">2</span>
</div>
The following example illustrates use of py:choose and py:when directives. The HTML form posts data to /marks URL. The marks() function redirects marks and results in the form of a dictionary object to total.html template. The conditional display of result Pass/Fail is achieved by using py:choose and py:when directives.
HTML script of entering marks (marks.html) is as follows −
<html>
   <body>
      <form action = "http://localhost:8080/marks" method = "post">
         <p>Marks in Physics:</p>
         <p><input type = "text" name = "phy" /></p>
         <p>Marks in Maths:</p>
         <p><input type = "text" name = "maths" /></p>
         <p><input type = "submit" value = "submit" /></p>
      </form>
   </body>
</html>
The complete code of root.py is as follows. The marks() controller is sending marks and result to total.html template −
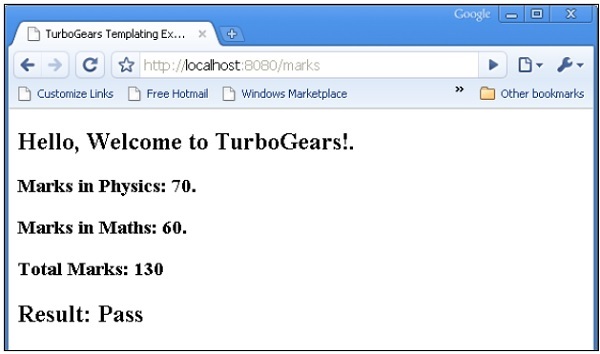
from hello.lib.base import BaseController
from tg import expose, request

class RootController(BaseController):
   @expose("hello.templates.marks")
      def marksform(self):
      return {}

   @expose("hello.templates.total")
      def marks(self, **kw):
      phy = kw['phy']
      maths = kw['maths']
      ttl = int(phy)+int(maths)
      avg = ttl/2

      if avg ≥ 50:
         mydata = {'phy':phy, 'maths':maths, 'total':ttl, 'result':2}
      else:
         mydata = {'phy':phy, 'maths':maths, 'total':ttl,'result':1}

      return mydata
The total.html in templates folder receives dictionary data and parses it in html output conditionally as follows −
<html xmlns = "http://www.w3.org/1999/xhtml"
   xmlns:py = "http://genshi.edgewall.org/"
   lang = "en">

   <head>
      <title>TurboGears Templating Example</title>
   </head>

   <body>
      <h2>Hello, Welcome to TurboGears!.</h2>
      <h3>Marks in Physics: ${phy}.</h3>
      <h3>Marks in Maths: ${maths}.</h3>
      <h3>Total Marks: ${total}</h3>

      <div py:choose = "result">
         <span py:when = "1"><h2>Result: Fail</h2></span>
         <span py:when = "2"><h2>Result: Pass</h2></span>
      </div>

   </body>
</html>
Start the server (if not already running)
Gearbox server –reload –debugEnter http://localhost::8080/marksform in browser −
The total.html will render following output −
py:for
Element in py:for directive is repeated for each item in an iterable, typically a Python List object. If items = [1,2,3] is present in a template context, it can be iterated upon by following py:for directive −<ul> <li py:for = "item in items">${item}</li> </ul>The following output will be rendered −
1
2
3
The following example shows HTML form data rendered in total.html template using py:for directive can also be used as follows −
<py:for each = "item in items">
   <li>${item}</li>
</py:for>
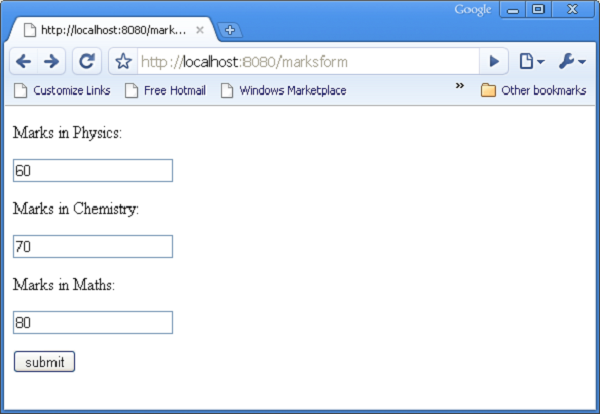
HTML Form Script
<html>
   <body>

      <form action = "http://localhost:8080/loop" method="post">
         <p>Marks in Physics:</p>
         <p><input type = "text" name = "phy" /></p>
         <p>Marks in Chemistry:</p>
         <p><input type = "text" name = "che" /></p>
         <p>Marks in Maths:</p>
         <p><input type = "text" name = "maths" /></p>
         <p><input type = "submit" value = "submit" /></p>
      </form>

   </body>
</html>
The loop() controller reads form data and sends it to total.template in the form of a list object.
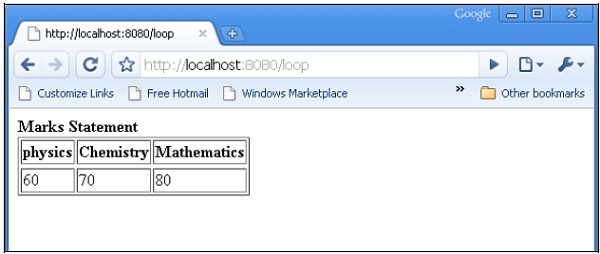
from hello.lib.base import BaseController
from tg import expose, request

class RootController(BaseController):
   @expose("hello.templates.marks")
   def marksform(self):
   return {}

   @expose("hello.templates.temp")
   def loop(self, **kw):
      phy = kw['phy']
      maths = kw['maths']
      che = kw['che']
      l1 = []
      l1.append(phy)
      l1.append(che)
      l1.append(maths)

   return ({'subjects':['physics', 'Chemistry', 'Mathematics'], 'marks':l1})
The temp.html template uses py:for loop to render contents of dict object in the form of a table.
<html xmlns = "http://www.w3.org/1999/xhtml"
   xmlns:py = "http://genshi.edgewall.org/" lang = "en">

   <body>
      <b>Marks Statement</b>
      <table border = '1'>
         <thead>
            <py:for each = "key in subjects"><th>${key}</th></py:for>
         </thead>
         <tr>
            <py:for each = "key in marks"><td>${key}</td></py:for>
         </tr>
      </table>
   </body>
</html>
Start the server (if not already running)
gearbox server –reload –debugEnter http://localhost::8080/marksform in the browser.
The following output will be displayed in the browser when the above form is submitted.
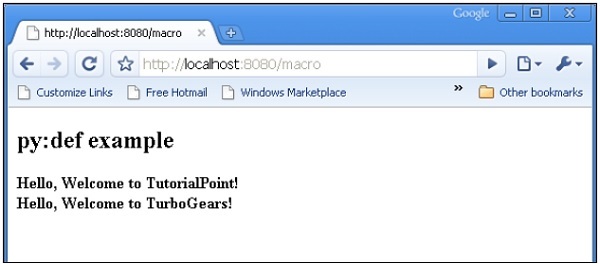
py:def
This directive is used to create a macro. A macro is a reusable snippet of template code. Much like a Python function, it has a name and can optionally have parameters. Output of this macro can be inserted at any place in a template.The py:def directive follows the following syntax −
<p py:def = "greeting(name)">
   Hello, ${name}!
</p>
This macro can be rendered with a variable value to ‘name’ parameter.${greeting('world')} ${greeting('everybody)}This directive can also be used with another version of syntax as follows −
<py:def function = "greeting(name)">
   <p>Hello, ${name}! </p>
</py:def>
In following example, macro() controller in root.py sends a dict object with two keys name1 and name2 to macro.html template.
from hello.lib.base import BaseController
from tg import expose, request

class RootController(BaseController):
   @expose('hello.templates.macro')
   def macro(self):
      return {'name1':'TutorialPoint', 'name2':'TurboGears'}
This macro.html template contains definition of a macro called greeting. It is used to generate greeting message for data received from controller.
<html xmlns = "http://www.w3.org/1999/xhtml"
   xmlns:py = "http://genshi.edgewall.org/"
   lang = "en">

   <body>
      <h2>py:def example</h2>

      <div>
         <div py:def = "greeting(name)">
            Hello, Welcome to ${name}!
         </div>

         <b>
            ${greeting(name1)}
            ${greeting(name2)}
         </b>

      </div>
   </body>
</html>
Start the server using gearbox
gearbox serve –reload –debugInvoke macro() controller by entering following URL in browser −
http://localhost:8080/macro
Following output will be rendered in the browser −
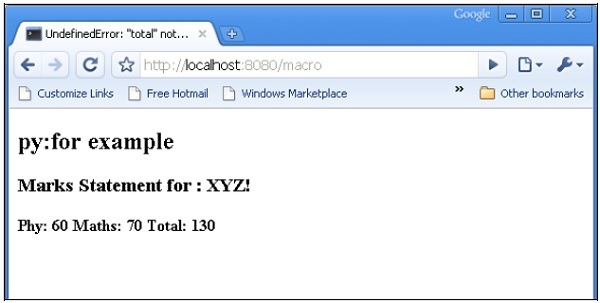
py:with
This directive lets you assign expressions to local variables. These local variables make expression inside less verbose and more efficient.Assuming that x = 50 is given in context data for a template, following will be the py:with directive −
<div>
   <span py:with = "y = 50; z = x+y">$x $y $z</span>
</div>
It will result in the following output −
50 50 100An alternative version for py:with directive is also available −
<div>
   <py:with = "y = 50; z = x+y">$x $y $z</py:with>
</div>
In the following example, macro() controller returns a dict object with name, phy and maths keys.
from hello.lib.base import BaseController
from tg import expose, request

class RootController(BaseController):
   @expose('hello.templates.macro')
   def macro(self):
      return {'name':'XYZ', 'phy':60, 'maths':70}
The template macro.html adds values of phy and maths keys using py:with directive.
<html xmlns = "http://www.w3.org/1999/xhtml"
   xmlns:py = "http://genshi.edgewall.org/"
   lang = "en">

   <body>
      <h2>py:with example</h2>
      <h3>Marks Statement for : ${name}!</h3>

      <b>Phy: $phy Maths: $maths
         <span py:with = "ttl = phy+maths">Total: $ttl</span>
      </b>

   </body>

</html>
The browser will render the following output in response to the URL http://localhost:8080/macro
Structure Manipulation Directives
The py:attrs directive adds, modifies or removes attributes from the element.<ul> <li py:attrs = "foo">Bar</li> </ul>If foo = {‘class’:’collapse’} is present in a template context, which the above snippet will render.
<ul>
   <li class = "collapse">Bar</li>
</ul>
The py:content directive replaces any nested content with the result of evaluating the expression −
<ul>
   <li py:content = "bar">Hello</li>
</ul>
Given bar = ’Bye’ in the context data, this would produce
<ul>
   <li>Bye</li>
</ul>
The py:replace directive replaces the element itself with the result of evaluating the expression −
<div>
   <span py:replace = "bar">Hello</span>
</div>
Given bar = ’Bye’ in the context data, it would produce
<div>
   Bye
</div>
No comments:
Post a Comment