Firstly, you should install Redis.
- Download the latest stable release at http://redis.io/download(3.05 in my case)
- Unpack it
- Inside the downloaded folder run sudo make install
- After the installation is finished, run make test to check whether everything is working correctly.
- redis-cli − command line interface for Redis (client part)
- redis-server − Redis data store
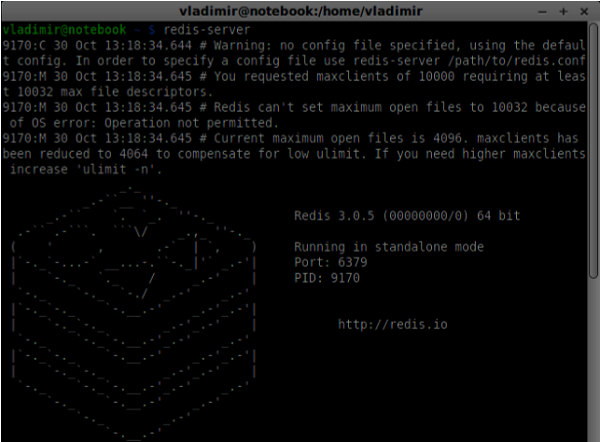 Now open a new terminal window and run redis-cli to open a client application.
 Basically, Redis is a key-value database. To create a key with a string value, you should use the SET command. To read the key value you should use the GET command. Let's add two users and passwords for them. Keys will be the usernames and values of these keys will be the corresponding passwords.
 Now we should modify our signaling server to add a user authentication. Add the following code to the top of the server.js file −
//require the redis library in Node.js
var redis = require("redis");

//creating the redis client object
var redisClient = redis.createClient();
In the above code, we require the Redis library for Node.js and creating a redis client for our server.
To add the authentication modify the message handler on the connection object −
//when a user connects to our sever
wss.on('connection', function(connection) {
   console.log("user connected");

   //when server gets a message from a connected user
   connection.on('message', function(message) {

      var data;
      //accepting only JSON messages
      try {
         data = JSON.parse(message);
      } catch (e) {
         console.log("Invalid JSON");
         data = {};
      }

      //check whether a user is authenticated
      if(data.type != "login") {

         //if user is not authenticated
         if(!connection.isAuth) {
            sendTo(connection, {
               type: "error",
               message: "You are not authenticated"
            });
            return;
         }
      }

      //switching type of the user message
      switch (data.type) {
         //when a user tries to login
         case "login":
            console.log("User logged:", data.name);
            //get password for this username from redis database

            redisClient.get(data.name, function(err, reply) {
               //check if password matches with the one stored in redis
               var loginSuccess = reply === data.password;

               //if anyone is logged in with this username or incorrect password
                  then refuse
               if(users[data.name] || !loginSuccess) {
                  sendTo(connection, {
                     type: "login",
                     success: false
                  });
               } else {
                  //save user connection on the server
                  users[data.name] = connection;
                  connection.name = data.name;
                  connection.isAuth = true;

                  sendTo(connection, {
                     type: "login",
                     success: true
                  });
               }
            });

            break;
      }
   });

}

//...
//*****other handlers*******
In the above code if a user tries to login we get from Redis his password, check if it matches with the stored one, and if it successful we store his username on the server. We also add the isAuth flag to the connection to check whether the user is authenticated. Notice this code −
//check whether a user is authenticated
if(data.type != "login") {

   //if user is not authenticated
   if(!connection.isAuth) {
      sendTo(connection, {
         type: "error",
         message: "You are not authenticated"
      });

      return;
   }
}
If an unauthenticated user tries to send offer or leave the connection we simply send an error back.
The next step is enabling a secure socket connection. It is highly recommended for WebRTC applications. PKI (Public Key Infrastructure) is a digital signature from a CA (Certificate Authority). Users then check that the private key used to sign a certificate matches the public key of the CA's certificate. For the development purposes. we will use a self-signed security certificate.
We will use the openssl. It is an open source tool that implements SSL (Secure Sockets Layer) and TLS (Transport Layer Security) protocols. It is often installed by default on Unix systems. Run openssl version -a to check whether it is installed.
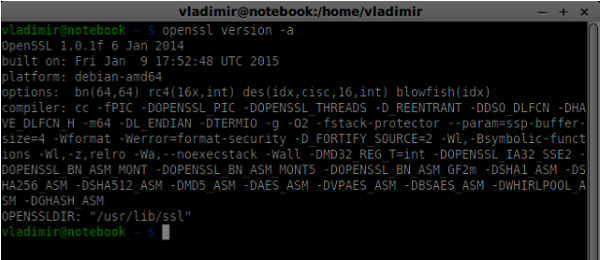 To generate public and private security certificate keys, you should follow the steps given below −
- Generate a temporary server password key
openssl genrsa -des3 -passout pass:x -out server.pass.key 2048

- Generate a server private key
openssl rsa -passin pass:12345 -in server.pass.key -out server.key

- Generate a signing request. You will be asked additional questions about your company. Just hit the “Enter” button all the time.
openssl req -new -key server.key -out server.csr
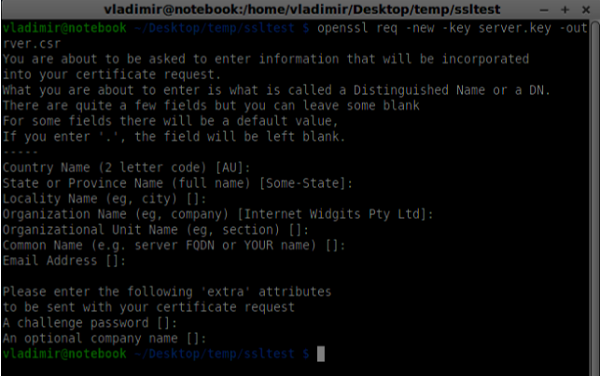
- Generate the certificate
openssl x509 -req -days 1095 -in server.csr -signkey server.key -out server.crt
 Now you have two files, the certificate (server.crt) and the private key (server.key). Copy them into the signaling server root folder.
To enable the secure socket connection modify our signaling server.
//require file system module
var fs = require('fs');
var httpServ = require('https');

//https://github.com/visionmedia/superagent/issues/205
process.env.NODE_TLS_REJECT_UNAUTHORIZED = "0";

//out secure server will bind to the port 9090
var cfg = {
   port: 9090,
   ssl_key: 'server.key',
   ssl_cert: 'server.crt'
};

//in case of http request just send back "OK"
var processRequest = function(req, res) {
   res.writeHead(200);
   res.end("OK");
};

//create our server with SSL enabled
var app = httpServ.createServer({
   key: fs.readFileSync(cfg.ssl_key),
   cert: fs.readFileSync(cfg.ssl_cert)
}, processRequest).listen(cfg.port);

//require our websocket library
var WebSocketServer = require('ws').Server;

//creating a websocket server at port 9090
var wss = new WebSocketServer({server: app});

//all connected to the server users
var users = {};

//require the redis library in Node.js
var redis = require("redis");

//creating the redis client object
var redisClient = redis.createClient();

//when a user connects to our sever
wss.on('connection', function(connection){
//...other code
In the above code, we require the fs library to read private key and certificate, create the cfg object with the binding port and paths for private key and certificate. Then, we create an HTTPS server with our keys along with WebSocket server on the port 9090.
Now open https://localhost:9090 in Opera. You should see the following −
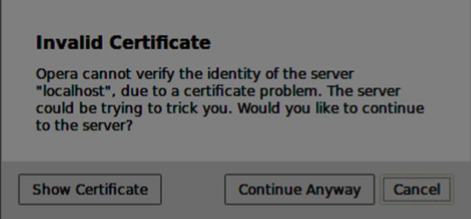 Click the “continue anyway” button. You should see the “OK” message.
To test our secure signaling server, we will modify the chat application we created in the “WebRTC Text Demo” tutorial. We just need to add a password field. The following is the entire index.html file −
<html>

   <head>
      <title>WebRTC Text Demo</title>
      <link rel = "stylesheet" href = "node_modules/bootstrap/dist/css/bootstrap.min.css"/>
   </head>

   <style>
      body {
         background: #eee;
         padding: 5% 0;
      }
   </style>

   <body>
      <div id = "loginPage" class = "container text-center">

         <div class = "row">
            <div class = "col-md-4 col-md-offset-4">
               <h2>WebRTC Text Demo. Please sign in</h2>
               <label for = "usernameInput" class = "sr-only">Login</label>
               <input type = "email" id = "usernameInput"
                  class = "form-control formgroup" placeholder = "Login"
                  required = "" autofocus = "">
               <input type = "text" id = "passwordInput"
                  class = "form-control form-group" placeholder = "Password"
                  required = "" autofocus = "">
               <button id = "loginBtn" class = "btn btn-lg btn-primary btnblock"
                  >Sign in</button>
            </div>
         </div>

      </div>

      <div id = "callPage" class = "call-page container">

         <div class = "row">
            <div class = "col-md-4 col-md-offset-4 text-center">
               <div class = "panel panel-primary">
                  <div class = "panel-heading">Text chat</div>
                  <div id = "chatarea" class = "panel-body text-left"></div>
               </div>
            </div>
         </div>

         <div class = "row text-center form-group">
            <div class = "col-md-12">
               <input id = "callToUsernameInput" type = "text"
                  placeholder = "username to call" />
               <button id = "callBtn" class = "btn-success btn">Call</button>
               <button id = "hangUpBtn" class = "btn-danger btn">Hang Up</button>
            </div>
         </div>

         <div class = "row text-center">
            <div class = "col-md-12">
               <input id = "msgInput" type = "text" placeholder = "message" />
               <button id = "sendMsgBtn" class = "btn-success btn">Send</button>
            </div>
         </div>

      </div>

      <script src = "client.js"></script>

   </body>

</html>
We also need to enable a secure socket connection in the client.js file through this line var conn = new WebSocket('wss://localhost:9090');. Notice the wss protocol. Then, the login button hander must modified to send password along with username −
loginBtn.addEventListener("click", function (event) {
   name = usernameInput.value;
   var pwd = passwordInput.value;

   if (name.length > 0) {
      send({
         type: "login",
         name: name,
         password: pwd
      });
   }

});
The following is the entire client.js file −
//our username
var name;
var connectedUser;

//connecting to our signaling server
var conn = new WebSocket('wss://localhost:9090');

conn.onopen = function () {
   console.log("Connected to the signaling server");
};

//when we got a message from a signaling server
conn.onmessage = function (msg) {
   console.log("Got message", msg.data);

   var data = JSON.parse(msg.data);

   switch(data.type) {
      case "login":
         handleLogin(data.success);
         break;
      //when somebody wants to call us
      case "offer":
         handleOffer(data.offer, data.name);
         break;
      case "answer":
         handleAnswer(data.answer);
         break;
      //when a remote peer sends an ice candidate to us
      case "candidate":
         handleCandidate(data.candidate);
         break;
      case "leave":
         handleLeave();
         break;
      default:
         break;
   }
};

conn.onerror = function (err) {
   console.log("Got error", err);
};

//alias for sending JSON encoded messages
function send(message) {
   //attach the other peer username to our messages
   if (connectedUser) {
      message.name = connectedUser;
   }

   conn.send(JSON.stringify(message));
};

//******
//UI selectors block
//******

var loginPage = document.querySelector('#loginPage');
var usernameInput = document.querySelector('#usernameInput');
var passwordInput = document.querySelector('#passwordInput');
var loginBtn = document.querySelector('#loginBtn');

var callPage = document.querySelector('#callPage');
var callToUsernameInput = document.querySelector('#callToUsernameInput');
var callBtn = document.querySelector('#callBtn');
var hangUpBtn = document.querySelector('#hangUpBtn');

var msgInput = document.querySelector('#msgInput');
var sendMsgBtn = document.querySelector('#sendMsgBtn');
var chatArea = document.querySelector('#chatarea');

var yourConn;
var dataChannel;

callPage.style.display = "none";

// Login when the user clicks the button
loginBtn.addEventListener("click", function (event) {
   name = usernameInput.value;
   var pwd = passwordInput.value;

   if (name.length > 0) {
      send({
         type: "login",
         name: name,
         password: pwd
      });
   }

});

function handleLogin(success) {
   if (success === false) {
      alert("Ooops...incorrect username or password");
   } else {
      loginPage.style.display = "none";
      callPage.style.display = "block";

      //**********************
      //Starting a peer connection
      //**********************

      //using Google public stun server
      var configuration = {
         "iceServers": [{ "url": "stun:stun2.1.google.com:19302" }]
      };

      yourConn = new webkitRTCPeerConnection(configuration, {optional: [{RtpDataChannels: true}]});

      // Setup ice handling
      yourConn.onicecandidate = function (event) {
         if (event.candidate) {
            send({
               type: "candidate",
               candidate: event.candidate
            });
         }
      };

      //creating data channel
      dataChannel = yourConn.createDataChannel("channel1", {reliable:true});

      dataChannel.onerror = function (error) {
         console.log("Ooops...error:", error);
      };

      //when we receive a message from the other peer, display it on the screen
      dataChannel.onmessage = function (event) {
         chatArea.innerHTML += connectedUser + ": " + event.data + "<br />";
      };

      dataChannel.onclose = function () {
         console.log("data channel is closed");
      };
   }

};

//initiating a call
callBtn.addEventListener("click", function () {
   var callToUsername = callToUsernameInput.value;

   if (callToUsername.length > 0) {

      connectedUser = callToUsername;

      // create an offer
      yourConn.createOffer(function (offer) {
         send({
            type: "offer",
            offer: offer
         });

         yourConn.setLocalDescription(offer);

      }, function (error) {
         alert("Error when creating an offer");
      });
   }
});

//when somebody sends us an offer
function handleOffer(offer, name) {
   connectedUser = name;
   yourConn.setRemoteDescription(new RTCSessionDescription(offer));

   //create an answer to an offer
   yourConn.createAnswer(function (answer) {
      yourConn.setLocalDescription(answer);

      send({
         type: "answer",
         answer: answer
      });

   }, function (error) {
      alert("Error when creating an answer");
   });

};

//when we got an answer from a remote user
function handleAnswer(answer) {
   yourConn.setRemoteDescription(new RTCSessionDescription(answer));
};

//when we got an ice candidate from a remote user
function handleCandidate(candidate) {
   yourConn.addIceCandidate(new RTCIceCandidate(candidate));
};

//hang up
hangUpBtn.addEventListener("click", function () {

   send({
      type: "leave"
   });

   handleLeave();
});

function handleLeave() {
   connectedUser = null;
   yourConn.close();
   yourConn.onicecandidate = null;
};

//when user clicks the "send message" button
sendMsgBtn.addEventListener("click", function (event) {
   var val = msgInput.value;
   chatArea.innerHTML += name + ": " + val + "<br />";

   //sending a message to a connected peer
   dataChannel.send(val);
   msgInput.value = "";
});
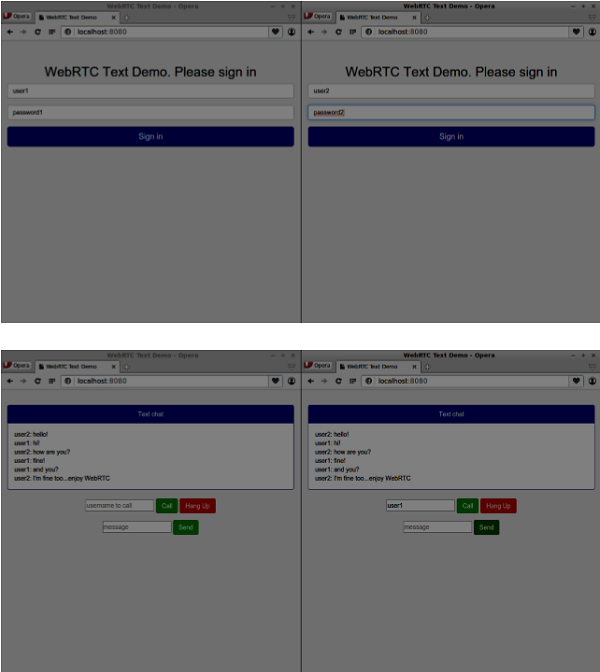
Now run our secure signaling server via node server. Run node static inside the modified chat demo folder. Open localhost:8080 in two browser tabs. Try to log in. Remember only “user1” with “password1” and “user2” with “password2” are allowed to login. Then establish the RTCPeerConnection(call another user) and try to send a message.
 The following is the entire code of our secure signaling server −
//require file system module
var fs = require('fs');
var httpServ = require('https');

//https://github.com/visionmedia/superagent/issues/205
process.env.NODE_TLS_REJECT_UNAUTHORIZED = "0";

//out secure server will bind to the port 9090
var cfg = {
   port: 9090,
   ssl_key: 'server.key',
   ssl_cert: 'server.crt'
};

//in case of http request just send back "OK"
var processRequest = function(req, res){
   res.writeHead(200);
   res.end("OK");
};

//create our server with SSL enabled
var app = httpServ.createServer({
   key: fs.readFileSync(cfg.ssl_key),
   cert: fs.readFileSync(cfg.ssl_cert)
}, processRequest).listen(cfg.port);

//require our websocket library
var WebSocketServer = require('ws').Server;

//creating a websocket server at port 9090
var wss = new WebSocketServer({server: app});

//all connected to the server users
var users = {};

//require the redis library in Node.js
var redis = require("redis");

//creating the redis client object
var redisClient = redis.createClient();

//when a user connects to our sever
wss.on('connection', function(connection) {
   console.log("user connected");

   //when server gets a message from a connected user
   connection.on('message', function(message) {

      var data;
      //accepting only JSON messages
      try {
         data = JSON.parse(message);
      } catch (e) {
         console.log("Invalid JSON");
         data = {};
      }

      //check whether a user is authenticated
      if(data.type != "login") {
         //if user is not authenticated
         if(!connection.isAuth) {
            sendTo(connection, {
               type: "error",
               message: "You are not authenticated"
            });

            return;
         }
      }

      //switching type of the user message
      switch (data.type) {
         //when a user tries to login
         case "login":
            console.log("User logged:", data.name);
            //get password for this username from redis database
            redisClient.get(data.name, function(err, reply) {

               //check if password matches with the one stored in redis
               var loginSuccess = reply === data.password;

               //if anyone is logged in with this username or incorrect password
                  then refuse
               if(users[data.name] || !loginSuccess) {
                  sendTo(connection, {
                     type: "login",
                     success: false
                  });
               } else {
                  //save user connection on the server
                  users[data.name] = connection;
                  connection.name = data.name;
                  connection.isAuth = true;

                  sendTo(connection, {
                     type: "login",
                     success: true
                  });
               }
            });

            break;

         case "offer":
            //for ex. UserA wants to call UserB
            console.log("Sending offer to: ", data.name);

            //if UserB exists then send him offer details
            var conn = users[data.name];

            if(conn != null) {
               //setting that UserA connected with UserB
               connection.otherName = data.name;

               sendTo(conn, {
                  type: "offer",
                  offer: data.offer,
                  name: connection.name
               });
            }

            break;

         case "answer":
            console.log("Sending answer to: ", data.name);
            //for ex. UserB answers UserA
            var conn = users[data.name];

            if(conn != null) {
               connection.otherName = data.name;

               sendTo(conn, {
                  type: "answer",
                  answer: data.answer
               });
            }

            break;

         case "candidate":
            console.log("Sending candidate to:",data.name);
            var conn = users[data.name];

            if(conn != null) {
               sendTo(conn, {
                  type: "candidate",
                  candidate: data.candidate
               });
            }

            break;

         case "leave":
            console.log("Disconnecting from", data.name);
            var conn = users[data.name];
            conn.otherName = null;

            //notify the other user so he can disconnect his peer connection
            if(conn != null) {
               sendTo(conn, {
                  type: "leave"
               });
            }

            break;

         connection.on("close", function() {

            if(connection.name) {
               delete users[connection.name];

               if(connection.otherName) {
                  console.log("Disconnecting from ", connection.otherName);
                  var conn = users[connection.otherName];
                  conn.otherName = null;

                  if(conn != null) {
                     sendTo(conn, {
                        type: "leave"
                    });
                  }

               }
            }
         });

         default:
            sendTo(connection, {
               type: "error",
               message: "Command no found: " + data.type
            });

            break;
      }
   });

   //when user exits, for example closes a browser window
   //this may help if we are still in "offer","answer" or "candidate" state
   connection.on("close", function() {
      if(connection.name) {
         delete users[connection.name];
      }
   });

   connection.send("Hello from server");
});

function sendTo(connection, message) {
   connection.send(JSON.stringify(message));
}

No comments:
Post a Comment