
Before we start building our WebRTC applications, we should set our
coding environment. First of all, you should have a text editor or IDE
where you can edit HTML and Javascript. There are chances that you have
already chosen the preferred one as you are reading this tutorial. As
for me, I'm using WebStorm IDE. You can download its trial version at https://www.jetbrains.com/webstorm/. I'm also using Linux Mint as my OS of choice.
The other requirement for common WebRTC applications is having a server to host the HTML and Javascript files. The code will not work just by double-clicking on the files because the browser is not allowed to connect to cameras and microphones unless the files are being served by an actual server. This is done obviously due to the security issues.
There are tons of different web servers, but in this tutorial, we are going to use Node.js with node-static −
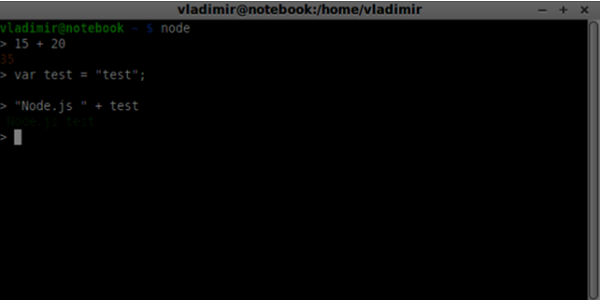
To test your Node.js installation open up your terminal and run the node command. Type a few commands to check how it works −
 Node.js runs Javascript files as well as commands typed in the terminal. Create an index.js file with the following content −
 When building our signaling server we will use a WebSockets library for Node.js. To install in run npm install ws in the terminal.
For testing our signaling server, we will use the wscat utility. To install it run npm install -g wscat in your terminal window.
The other requirement for common WebRTC applications is having a server to host the HTML and Javascript files. The code will not work just by double-clicking on the files because the browser is not allowed to connect to cameras and microphones unless the files are being served by an actual server. This is done obviously due to the security issues.
There are tons of different web servers, but in this tutorial, we are going to use Node.js with node-static −
- Visit https://nodejs.org/en/ and download the latest Node.js version.
- Unpack it to the /usr/local/nodejs directory.
- Open the /home/YOUR_USERNAME/.profile file and add the following line to the end − export PATH=$PATH:/usr/local/nodejs/bin
- The you can restart your computer or run source /home/YOUR_USERNAME/.profile
- Now the node command should be available from the command line. The npm command is also available. NMP is the package manager for Node.js. You can learn more at https://www.npmjs.com/.
- Open up a terminal and run sudo npm install -g node-static. This will install the static web server for Node.js.
- Now navigate to any directory containing the HTML files and run the static command inside the directory to start your web server.
- You can navigate to http://localhost:8080 to see your files.
To test your Node.js installation open up your terminal and run the node command. Type a few commands to check how it works −
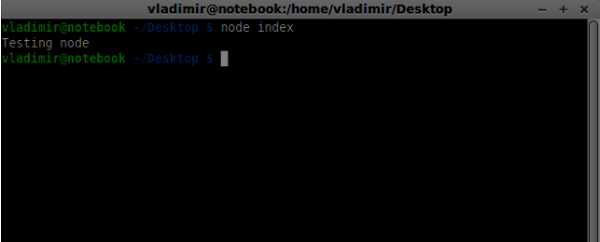
Node.js runs Javascript files as well as commands typed in the terminal. Create an index.js file with the following content −console.log(“Testing Node.js”);Then run the node index command. You will see the following −
When building our signaling server we will use a WebSockets library for Node.js. To install in run npm install ws in the terminal.For testing our signaling server, we will use the wscat utility. To install it run npm install -g wscat in your terminal window.
| S.No | Protocols & Description |
|---|---|
| 1 | WebRTC Protocols WebRTC applications use UDP (User Datagram Protocol) as the transport protocol. Most web applications today are built with the using of the TCP (Transmission Control Protocol) |
| 2 | Session Description Protocol The SDP is an important part of the WebRTC. It is a protocol that is intended to describe media communication sessions. |
| 3 | Finding a Route In order to connect to another user, you should find a clear path around your own network and the other user's network. But there are chances that the network you are using has several levels of access control to avoid security issues. |
| 4 | Stream Control Transmission Protocol With the peer connection, we have the ability to send quickly video and audio data. The SCTP protocol is used today to send blob data on top of our currently setup peer connection when using the RTCDataChannel object. |
No comments:
Post a Comment