
TurboGears also supports MongoDB document databases. It uses Ming, an
Object Document Mapper API. Usage of Ming is very much similar to
SQLAlchemy. Ming query language makes it possible to port SQLAlchemy
based TurboGears project to Ming.
On Windows, start MongoDB server by providing -dbpath option −
Now create a TurboGears project with -ming option −
The MappedClass requires that a __mongometa__ subclass is available inside, which further provides the details regarding the name of the collection storing the documents and the session used to store the documents.
MappedClass also contains definition of fields in the document. Ming’s odm module has definitions of different types of field properties −
 The creation of collections can also be verified in MongoDB web interface as well as the MongoDB shell.
The ODMSession is used to perform several database operations using the following functions −
Following is the code for creating a studentform.py −
The root.py for this activity is as follows −
 Each time the data is added and submit button is pressed, the list of current entries will be displayed.
What is PyMongo
PyMongo is a Python distribution containing tools for working with MongoDB. Ming extends PyMongo providing −- Declarative Models
- Schema Validation and Conversion
- Schema Evolution
- Pure InMemory MongoDB Implementation
- Unit of Work
- Identity Map
- One-To-Many, Many-To-One and Many-To-Many Relations
On Windows, start MongoDB server by providing -dbpath option −
C:\mongodb\bin>Mongod --dbpath d:\mongoD:\mongo folder is designated to store MongoDB database. Server starts listening at http://localhost:27017. Now to start MongoDB shell use the following command −
C:\mongodb\bin>MongoOur MongoDB environment is now ready.
Now create a TurboGears project with -ming option −
gearbox quickstart --ming HelloThis quickstarted project will provide an authentication and authorization layer like the one that is provided for the SQLAlchemy version. This application will now try to connect to a server on port 27017 on the local machine. The development.ini file in project folder contains the following settings −
ming.url = mongodb://localhost:27017/
ming.db = hello
Setup the project using the following command −
Python setup.py developThe project folder contains models subfolder which has the following files −
- __init__.py − This is where the database access is set up. Your collections should be imported into this module. For example, we shall add student collection in this package.
- session.py − This file defines the session of your database connection. You will need to import this each time you have to declare a MappedClass to specify the session to perform queries.
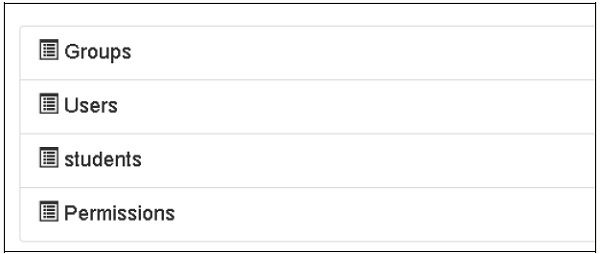
- auth.py − This file will be created, if you have enabled authentication and authorization in the quickstart. It defines three collections repoze.who, which further relies on: User, Group, and Permission.
Defining Your Collection
By default, TurboGears configures Ming in a declarative mode. This is similar to the SQLAlchemy declarative support and needs each model to inherit from the MappedClass class.The MappedClass requires that a __mongometa__ subclass is available inside, which further provides the details regarding the name of the collection storing the documents and the session used to store the documents.
MappedClass also contains definition of fields in the document. Ming’s odm module has definitions of different types of field properties −
- FieldProperty
- ForeignIdProperty
- RelationProperty
- ming.schema.Anything
- ming.schema.Array
- ming.schema.Binary
- ming.schema.Bool
- ming.schema.Float
- ming.schema.Int
- ming.schema.ObjectId
- ming.schema.Scalar
- ming.schema.String
Hello\models\student.py
from ming import schema
from ming.odm import MappedClass
from ming.odm import FieldProperty, ForeignIdProperty
from hello.model import DBSession

Class student(MappedClass):
   class __mongometa__:
      session = DBSession
      name = 'student'

   _id = FieldProperty(schema.ObjectId)
   name = FieldProperty(schema.String(required = True))
   city = FieldProperty(schema.String(if_missing = ''))
   address = FieldProperty(schema.String(if_missing = ''))
   pincode = FieldProperty(schema.String(if_missing = ''))
Finally, include this model in hello\models\__init__.py
# Import your model modules here.
from hello.model.auth import User, Group, Permission
from hello.model.student import student
To set up these models, run the following gearbox command −
Gearbox setup-appStart the server with the following gearbox command −
Gearbox serve –reload –debugOpen the homepage of this application (http://localhost:8080/) and login with manager credentials. Admin page of this application will show the list of models set up. (login as manager, password managepass)
The creation of collections can also be verified in MongoDB web interface as well as the MongoDB shell.The ODMSession is used to perform several database operations using the following functions −
- model.query.find()
- model.query.find_and_modify()
- model.remove()
- model.update()
- model.flush()
Designing a ToscoWidget Form
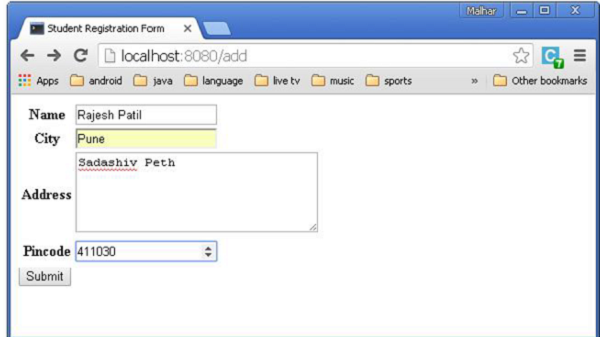
We shall now design a ToscoWidget form to enter student data and add it into the table underlying the student model.Following is the code for creating a studentform.py −
Hello\controllers\studentform.py
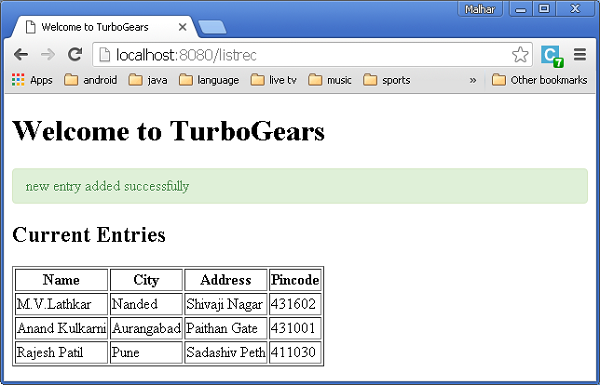
import tw2.core as twc
import tw2.forms as twf

class StudentForm(twf.Form):

   class child(twf.TableLayout):
      name = twf.TextField(size = 20)
      city = twf.TextField()
      address = twf.TextArea("",rows = 5, cols = 30)
      pincode = twf.NumberField()

   action = '/save_record'
   submit = twf.SubmitButton(value = 'Submit')
In the application's Rootcontroller '/add' URL that calls add() function, which will open the above designed form in the browser. Its submit button then invokes save_record() function. It retrieves the form data and saves it in student table and redirects the application to '/listrec' URL, which exposes the studentlist template.
The root.py for this activity is as follows −
Hello/controllers/root.py
from hello.lib.base import BaseController
from tg import expose, flash, redirect, request,url, lurl
from tg import redirect, validate
from hello import model
from hello.model import DBSession
from hello.model.student import student

from hello.controllers.studentform import StudentForm

class RootController(BaseController):
   @expose()
   def index(self):
      return "<h1>Hello World</h1>"

   @expose ("hello.templates.studentlist")
   def listrec(self):
      entries = student.query.find()
      return dict(entries = entries)

   @expose('hello.templates.studentform')
   def add(self, *args, **kw):
      return dict(page = 'studentform', form = StudentForm)

   @expose()
   def save_record(self, **kw):
      newstudent = student(name = kw['name'],city = kw['city'],
         address = kw['address'], pincode = kw['pincode'])
      DBSession.flush()
      flash(message = "new entry added successfully")
      redirect("/listrec")
The following templates are created in the templates folder −
Hello\templates\studentform.html
<!DOCTYPE html>
<html xmlns = "http://www.w3.org/1999/xhtml"
   xmlns:py = "http://genshi.edgewall.org/" lang = "en">

   <head>
      <title>Student Registration Form</title>
   </head>


   <body>
      <div id = "getting_started">
         ${form.display(value = dict(title = 'Enter data'))}
      </div>
   </body>

</html>
Hello\templates\studentlist.html
<html xmlns = "http://www.w3.org/1999/xhtml"
   xmlns:py = "http://genshi.edgewall.org/">

   <head>
      <link rel = "stylesheet" type = "text/css" media = "screen"
         href = ${tg.url('/css/style.css')}" />
      <title>Welcome to TurboGears</title>
   </head>

   <body>
      <h1>Welcome to TurboGears</h1>

      <py:with vars = "flash = tg.flash_obj.render('flash', use_js = False)">
         <div py:if = "flash" py:replace = "Markup(flash)" />
      </py:with>

      <h2>Current Entries</h2>

      <table border = '1'>
         <thead>
            <tr>
               <th>Name</th>
               <th>City</th>
               <th>Address</th>
               <th>Pincode</th>
            </tr>
         </thead>

         <tbody>
            <py:for each = "entry in entries">
               <tr>
                  <td>${entry.name}</td>
                  <td>${entry.city}</td>
                  <td>${entry.address}</td>
                  <td>${entry.pincode}</td>
               </tr>
            </py:for>
         </tbody>
      </table>

   </body>

</html>
Restart the server and enter http://localhost:8080/add in the browser −
Each time the data is added and submit button is pressed, the list of current entries will be displayed.
No comments:
Post a Comment