
An event is an action or occurrence recognized by a program that may
be handled by the program. Laravel events simply provide an observer
implementation. Event can be handled by the following steps −
Step 1 − Create an Event class.
Event class can be created by executing the following command.
Step 2 − Create a handler class to handle the created event.
Event handler class can be created by executing the following command.
Step 3 − Register the Event class and its handler in EventServiceProvider class.
We now need to register the event and its handler class in app\Providers\EventServiceProvier.php file. This file contains an array called $listen. In this array we need to add event class as key and event handler class as its value.
Step 4 − Fire the event.
Last step is to fire the event with Event facade. fire() method hsould be called which takes object of the event class. Event can be fired as shown below −
 Step 3 − Copy the following code in app/Http/Controllers/CreateStudentController.php file.
app/Http/Controllers/CreateStudentController.php
 Step 6 − The above command will create an event file at App\Events\StudentAdded.php. Copy the following code in that file.
App\Events\StudentAdded.php
 Step 9 − The above command will create an event handler file at app\Handlers\Events\HandleNewStudentAdded.php. Copy the following code in that file.
app\Handlers\Events\HandleNewStudentAdded.php
app\Providers\EventServiceProvider.php
app/Http/routes.php
http://localhost:8000/event
Step 13 − After visiting the above URL, you will receive the following output −
 Step 14 − Add the name of student and click the “Add student”
button which will redirect you to the below screen. Look at the line
highlighted in gray color. We have added this line in our handle method
of HandleNewStudentAdded class which indicates that statements are
executed in handle method when an event is fired.
Step 14 − Add the name of student and click the “Add student”
button which will redirect you to the below screen. Look at the line
highlighted in gray color. We have added this line in our handle method
of HandleNewStudentAdded class which indicates that statements are
executed in handle method when an event is fired.
Step 1 − Create an Event class.
Event class can be created by executing the following command.
php artisan make:event <event-class>Here the <event-class> should be replaced with the name of the event class. The created class will be stored at app\Events directory.
Step 2 − Create a handler class to handle the created event.
Event handler class can be created by executing the following command.
php artisan handler:event <handler-class> --event = <event-class>Here the <event-class> should be replaced with the name of the event class that we have created in step-1 and the <handler-class> should be replaced with the name of the handler class. The newly created handler class will be stored at app\Handlers\Events directory.
Step 3 − Register the Event class and its handler in EventServiceProvider class.
We now need to register the event and its handler class in app\Providers\EventServiceProvier.php file. This file contains an array called $listen. In this array we need to add event class as key and event handler class as its value.
Step 4 − Fire the event.
Last step is to fire the event with Event facade. fire() method hsould be called which takes object of the event class. Event can be fired as shown below −
Event::fire(<Event Class Object>);<Event Class Object> should be replaced with the object of the event class.
Example
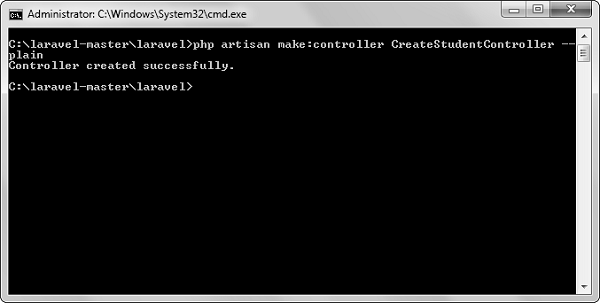
Step 1 − Create a controller called CreateStudentController by executing the following command.php artisan make:controller CreateStudentController --plainStep 2 − After successful execution, you will receive the following output −
Step 3 − Copy the following code in app/Http/Controllers/CreateStudentController.php file.app/Http/Controllers/CreateStudentController.php
<?php
namespace App\Http\Controllers;
use Illuminate\Http\Request;
use DB;
use App\Http\Requests;
use App\Http\Controllers\Controller;
use App\Events\StudentAdded;
use Event;

class CreateStudentController extends Controller {
   public function insertform(){
      return view('stud_add');
   }

   public function insert(Request $request){
      $name = $request->input('stud_name');
      DB::insert('insert into student (name) values(?)',[$name]);
      echo "Record inserted successfully.<br/>";
      echo '<a href = "/event">Click Here</a> to go back.';

      //firing an event
      Event::fire(new StudentAdded($name));
   }
}
Step 4 − Create an event called StudentAdded by executing the following command.
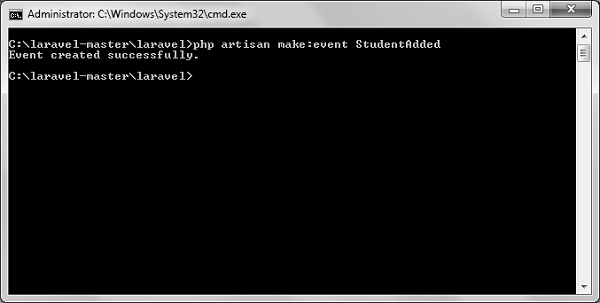
php artisan make:event StudentAddedStep 5 − After successful execution, you will receive the following output −
Step 6 − The above command will create an event file at App\Events\StudentAdded.php. Copy the following code in that file.App\Events\StudentAdded.php
<?php
namespace App\Events;
use App\Events\Event;
use Illuminate\Queue\SerializesModels;
use Illuminate\Contracts\Broadcasting\ShouldBroadcast;

class StudentAdded extends Event {
   use SerializesModels;
   public $name;

   public function __construct($name) {
      $this->name = $name;
   }
   public function broadcastOn() {
      return [];
   }
}
Step 7 − Create an event handler called HandleNewStudentAdded by executing the following command.
php artisan handler:event HandlerNewStudentAdded --event = StudentAddedStep 8 − After successful execution, you will receive the following output −
Step 9 − The above command will create an event handler file at app\Handlers\Events\HandleNewStudentAdded.php. Copy the following code in that file.app\Handlers\Events\HandleNewStudentAdded.php
<?php
namespace App\Handlers\Events;
use App\Events\StudentAdded;
use Illuminate\Queue\InteractsWithQueue;
use Illuminate\Contracts\Queue\ShouldQueue;

class HandleNewStudentAdded {
   protected $name;

   public function __construct() {
      //
   }
   public function handle(StudentAdded $event) {
      $this->name = $event->name;
      echo "<br>New Student added in database with name: ".$this->name;
   }
}
Step 10 − We now need to add the event class and its handler class in a file stored at app\Providers\EventServiceProvider.php. Notice the line in bold font and add that line in the file.app\Providers\EventServiceProvider.php
<?php
namespace App\Providers;
use Illuminate\Contracts\Events\Dispatcher as DispatcherContract;
use Illuminate\Foundation\Support\Providers\EventServiceProvider as ServiceProvider;

class EventServiceProvider extends ServiceProvider {
   /**
   * The event listener mappings for the application.
   *
   * @var array
   */
   protected $listen = [
      'App\Events\SomeEvent' => [
         'App\Listeners\EventListener',
      ],

      'App\Events\StudentAdded' => [
         'App\Handlers\Events\HandleNewStudentAdded',
      ],
   ];
   /**
   * Register any other events for your application.
   *
   * @param \Illuminate\Contracts\Events\Dispatcher $events
   * @return void
   */
   public function boot(DispatcherContract $events) {
      parent::boot($events);
      //
   }
}
Step 11 − Add the following lines in app/Http/routes.php.
app/Http/routes.php
Route::get('event','CreateStudentController@insertform');
Route::post('addstudent','CreateStudentController@insert');
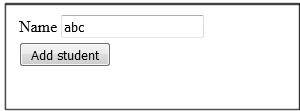
Step 12 − Visit the following URL to test the event.http://localhost:8000/event
Step 13 − After visiting the above URL, you will receive the following output −
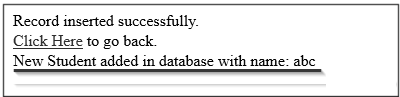
Step 14 − Add the name of student and click the “Add student”
button which will redirect you to the below screen. Look at the line
highlighted in gray color. We have added this line in our handle method
of HandleNewStudentAdded class which indicates that statements are
executed in handle method when an event is fired.
No comments:
Post a Comment