
Like many other frameworks, CakePHP also supports
Internationalization. We need to follow these steps to go from single
language to multiple language.
Step 1 − Create a separate Locale directory src\Locale.
Step 2 − Create subdirectory for each language under the directory src\Locale. The name of the subdirectory can be two letter ISO code of the language or full locale name like en_US, fr_FR etc.
Step 3 − Create separate default.po file under each language subdirectory. This file contains entry in the form of msgid and msgstr as shown in the following program.
Step 4 − In the View template file, we can use the above msgid as shown below which will be translated based on the set value of locale.
config/routes.php
src/Controller/LocalizationsController.php
src/Locale/en_US/default.po
src/Template/Localizations/index.ctp
http://localhost:85/CakePHP/locale
Email
CakePHP provides Email class to manage email related functionalities. To use email functionality in any controller, we first need to load the Email class by writing the following line.
config/routes.php
src/Controller/EmailsController.php
src/Template/Emails/index.ctp
config/app.php
 Execute the above example by visiting the following URL:http://localhost:85/CakePHP/email
Step 1 − Create a separate Locale directory src\Locale.
Step 2 − Create subdirectory for each language under the directory src\Locale. The name of the subdirectory can be two letter ISO code of the language or full locale name like en_US, fr_FR etc.
Step 3 − Create separate default.po file under each language subdirectory. This file contains entry in the form of msgid and msgstr as shown in the following program.
msgid "msg"
msgstr "CakePHP Internationalization example."
Here, the msgid is the key which will be used in the View template file and msgstr is the value which stores the translation.
Step 4 − In the View template file, we can use the above msgid as shown below which will be translated based on the set value of locale.
<?php echo __('msg'); ?>
The default locale can be set in the config/bootstrap.php file by the following line.'defaultLocale' => env('APP_DEFAULT_LOCALE', 'en_US')
To change the local at runtime we can use the following lines.use Cake\I18n\I18n;
I18n::locale('de_DE');
Example
Make changes in the config/routes.php file as shown in the following program.config/routes.php
<?php
   use Cake\Core\Plugin;
   use Cake\Routing\RouteBuilder;
   use Cake\Routing\Router;

   Router::defaultRouteClass('DashedRoute');
   Router::scope('/', function (RouteBuilder $routes) {
      $routes->connect('locale',['controller'=>'Localizations','action'=>'index']);
      $routes->fallbacks('DashedRoute');
   });
   Plugin::routes();
Create a LocalizationsController.php file at src/Controller/LocalizationsController.php. Copy the following code in the controller file.
src/Controller/LocalizationsController.php
<?php
   namespace App\Controller;
   use App\Controller\AppController;
   use Cake\I18n\I18n;

   class LocalizationsController extends AppController{
      public function index(){
         if($this->request->is('post')){
            $locale = $this->request->data('locale');
            I18n::locale($locale);
         }
      }
   }
?>
Create a Locale directory at src\Locale. Create 3 directories called en_US, fr_FR, de_DE under the Locale directory. Create a file under each directory called default.po. Copy the following code in the respective file.
src/Locale/en_US/default.po
msgid "msg"
msgstr "CakePHP Internationalization example."
src/Locale/fr_FR/default.po
msgid "msg"
msgstr "Exemple CakePHP internationalisation."
src/Locale/de_DE/default.po
msgid "msg"
msgstr "CakePHP Internationalisierung Beispiel."
Create a directory Localizations at src/Template and under that directory create a View file called index.ctp. Copy the following code in that file.
src/Template/Localizations/index.ctp
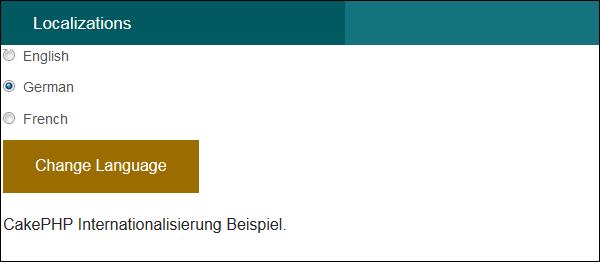
<?php
   echo $this->Form->create("Localizations",array('url'=>'/locale'));
   echo $this->Form->radio("locale",[
      ['value'=>'en_US','text'=>'English'],
      ['value'=>'de_DE','text'=>'German'],
      ['value'=>'fr_FR','text'=>'French'],
   ]);
   echo $this->Form->button('Change Language');
   echo $this->Form->end();
?>
<?php echo __('msg'); ?>
Execute the above example by visiting the following URL.
http://localhost:85/CakePHP/locale
Output
Upon execution, you will receive the following output.
use Cake\Mailer\Email;The Email class provides various useful methods which are described below.
| Syntax | From (string|array|null $email null, string|null $name null ) |
| Parameters |
|
| Returns | array|$this |
| Description | It specifies from which email address; the email will be sent |
| Syntax | To (string|array|null $email null, string|null $name null) |
| Parameters |
|
| Returns | array|$this |
| Description | It specifies to whom the email will be sent |
| Syntax | Send (string|array|null $content null) |
| Parameters |
|
| Returns | array |
| Description | Send an email using the specified content, template and layout |
| Syntax | Subject (string|null $subject null) |
| Parameters |
|
| Returns | array|$this |
| Description | Get/Set Subject. |
| Syntax | Attachments (string|array|null $attachments null) |
| Parameters |
|
| Returns | array|$this |
| Description | Add attachments to the email message |
| Syntax | Bcc (string|array|null $email null, string|null $name null) |
| Parameters |
|
| Returns | array|$this |
| Description | Bcc |
| Syntax | cc( string|array|null $email null, string|null $name null ) |
| Parameters |
|
| Returns | array|$this |
| Description | Cc |
Example
Make changes in the config/routes.php file as shown in the following program.config/routes.php
<?php
   use Cake\Core\Plugin;
   use Cake\Routing\RouteBuilder;
   use Cake\Routing\Router;

   Router::defaultRouteClass('DashedRoute');
   Router::scope('/', function (RouteBuilder $routes) {
      $routes->connect('/email',['controller'=>'Emails','action'=>'index']);
      $routes->fallbacks('DashedRoute');
   });
   Plugin::routes();
Create an EmailsController.php file at src/Controller/EmailsController.php. Copy the following code in the controller file.
src/Controller/EmailsController.php
<?php
   namespace App\Controller;
   use App\Controller\AppController;
   use Cake\Mailer\Email;

   class EmailsController extends AppController{
      public function index(){
         $email = new Email('default');
         $email->to('abc@gmail.com')->subject('About')->send('My message');
      }
   }
?>
Create a directory Emails at src/Template and under that directory create a View file called index.ctp. Copy the following code in that file.
src/Template/Emails/index.ctp
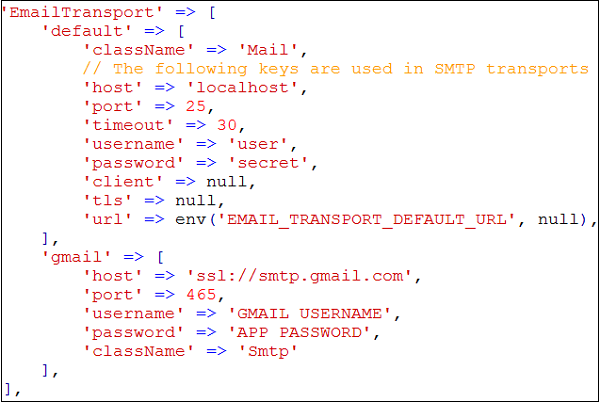
Email Sent.Before we send any email, we need to configure it. In the below screenshot, you can see that there are two transports, default and Gmail. We have used Gmail transport. You need to replace the “GMAIL USERNAME” with your Gmail username and “APP PASSWORD” with your applications password. You need to turn on 2-step verification in Gmail and create a new APP password to send email.
config/app.php
Execute the above example by visiting the following URL:http://localhost:85/CakePHP/emailOutput
Upon execution, you will receive the following output.
No comments:
Post a Comment