
On desktop apps we generally have 2 types of menus, namely the application menu(on the top bar) and a context menu(right click menu). We will learn how to create both of these in this chpater.
We'll be using 2 modules namely Menu and MenuItem.
Note that Menu and MenuItem modules are only available in the main process. For using them in the renderer process you need another module remote. We'll see this when we create a context menu.
Lets create a new main.js file for the main process:
Now create an empty HTML file called index.html and run this application using:
 We created this menu from the main process. Now lets create a context menu for our app. We'll do this in our HTML file:
 Thats how simple it is to create menus in electron. Now you can
attach your event handlers to these items and handle the events
according to your needs.
Thats how simple it is to create menus in electron. Now you can
attach your event handlers to these items and handle the events
according to your needs.
We'll be using 2 modules namely Menu and MenuItem.
Note that Menu and MenuItem modules are only available in the main process. For using them in the renderer process you need another module remote. We'll see this when we create a context menu.
Lets create a new main.js file for the main process:
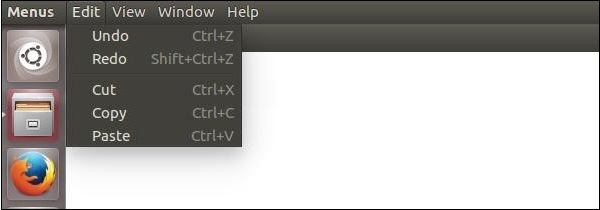
const {app, BrowserWindow, Menu, MenuItem} = require('electron')
const url = require('url')
const path = require('path')

let win

function createWindow() {
   win = new BrowserWindow({width: 800, height: 600})
   win.loadURL(url.format({
      pathname: path.join(__dirname, 'index.html'),
      protocol: 'file:',
      slashes: true
   }))
}

const template = [
   {
      label: 'Edit',
      submenu: [
         {
            role: 'undo'
         },
         {
            role: 'redo'
         },
         {
            type: 'separator'
         },
         {
            role: 'cut'
         },
         {
            role: 'copy'
         },
         {
            role: 'paste'
         }
      ]
   },
   {
      label: 'View',
      submenu: [
         {
            role: 'reload'
         },
         {
            role: 'toggledevtools'
         },
         {
            type: 'separator'
         },
         {
            role: 'resetzoom'
         },
         {
            role: 'zoomin'
         },
         {
            role: 'zoomout'
         },
         {
            type: 'separator'
         },
         {
            role: 'togglefullscreen'
         }
      ]
   },
   {
      role: 'window',
      submenu: [
         {
            role: 'minimize'
         },
         {
            role: 'close'
         }
      ]
   },
   {
      role: 'help',
      submenu: [
         {
            label: 'Learn More'
         }
      ]
   }
]

const menu = Menu.buildFromTemplate(template)
Menu.setApplicationMenu(menu)
We're building a menu from a template here. This means that we provide the menu as a JSON to the function and it'll take care of the rest. Now we have to set this menu as the Application menu.
Now create an empty HTML file called index.html and run this application using:
$ electron ./main.jsOn the normal position of application menus you'll now see a menu based on above template.
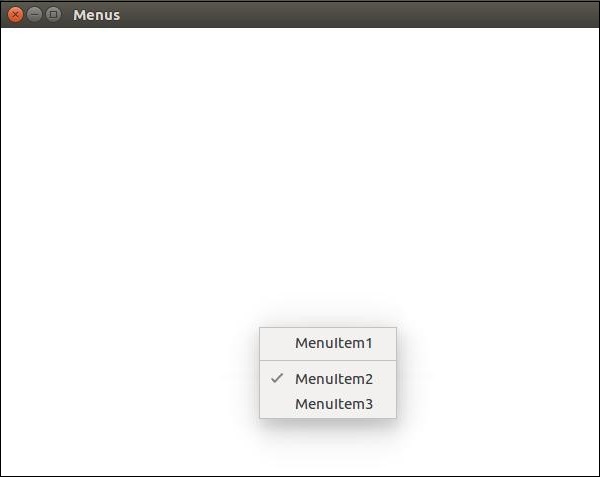
We created this menu from the main process. Now lets create a context menu for our app. We'll do this in our HTML file: <!DOCTYPE html> <html> <head> <meta charset="UTF-8"> <title>Menus</title> </head> <body> <script type="text/javascript"> const {remote} = require('electron') const {Menu, MenuItem} = remote const menu = new Menu() // Build menu one item at a time, unlike menu.append(new MenuItem({ label: 'MenuItem1', click() { console.log('item 1 clicked') } })) menu.append(new MenuItem({type: 'separator'})) menu.append(new MenuItem({label: 'MenuItem2', type: 'checkbox', checked: true})) menu.append(new MenuItem({ label: 'MenuItem3', click() { console.log('item 3 clicked') } })) // Prevent default action of right click in chromium. Replace with our menu. window.addEventListener('contextmenu', (e) => { e.preventDefault() menu.popup(remote.getCurrentWindow()) }, false) </script> </body> </html>We imported the Menu and MenuItem modules using the remote module. Then we created a menu and appended our menuitems to it one by one. Then we prevented the default action of right click in chromium and replaced it with our menu.
Thats how simple it is to create menus in electron. Now you can
attach your event handlers to these items and handle the events
according to your needs.
No comments:
Post a Comment