
Full stack applications provide a facility to create a new application via some command or execution of the file.
Consider the Python applications like web2py framework; the entire project/application is created in terms of MVC framework. Likewise, CherryPy allows the user to set up and configure the layout of the code as per their requirements.
In this chapter, we will learn in detail how to create CherryPy application and execute it.
 Here is a brief description of the various files that we have in the file system −
Step 1 − Create an application that should contain the application.
Step 2 − Inside the directory, create a python package corresponding to the project. Create gedit directory and include _init_.py file within the same.
Step 3 − Inside the package, include controllers.py file with the following content −
Step 5 − In the above code for controllers, we have index(), which is a default function and loads first if a particular controller is called.
Step 6 − The implementation of the index() method can be changed in the following way −
 Here, the method name is defined as “POST”. It is always important to
cross verify the method specified in the file. If the method includes
“POST” method, the values should be rechecked in the database in
appropriate fields.
Here, the method name is defined as “POST”. It is always important to
cross verify the method specified in the file. If the method includes
“POST” method, the values should be rechecked in the database in
appropriate fields.
If the method includes “GET” method, the values to be saved will be visible in the URL.
Consider the Python applications like web2py framework; the entire project/application is created in terms of MVC framework. Likewise, CherryPy allows the user to set up and configure the layout of the code as per their requirements.
In this chapter, we will learn in detail how to create CherryPy application and execute it.
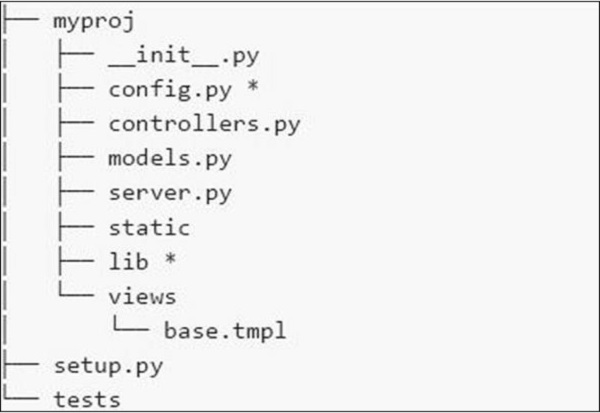
File System
The file system of the application is shown in the following screenshot −
Here is a brief description of the various files that we have in the file system −- config.py − Every application needs a configuration file and a way to load it. This functionality can be defined in config.py.
- controllers.py − MVC is a popular design pattern followed by the users. The controllers.py is where all the objects are implemented that will be mounted on the cherrypy.tree.
- models.py − This file interacts with the database directly for some services or for storing persistent data.
- server.py − This file interacts with production ready web server that works properly with load balancing proxy.
- Static − It includes all the CSS and image files.
- Views − It includes all the template files for a given application.
Example
Let us learn in detail the steps to create a CherryPy application.Step 1 − Create an application that should contain the application.
Step 2 − Inside the directory, create a python package corresponding to the project. Create gedit directory and include _init_.py file within the same.
Step 3 − Inside the package, include controllers.py file with the following content −
#!/usr/bin/env python

import cherrypy

class Root(object):

   def __init__(self, data):
      self.data = data

   @cherrypy.expose
   def index(self):
      return 'Hi! Welcome to your application'

def main(filename):
   data = {} # will be replaced with proper functionality later

   # configuration file
   cherrypy.config.update({
      'tools.encode.on': True, 'tools.encode.encoding': 'utf-8',
      'tools.decode.on': True,
      'tools.trailing_slash.on': True,
      'tools.staticdir.root': os.path.abspath(os.path.dirname(__file__)),
   })

   cherrypy.quickstart(Root(data), '/', {
      '/media': {
         'tools.staticdir.on': True,
         'tools.staticdir.dir': 'static'
      }
   })

if __name__ == '__main__':
main(sys.argv[1])
Step 4 − Consider an application where the user inputs the value through a form. Let’s include two forms — index.html and submit.html in the application.
Step 5 − In the above code for controllers, we have index(), which is a default function and loads first if a particular controller is called.
Step 6 − The implementation of the index() method can be changed in the following way −
@cherrypy.expose
   def index(self):
      tmpl = loader.load('index.html')

      return tmpl.generate(title='Sample').render('html', doctype='html')
Step 7 − This will load index.html on starting the given application and direct it to the given output stream. The index.html file is as follows −
index.html
<!DOCTYPE html >
<html>
   <head>
      <title>Sample</title>
   </head>

   <body class = "index">
      <div id = "header">
         <h1>Sample Application</h1>
      </div>

      <p>Welcome!</p>

      <div id = "footer">
         <hr>
      </div>

   </body>

</html>
Step 8 − It is important to add a method to the Root class in controller.py if you want to create a form which accepts values such as names and titles.
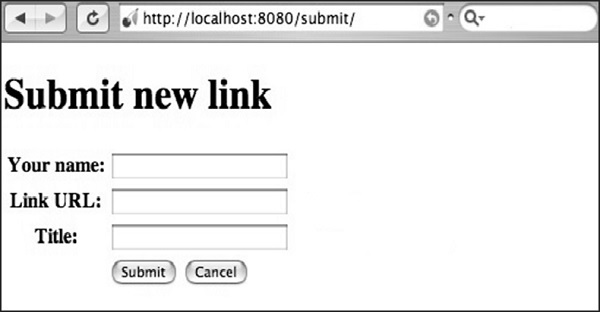
@cherrypy.expose
   def submit(self, cancel = False, **value):

      if cherrypy.request.method == 'POST':
         if cancel:
            raise cherrypy.HTTPRedirect('/') # to cancel the action
         link = Link(**value)
         self.data[link.id] = link
         raise cherrypy.HTTPRedirect('/')
      tmp = loader.load('submit.html')
      streamValue = tmp.generate()

      return streamValue.render('html', doctype='html')
Step 9 − The code to be included in submit.html is as follows −
<!DOCTYPE html>
   <head>
      <title>Input the new link</title>
   </head>

   <body class = "submit">
      <div id = " header">
         <h1>Submit new link</h1>
      </div>

      <form action = "" method = "post">
         <table summary = "">
            <tr>
               <th><label for = " username">Your name:</label></th>
               <td><input type = " text" id = " username" name = " username" /></td>
            </tr>

            <tr>
               <th><label for = " url">Link URL:</label></th>
               <td><input type = " text" id=" url" name= " url" /></td>
            </tr>

            <tr>
               <th><label for = " title">Title:</label></th>
               <td><input type = " text" name = " title" /></td>
            </tr>

            <tr>
               <td></td>
               <td>
                  <input type = " submit" value = " Submit" />
                  <input type = " submit" name = " cancel" value = "Cancel" />
               </td>
            </tr>

         </table>

      </form>
      <div id = "footer">
      </div>

   </body>

</html>
Step 10 − You will receive the following output −
Here, the method name is defined as “POST”. It is always important to
cross verify the method specified in the file. If the method includes
“POST” method, the values should be rechecked in the database in
appropriate fields.If the method includes “GET” method, the values to be saved will be visible in the URL.
No comments:
Post a Comment