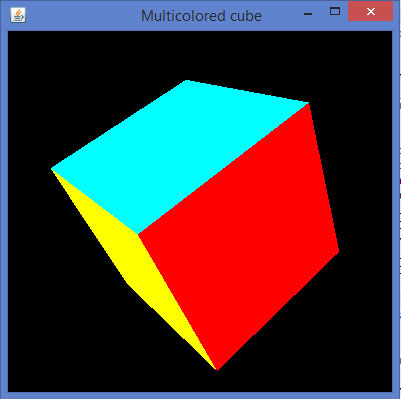
Below given is the program to draw a 3d cube and apply colours to it.
import java.awt.DisplayMode;
import javax.media.opengl.GL2;
import javax.media.opengl.GLAutoDrawable;
import javax.media.opengl.GLCapabilities;
import javax.media.opengl.GLEventListener;
import javax.media.opengl.GLProfile;
import javax.media.opengl.awt.GLCanvas;
import javax.media.opengl.glu.GLU;

import javax.swing.JFrame;

import com.jogamp.opengl.util.FPSAnimator;

public class Cube implements GLEventListener {

   public static DisplayMode dm, dm_old;
   private GLU glu = new GLU();
   private float rquad = 0.0f;

   @Override
   public void display( GLAutoDrawable drawable ) {

      final GL2 gl = drawable.getGL().getGL2();
      gl.glClear(GL2.GL_COLOR_BUFFER_BIT | GL2.GL_DEPTH_BUFFER_BIT );
      gl.glLoadIdentity();
      gl.glTranslatef( 0f, 0f, -5.0f );

      // Rotate The Cube On X, Y & Z
      gl.glRotatef(rquad, 1.0f, 1.0f, 1.0f);

      //giving different colors to different sides
      gl.glBegin(GL2.GL_QUADS); // Start Drawing The Cube
      gl.glColor3f(1f,0f,0f); //red color
      gl.glVertex3f(1.0f, 1.0f, -1.0f); // Top Right Of The Quad (Top)
      gl.glVertex3f( -1.0f, 1.0f, -1.0f); // Top Left Of The Quad (Top)
      gl.glVertex3f( -1.0f, 1.0f, 1.0f ); // Bottom Left Of The Quad (Top)
      gl.glVertex3f( 1.0f, 1.0f, 1.0f ); // Bottom Right Of The Quad (Top)

      gl.glColor3f( 0f,1f,0f ); //green color
      gl.glVertex3f( 1.0f, -1.0f, 1.0f ); // Top Right Of The Quad
      gl.glVertex3f( -1.0f, -1.0f, 1.0f ); // Top Left Of The Quad
      gl.glVertex3f( -1.0f, -1.0f, -1.0f ); // Bottom Left Of The Quad
      gl.glVertex3f( 1.0f, -1.0f, -1.0f ); // Bottom Right Of The Quad

      gl.glColor3f( 0f,0f,1f ); //blue color
      gl.glVertex3f( 1.0f, 1.0f, 1.0f ); // Top Right Of The Quad (Front)
      gl.glVertex3f( -1.0f, 1.0f, 1.0f ); // Top Left Of The Quad (Front)
      gl.glVertex3f( -1.0f, -1.0f, 1.0f ); // Bottom Left Of The Quad
      gl.glVertex3f( 1.0f, -1.0f, 1.0f ); // Bottom Right Of The Quad

      gl.glColor3f( 1f,1f,0f ); //yellow (red + green)
      gl.glVertex3f( 1.0f, -1.0f, -1.0f ); // Bottom Left Of The Quad
      gl.glVertex3f( -1.0f, -1.0f, -1.0f ); // Bottom Right Of The Quad
      gl.glVertex3f( -1.0f, 1.0f, -1.0f ); // Top Right Of The Quad (Back)
      gl.glVertex3f( 1.0f, 1.0f, -1.0f ); // Top Left Of The Quad (Back)

      gl.glColor3f( 1f,0f,1f ); //purple (red + green)
      gl.glVertex3f( -1.0f, 1.0f, 1.0f ); // Top Right Of The Quad (Left)
      gl.glVertex3f( -1.0f, 1.0f, -1.0f ); // Top Left Of The Quad (Left)
      gl.glVertex3f( -1.0f, -1.0f, -1.0f ); // Bottom Left Of The Quad
      gl.glVertex3f( -1.0f, -1.0f, 1.0f ); // Bottom Right Of The Quad

      gl.glColor3f( 0f,1f, 1f ); //sky blue (blue +green)
      gl.glVertex3f( 1.0f, 1.0f, -1.0f ); // Top Right Of The Quad (Right)
      gl.glVertex3f( 1.0f, 1.0f, 1.0f ); // Top Left Of The Quad
      gl.glVertex3f( 1.0f, -1.0f, 1.0f ); // Bottom Left Of The Quad
      gl.glVertex3f( 1.0f, -1.0f, -1.0f ); // Bottom Right Of The Quad
      gl.glEnd(); // Done Drawing The Quad
      gl.glFlush();

      rquad -= 0.15f;
   }

   @Override
   public void dispose( GLAutoDrawable drawable ) {
      // TODO Auto-generated method stub
   }

   @Override
   public void init( GLAutoDrawable drawable ) {

      final GL2 gl = drawable.getGL().getGL2();
      gl.glShadeModel( GL2.GL_SMOOTH );
      gl.glClearColor( 0f, 0f, 0f, 0f );
      gl.glClearDepth( 1.0f );
      gl.glEnable( GL2.GL_DEPTH_TEST );
      gl.glDepthFunc( GL2.GL_LEQUAL );
      gl.glHint( GL2.GL_PERSPECTIVE_CORRECTION_HINT, GL2.GL_NICEST );
   }

   @Override
   public void reshape( GLAutoDrawable drawable, int x, int y, int width, int height ) {

      // TODO Auto-generated method stub
      final GL2 gl = drawable.getGL().getGL2();
      if( height lt;= 0 )
         height = 1;

      final float h = ( float ) width / ( float ) height;
      gl.glViewport( 0, 0, width, height );
      gl.glMatrixMode( GL2.GL_PROJECTION );
      gl.glLoadIdentity();

      glu.gluPerspective( 45.0f, h, 1.0, 20.0 );
      gl.glMatrixMode( GL2.GL_MODELVIEW );
      gl.glLoadIdentity();
   }

   public static void main( String[] args ) {

      final GLProfile profile = GLProfile.get( GLProfile.GL2 );
      GLCapabilities capabilities = new GLCapabilities( profile );

      // The canvas
      final GLCanvas glcanvas = new GLCanvas( capabilities );
      Cube cube = new Cube();

      glcanvas.addGLEventListener( cube );
      glcanvas.setSize( 400, 400 );

      final JFrame frame = new JFrame ( " Multicolored cube" );
      frame.getContentPane().add( glcanvas );
      frame.setSize( frame.getContentPane().getPreferredSize() );
      frame.setVisible( true );
      final FPSAnimator animator = new FPSAnimator(glcanvas, 300,true);

      animator.start();
   }

}
When you compile and execute the above program, the following output is generated. It shows a colored 3D cube.

Applying Texture to the Cube
The following steps are given to apply texture to a cube −- You can bind required texture to the cube using the gl.glBindTexture(GL2.GL_TEXTURE_2D.texture) method of the Drawable interface.
- This method requires texture (int) argument along with GL2.GL_TEXTURE_2D(int).
- Before you execute Display(), you need to create texture variable
- In the init() method or in the starting lines of glDisplay() method, enable the texture using gl.glEnable(GL2.GL_TEXTURE_2D) method.
- Create the texture object, which needs a file object as a parameter, which in turn needs the path of the image used as the texture to the object.
File file = new File(“c:\\pictures\\boy.jpg”);
Texture t = textureIO.newTexture(file, true);
texture = t.getTextureObject(gl);
- Handle the ‘file not found’ exception
import java.awt.DisplayMode;

import java.io.File;
import java.io.IOException;

import javax.media.opengl.GL2;
import javax.media.opengl.GLAutoDrawable;
import javax.media.opengl.GLCapabilities;
import javax.media.opengl.GLEventListener;
import javax.media.opengl.GLProfile;
import javax.media.opengl.awt.GLCanvas;
import javax.media.opengl.glu.GLU;

import javax.swing.JFrame;

import com.jogamp.opengl.util.FPSAnimator;
import com.jogamp.opengl.util.texture.Texture;
import com.jogamp.opengl.util.texture.TextureIO;

public class CubeTexture implements GLEventListener {

   public static DisplayMode dm, dm_old;
   private GLU glu = new GLU();
   private float xrot,yrot,zrot;
   private int texture;

   @Override
   public void display(GLAutoDrawable drawable) {

      // TODO Auto-generated method stub
      final GL2 gl = drawable.getGL().getGL2();
      gl.glClear(GL2.GL_COLOR_BUFFER_BIT | GL2.GL_DEPTH_BUFFER_BIT);
      gl.glLoadIdentity(); // Reset The View
      gl.glTranslatef(0f, 0f, -5.0f);

      gl.glRotatef(xrot, 1.0f, 1.0f, 1.0f);
      gl.glRotatef(yrot, 0.0f, 1.0f, 0.0f);
      gl.glRotatef(zrot, 0.0f, 0.0f, 1.0f);

      gl.glBindTexture(GL2.GL_TEXTURE_2D, texture);
      gl.glBegin(GL2.GL_QUADS);

      // Front Face
      gl.glTexCoord2f(0.0f, 0.0f); gl.glVertex3f(-1.0f, -1.0f, 1.0f);
      gl.glTexCoord2f(1.0f, 0.0f); gl.glVertex3f( 1.0f, -1.0f, 1.0f);
      gl.glTexCoord2f(1.0f, 1.0f); gl.glVertex3f( 1.0f, 1.0f, 1.0f);
      gl.glTexCoord2f(0.0f, 1.0f); gl.glVertex3f(-1.0f, 1.0f, 1.0f);

      // Back Face
      gl.glTexCoord2f(1.0f, 0.0f); gl.glVertex3f(-1.0f, -1.0f, -1.0f);
      gl.glTexCoord2f(1.0f, 1.0f); gl.glVertex3f(-1.0f, 1.0f, -1.0f);
      gl.glTexCoord2f(0.0f, 1.0f); gl.glVertex3f( 1.0f, 1.0f, -1.0f);
      gl.glTexCoord2f(0.0f, 0.0f); gl.glVertex3f( 1.0f, -1.0f, -1.0f);

      // Top Face
      gl.glTexCoord2f(0.0f, 1.0f); gl.glVertex3f(-1.0f, 1.0f, -1.0f);
      gl.glTexCoord2f(0.0f, 0.0f); gl.glVertex3f(-1.0f, 1.0f, 1.0f);
      gl.glTexCoord2f(1.0f, 0.0f); gl.glVertex3f( 1.0f, 1.0f, 1.0f);
      gl.glTexCoord2f(1.0f, 1.0f); gl.glVertex3f( 1.0f, 1.0f, -1.0f);

      // Bottom Face
      gl.glTexCoord2f(1.0f, 1.0f); gl.glVertex3f(-1.0f, -1.0f, -1.0f);
      gl.glTexCoord2f(0.0f, 1.0f); gl.glVertex3f( 1.0f, -1.0f, -1.0f);
      gl.glTexCoord2f(0.0f, 0.0f); gl.glVertex3f( 1.0f, -1.0f, 1.0f);
      gl.glTexCoord2f(1.0f, 0.0f); gl.glVertex3f(-1.0f, -1.0f, 1.0f);

      // Right face
      gl.glTexCoord2f(1.0f, 0.0f); gl.glVertex3f( 1.0f, -1.0f, -1.0f);
      gl.glTexCoord2f(1.0f, 1.0f); gl.glVertex3f( 1.0f, 1.0f, -1.0f);
      gl.glTexCoord2f(0.0f, 1.0f); gl.glVertex3f( 1.0f, 1.0f, 1.0f);
      gl.glTexCoord2f(0.0f, 0.0f); gl.glVertex3f( 1.0f, -1.0f, 1.0f);

      // Left Face
      gl.glTexCoord2f(0.0f, 0.0f); gl.glVertex3f(-1.0f, -1.0f, -1.0f);
      gl.glTexCoord2f(1.0f, 0.0f); gl.glVertex3f(-1.0f, -1.0f, 1.0f);
      gl.glTexCoord2f(1.0f, 1.0f); gl.glVertex3f(-1.0f, 1.0f, 1.0f);
      gl.glTexCoord2f(0.0f, 1.0f); gl.glVertex3f(-1.0f, 1.0f, -1.0f);
      gl.glEnd();
      gl.glFlush();

      //change the speeds here
      xrot += .1f;
      yrot += .1f;
      zrot += .1f;
   }

   @Override
   public void dispose(GLAutoDrawable drawable) {
      // method body
   }

   @Override
   public void init(GLAutoDrawable drawable) {

      final GL2 gl = drawable.getGL().getGL2();

      gl.glShadeModel(GL2.GL_SMOOTH);
      gl.glClearColor(0f, 0f, 0f, 0f);
      gl.glClearDepth(1.0f);
      gl.glEnable(GL2.GL_DEPTH_TEST);
      gl.glDepthFunc(GL2.GL_LEQUAL);
      gl.glHint(GL2.GL_PERSPECTIVE_CORRECTION_HINT, GL2.GL_NICEST);

      //
      gl.glEnable(GL2.GL_TEXTURE_2D);
      try{

         File im = new File("E:\\office\\boy.jpg ");
         Texture t = TextureIO.newTexture(im, true);
         texture= t.getTextureObject(gl);

      }catch(IOException e){
         e.printStackTrace();
      }
   }

   @Override
   public void reshape(GLAutoDrawable drawable, int x, int y, int width, int height) {

      // TODO Auto-generated method stub
      final GL2 gl = drawable.getGL().getGL2();
      if(height lt;= 0)
         height = 1;

      final float h = (float) width / (float) height;
      gl.glViewport(0, 0, width, height);
      gl.glMatrixMode(GL2.GL_PROJECTION);
      gl.glLoadIdentity();

      glu.gluPerspective(45.0f, h, 1.0, 20.0);
      gl.glMatrixMode(GL2.GL_MODELVIEW);
      gl.glLoadIdentity();
   }

   public static void main(String[] args) {

      // TODO Auto-generated method stub
      final GLProfile profile = GLProfile.get(GLProfile.GL2);
      GLCapabilities capabilities = new GLCapabilities(profile);

      // The canvas
      final GLCanvas glcanvas = new GLCanvas(capabilities);
      CubeTexture r = new CubeTexture();

      glcanvas.addGLEventListener(r);
      glcanvas.setSize(400, 400);

      final JFrame frame = new JFrame (" Textured Cube");
      frame.getContentPane().add(glcanvas);
      frame.setSize(frame.getContentPane().getPreferredSize());
      frame.setVisible(true);
      final FPSAnimator animator = new FPSAnimator(glcanvas, 300, true);

      animator.start();
   }

}
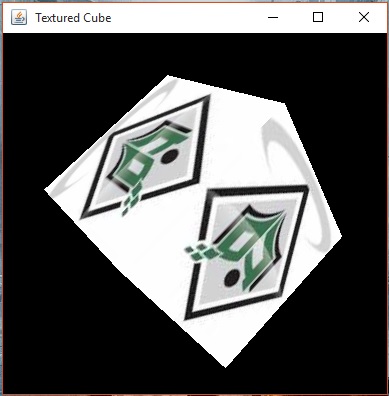
When you compile and execute the above program, the following output is generated. You can see a 3D cube with desired texture applied on it.


No comments:
Post a Comment