Testing is the process of checking the functionality of the
application whether it is working as per requirements and to ensure that
at developer level, unit testing comes into picture. Unit testing is
the testing of single entity (class or method).
Unit testing is very
essential to every software company to give a quality product to their
customers.
JUnit has driven developers to understand the usefulness of tests,
especially of unit tests when compared to any other testing framework.
Leveraging a rather simple, pragmatic, and strict architecture, JUnit
has been able to "infect" great number of developers. Features of JUnit
can be seen in
Junit Features.
Some of the short comings of JUnit are:
- Initially designed to enable unit testing only, now used for all kinds of testing.
- Cannot do dependency testing.
- Poor configuration control (setUp/tearDown).
- Intrusive (forces you to extend classes and name your methods a certain way).
- Static programming model (forces you to recompile unnecessarily).
- The management of different suites of tests in complex projects can be very tricky..
What is TestNG?
Definition of TestNG as per its documentation is:
TestNG is a testing framework inspired from JUnit and NUnit but
introducing some new functionalities that make it more powerful and
easier to use.
TestNG is an open source automated testing framework; where
NG of Test
NG means
Next
Generation.
TestNG is similar to JUnit (especially JUnit 4), but its not a JUnit
extension. Its inspired by JUnit. It is designed to be better than
JUnit, especially when testing integrated classes. The creator of TestNG
is
Cedric Beust.
TestNG eliminates most of the limitations of the older framework and
gives the developer the ability to write more flexible and powerful
tests. As it heavily borrows from Java Annotations (introduced with JDK
5.0) to define tests, it can also show you how to use this new feature
of the Java language in a real production environment.
TestNG Features
- Annotations.
- TestNG uses more Java and OO features.
- Supports testing integrated classes (e.g., by default, no need to create a new test class instance for every test method).
- Separate compile-time test code from run-time configuration/data info.
- Flexible runtime configuration.
- Introduces ‘test groups’. Once you have compiled your tests, you
can just ask TestNG to run all the "front-end" tests, or "fast", "slow",
"database", etc...
- Supports Dependent test methods, parallel testing, load testing, partial failure.
- Flexible plug-in API.
- Support for multi threaded testing.
Environment Set-Up
TestNG is a framework for Java, so the very first requirement is to have JDK installed in your machine.
System Requirement
| JDK | 1.5 or above. |
|---|
| Memory | no minimum requirement. |
|---|
| Disk Space | no minimum requirement. |
|---|
| Operating System | no minimum requirement. |
|---|
Step 1 - verify Java installation in your machine
Now, open console and execute the following
java command.
| OS | Task | Command |
|---|
| Windows | Open Command Console | c:\> java -version |
| Linux | Open Command Terminal | $ java -version |
| Mac | Open Terminal | machine:~ joseph$ java -version |
Let's verify the output for all the operating systems:
| OS | Output |
|---|
| Windows |
java version "1.7.0_25"
Java(TM) SE Runtime Environment (build 1.7.0_25-b15)
Java HotSpot(TM) 64-Bit Server VM (build 23.25-b01, mixed mode)
|
| Linux |
java version "1.7.0_25"
Java(TM) SE Runtime Environment (build 1.7.0_25-b15)
Java HotSpot(TM) 64-Bit Server VM (build 23.25-b01, mixed mode)
|
| Mac |
java version "1.7.0_25"
Java(TM) SE Runtime Environment (build 1.7.0_25-b15)
Java HotSpot(TM) 64-Bit Server VM (build 23.25-b01, mixed mode)
|
If you do not have Java installed, install the Java Software Development Kit (SDK) from
http://www.oracle.com/technetwork/java/javase/downloads/index.html. We are assuming Java 1.7.0_25 as installed version for this tutorial.
Step 2: Set JAVA environment
Set the
JAVA_HOME environment variable to point to the base directory location, where Java is installed on your machine. For example;
| OS | Output |
|---|
| Windows | Set the environment variable JAVA_HOME to C:\Program Files\Java\jdk1.7.0_25 |
| Linux | export JAVA_HOME=/usr/local/java-current |
| Mac | export JAVA_HOME=/Library/Java/Home |
Append Java compiler location to System Path.
| OS | Output |
|---|
| Windows | Append the string ;C:\Program Files\Java\jdk1.7.0_25\bin to the end of the system variable, Path. |
| Linux | export PATH=$PATH:$JAVA_HOME/bin/ |
| Mac | not required |
Verify Java Installation using
java -version command explained above.
Step 3: Download TestNG archive
Download latest version of TestNG jar file from
http://www.testng.org. At the time of writing this tutorial, I downloaded
testng-6.8.jar and copied it into C:\>TestNG folder.
| OS | Archive name |
|---|
| Windows | testng-6.8.jar |
| Linux | testng-6.8.jar |
| Mac | testng-6.8.jar |
Step 4: Set TestNG environment
Set the
TESTNG_HOME environment variable to point to the base
directory location, where TestNG jar is stored on your machine.
Assuming, we've stored testng-6.8.jar in TestNG folder on various
Operating Systems as follows.
| OS | Output |
|---|
| Windows | Set the environment variable TESTNG_HOME to C:\TESTNG |
| Linux | export TESTNG_HOME=/usr/local/TESTNG |
| Mac | export TESTNG_HOME=/Library/TESTNG |
Step 5: Set CLASSPATH variable
Set the
CLASSPATH environment variable to point to the TestNG
jar location. Assuming, we've stored testng-6.8.jar in TestNG folder on
various Operating Systems as follows.
| OS | Output |
|---|
| Windows | Set the environment variable CLASSPATH to %CLASSPATH%;%TESTNG_HOME%\testng-6.8.jar; |
| Linux | export CLASSPATH=$CLASSPATH:$TESTNG_HOME/testng-6.8.jar: |
| Mac | export CLASSPATH=$CLASSPATH:$TESTNG_HOME/testng-6.8.jar: |
Step 6: Test TestNG Setup
Create a java class file name TestNGSimpleTest in
C:\ > TestNG_WORKSPACE
import org.testng.annotations.Test;
import static org.testng.Assert.assertEquals;

public class TestNGSimpleTest {
 @Test
 public void testAdd() {
  String str = "TestNG is working fine";
  assertEquals("TestNG is working fine", str);
 }
}
TestNG can be invoked in several different ways:
- With a testng.xml file
- With ant
- From the command line
Let us invoke using the testng.xml file. Create an xml file with name testng.xml in
C:\ > TestNG_WORKSPACE to execute Test case(s).
<?xml version="1.0" encoding="UTF-8"?>
<!DOCTYPE suite SYSTEM "http://testng.org/testng-1.0.dtd" >
<suite name="Suite1">
  <test name="test1">
    <classes>
       <class name="TestNGSimpleTest"/>
    </classes>
  </test>
</suite>
Step 7: Verify the Result
Compile the class using
javac compiler as follows:
C:\TestNG_WORKSPACE>javac TestNGSimpleTest.java
Now, invoke the testng.xml to see the result.
C:\TestNG_WORKSPACE>java -cp "C:\TestNG_WORKSPACE" org.testng.TestNG testng.xml
Verify the output.
===============================================
Suite1
Total tests run: 1, Failures: 0, Skips: 0
===============================================
Writing Tests
Writing a test in TestNG basically involves following steps:
- Write the business logic of your test and insert TestNG annotations in your code.
- Add the information about your test (e.g. the class name, the
groups you wish to run, etc...) in a testng.xml file or in build.xml..
- Run TestNG.
Here, we will see one complete example of TestNG testing using POJO
class, Business logic class and a test xml, which will be run by TestNG.
Create
EmployeeDetails.java in
C:\ > TestNG_WORKSPACE which is a POJO class.
public class EmployeeDetails {

   private String name;
   private double monthlySalary;
   private int age;

   /**
   * @return the name
   */
   public String getName() {
      return name;
   }
   /**
   * @param name the name to set
   */
   public void setName(String name) {
      this.name = name;
   }
   /**
   * @return the monthlySalary
   */
   public double getMonthlySalary() {
      return monthlySalary;
   }
   /**
   * @param monthlySalary the monthlySalary to set
   */
   public void setMonthlySalary(double monthlySalary) {
      this.monthlySalary = monthlySalary;
   }
   /**
   * @return the age
   */
   public int getAge() {
      return age;
   }
   /**
   * @param age the age to set
   */
   public void setAge(int age) {
   this.age = age;
   }
}
EmployeeDetails class is used to:
- get/set the value of employee's name.
- get/set the value of employee's monthly salary.
- get/set the value of employee's age.
Create a
EmpBusinessLogic.java in
C:\ > TestNG_WORKSPACE which contains business logic.
public class EmpBusinessLogic {
   // Calculate the yearly salary of employee
   public double calculateYearlySalary(EmployeeDetails employeeDetails){
      double yearlySalary=0;
      yearlySalary = employeeDetails.getMonthlySalary() * 12;
      return yearlySalary;
   }

   // Calculate the appraisal amount of employee
   public double calculateAppraisal(EmployeeDetails employeeDetails){
      double appraisal=0;
      if(employeeDetails.getMonthlySalary() < 10000){
         appraisal = 500;
      }else{
         appraisal = 1000;
      }
      return appraisal;
   }
}
EmpBusinessLogic class is used for calculating.
- the yearly salary of employee.
- the appraisal amount of employee.
Now, let's create a TestNG class called
TestEmployeeDetails.java in
C:\ > TestNG_WORKSPACE.A
TestNG class is a Java class that contains at least one TestNG
annotation. This class contains test cases to be tested. A TestNG test
can be configured by @BeforeXXX and @AfterXXX annotations (we will see
this in the chapter
TestNG - Execution Procedure) which allows to perform some Java logic before and after a certain point.
import org.testng.Assert;
import org.testng.annotations.Test;

public class TestEmployeeDetails {
 EmpBusinessLogic empBusinessLogic = new EmpBusinessLogic();
 EmployeeDetails employee = new EmployeeDetails();

 @Test
 public void testCalculateAppriasal() {
  employee.setName("Rajeev");
  employee.setAge(25);
  employee.setMonthlySalary(8000);
  double appraisal = empBusinessLogic
   .calculateAppraisal(employee);
  Assert.assertEquals(500, appraisal, 0.0, "500");
 }

 // test to check yearly salary
 @Test
 public void testCalculateYearlySalary() {
  employee.setName("Rajeev");
  employee.setAge(25);
  employee.setMonthlySalary(8000);
  double salary = empBusinessLogic
   .calculateYearlySalary(employee);
  Assert.assertEquals(96000, salary, 0.0, "8000");
 }
}
TestEmployeeDetails class is used for testing the methods of
EmpBusinessLogic class. It
- tests the yearly salary of the employee.
- tests the appraisal amount of the employee.
Before you can run the tests, however, you must configure TestNG
using a special XML file, conventionally named testng.xml. The syntax
for this file is very simple, and its contents as below. Create this
file in
C:\ > TestNG_WORKSPACE:
<?xml version="1.0" encoding="UTF-8"?>
<!DOCTYPE suite SYSTEM "http://testng.org/testng-1.0.dtd" >
<suite name="Suite1">
  <test name="test1">
    <classes>
       <class name="TestEmployeeDetails"/>
    </classes>
  </test>
</suite>
Details of the above file are as below:
- A suite is represented by one XML file. It can contain one or more tests and is defined by the <suite> tag.
- Tag <test> represents one test and can contain one or more TestNG classes.
- <class> tag represents a TestNG class is a Java class that
contains at least one TestNG annotation. It can contain one or more test
methods.
Compile the Test case classes using javac.
C:\TestNG_WORKSPACE>javac EmployeeDetails.java EmpBusinessLogic.java TestEmployeeDetails.java
Now TestNG with the following command:
C:\TestNG_WORKSPACE>java -cp "C:\TestNG_WORKSPACE" org.testng.TestNG testng.xml
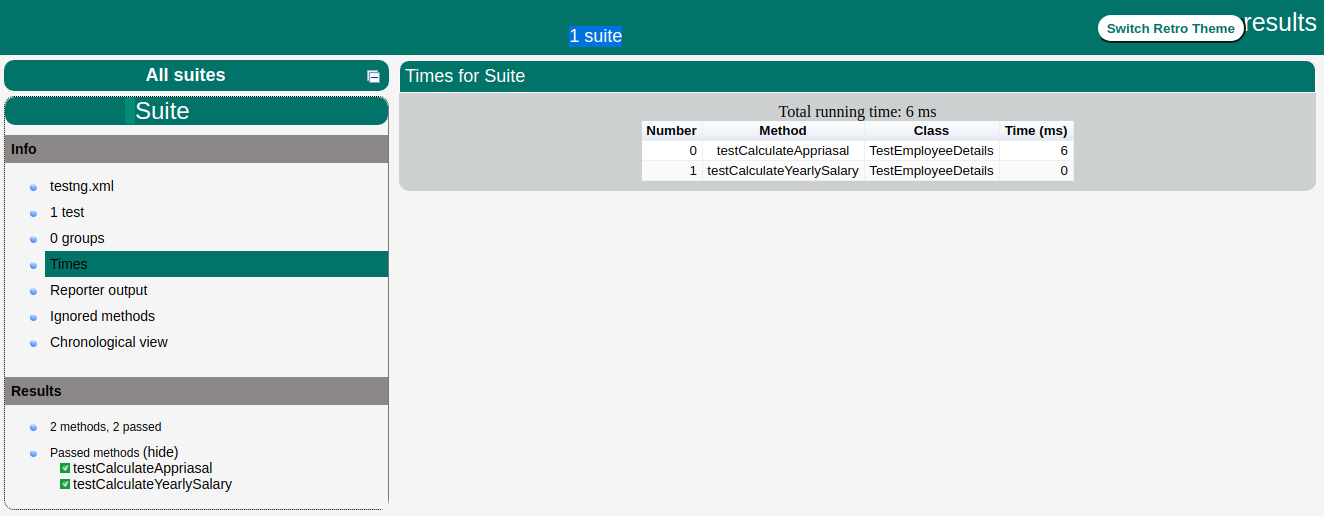
If all has been done correctly, you should see the results of your
tests in the console. Furthermore, TestNG creates a very nice HTML
report in a folder called
test-output that is automatically
created in the current directory. If you open it and load index.html,
you will see a page similar to the one in the image below:
Basic Annotations
The traditional way to indicate test methods in JUnit 3 is by
prefixing their name with test. This is a very effective method for
tagging certain methods in a class as having a special meaning, but the
naming doesn’t scale very well (what if we want to add more tags for
different frameworks?) and is rather inflexible (what if we want to pass
additional parameters to the testing framework?).
Annotations were formally added to the Java language in JDK 5 and
TestNG made the choice to use annotations to annotate test classes.
Here is the list of annotations that TestNG supports:
| Annotation | Description |
|---|
| @BeforeSuite | The annotated method will be run only once before all tests in this suite have run. |
| @AfterSuite | The annotated method will be run only once after all tests in this suite have run. |
| @BeforeClass | The annotated method will be run only once before the first test method in the current class is invoked. |
| @AfterClass | The annotated method will be run only once after all the test methods in the current class have been run. |
| @BeforeTest | The annotated method will be run before any test method belonging to the classes inside the <test> tag is run. |
| @AfterTest | The annotated method will be run after all the test methods belonging to the classes inside the <test> tag have run. |
| @BeforeGroups | The list of groups that this
configuration method will run before. This method is guaranteed to run
shortly before the first test method that belongs to any of these groups
is invoked. |
| @AfterGroups | The list of groups that this
configuration method will run after. This method is guaranteed to run
shortly after the last test method that belongs to any of these groups
is invoked. |
| @BeforeMethod | The annotated method will be run before each test method. |
| @AfterMethod | The annotated method will be run after each test method. |
| @DataProvider | Marks a method as supplying data
for a test method. The annotated method must return an Object[][] where
each Object[] can be assigned the parameter list of the test method. The
@Test method that wants to receive data from this DataProvider needs to
use a dataProvider name equals to the name of this annotation. |
| @Factory | Marks a method as a factory that returns objects that will be used by TestNG as Test classes. The method must return Object[]. |
| @Listeners | Defines listeners on a test class. |
| @Parameters | Describes how to pass parameters to a @Test method. |
| @Test | Marks a class or a method as part of the test. |
Benefits of using annotations
Following are some of the benefits of using annotations:
- TestNG identifies the methods it is interested in by looking
up annotations. Hence method names are not restricted to any pattern or
format.
- We can pass additional parameters to annotations.
- Annotations are strongly typed, so the compiler will flag any mistakes right away.
- Test classes no longer need to extend anything (such as TestCase, for JUnit 3).
Excecution Procedure
This tutorial explains the execution procedure of methods in TestNG
which means that which method is called first and which one after that.
Here is the execution procedure of the TestNG test API methods with the
example.
Create a java class file name TestngAnnotation.java in
C:\ > TestNG_WORKSPACE to test annotation.
import org.testng.annotations.Test;
import org.testng.annotations.BeforeMethod;
import org.testng.annotations.AfterMethod;
import org.testng.annotations.BeforeClass;
import org.testng.annotations.AfterClass;
import org.testng.annotations.BeforeTest;
import org.testng.annotations.AfterTest;
import org.testng.annotations.BeforeSuite;
import org.testng.annotations.AfterSuite;

public class TestngAnnotation {
 // test case 1
 @Test
 public void testCase1() {
  System.out.println("in test case 1");
 }

 // test case 2
 @Test
 public void testCase2() {
  System.out.println("in test case 2");
 }

 @BeforeMethod
 public void beforeMethod() {
  System.out.println("in beforeMethod");
 }

 @AfterMethod
 public void afterMethod() {
  System.out.println("in afterMethod");
 }

 @BeforeClass
 public void beforeClass() {
  System.out.println("in beforeClass");
 }

 @AfterClass
 public void afterClass() {
  System.out.println("in afterClass");
 }

 @BeforeTest
 public void beforeTest() {
  System.out.println("in beforeTest");
 }

 @AfterTest
 public void afterTest() {
  System.out.println("in afterTest");
 }

 @BeforeSuite
 public void beforeSuite() {
  System.out.println("in beforeSuite");
 }

 @AfterSuite
 public void afterSuite() {
  System.out.println("in afterSuite");
 }

}
Next, let's create the file
testng.xml in
C:\ > TestNG_WORKSPACE to execute annotations.
<?xml version="1.0" encoding="UTF-8"?>
<!DOCTYPE suite SYSTEM "http://testng.org/testng-1.0.dtd" >
<suite name="Suite1">
  <test name="test1">
    <classes>
       <class name="TestngAnnotation"/>
    </classes>
  </test>
</suite>
Compile the Test case class using javac.
C:\TestNG_WORKSPACE>javac TestngAnnotation.java
Now, run the testng.xml, which will run test case defined in provided Test Case class.
C:\TestNG_WORKSPACE>java org.testng.TestNG testng.xml
Verify the output.
in beforeSuite
in beforeTest
in beforeClass
in beforeMethod
in test case 1
in afterMethod
in beforeMethod
in test case 2
in afterMethod
in afterClass
in afterTest
in afterSuite

===============================================
Suite
Total tests run: 2, Failures: 0, Skips: 0
===============================================
See the above output and this is how the TestNG execution procedure is:
- First of all beforeSuite() method is executed only once.
- Lastly, the afterSuite() method executes only once.
- Even the methods beforeTest(), beforeClass(), afterClass() and afterTest() methods are executed only once.
- beforeMethod() method executes for each test case but before executing the test case.
- afterMethod() method executes for each test case but after the execution of test case.
- In between beforeMethod() and afterMethod() each test case executes.
Executing Tests
The test cases are executed using
TestNG class. This class is
the main entry point for running tests in the TestNG framework. Users
can create their own TestNG object and invoke it in many different ways:
- On an existing testng.xml
- On a synthetic testng.xml, created entirely from Java
- By directly setting the test classes.
You can also define which groups to include or exclude, assign parameters, etc. The command line parameters are:
- -d outputdir: specify the output directory
- -testclass class_name: specifies one or several class names
- -testjar jar_name: specifies the jar containing the tests
- -sourcedir src1;src2: ; separated list of source directories (used only when javadoc annotations are used)
- -target
- -groups
- -testrunfactory
- -listener
We will create the TestNG object an existing testng.xml in our example below.
Create a Class
- Create a java class to be tested say MessageUtil.java in C:\ > TestNG_WORKSPACE
/*
* This class prints the given message on console.
*/
public class MessageUtil {

   private String message;

   //Constructor
   //@param message to be printed
   public MessageUtil(String message){
      this.message = message;
   }

   // prints the message
   public String printMessage(){
      System.out.println(message);
      return message;
   }
}
Create Test Case Class
- Create a java test class say SampleTest.java.
- Add a test method testPrintMessage() to your test class.
- Add an Annotation @Test to method testPrintMessage().
- Implement the test condition and check the condition using assertEquals API of TestNG.
Create a java class file name SampleTest.java in
C:\ > TestNG_WORKSPACE
import org.testng.Assert;
import org.testng.annotations.Test;

public class SampleTest {

   String message = "Hello World";
   MessageUtil messageUtil = new MessageUtil(message);

   @Test
   public void testPrintMessage() {
        Assert.assertEquals(message, messageUtil.printMessage());
   }
}
Create testng.xml
Next, let's create testng.xml file in
C:\ > TestNG_WORKSPACE
to execute Test case(s). This file captures your entire testing in XML.
This file makes it easy to describe all your test suites and their
parameters in one file, which you can check in your code repository or
email to coworkers. It also makes it easy to extract subsets of your
tests or split several runtime configurations (e.g., testng-database.xml
would run only tests that exercise your database).
<?xml version="1.0" encoding="UTF-8"?>
<suite name="Sample test Suite">
   <test name="Sample test">
    <classes>
      <class name="SampleTest" />
    </classes>
  </test>
</suite>
Compile the Test case using javac.
C:\TestNG_WORKSPACE>javac MessageUtil.java SampleTest.java
Now, run the testng.xml, which will run test case defined in <test> tag.
C:\TestNG_WORKSPACE>java -cp "C:\TestNG_WORKSPACE" org.testng.TestNG testng.xml
Verify the output.
Hello World

===============================================
Sample test Suite
Total tests run: 1, Failures: 0, Skips: 0
===============================================
Suite Tests
A
Test suite is a collection of test cases that are intended
to test a behavior or set of behaviors of software program.
In TestNG, we cannot define a suite in testing source code, but it is
represented by one XML file as suite is the feature of execution. This
also allows flexible configuration of the
tests to be run. A suite can contain one or more tests and is defined by the <suite> tag.
<suite> is a root tag of your testng.xml. It describes a test
suite, which in turn is made of several <test> sections.
Table below lists all the legal attributes <suite> accepts.
| Attribute | Description |
|---|
| name | The name of this suite. It is a mandatory attribute. |
| verbose | The level or verbosity for this run. |
| parallel | Whether TestNG should run different threads to run this suite. |
| thread-count | The number of threads to use,if parallel mode is enabled (ignored other-wise). |
| annotations | The type of annotations you are using in your tests. |
| time-out | The default timeout that will be used on all the test methods found in this test. |
In this chapter we will show you an example having two Test1 & Test2 test classes to run together using Test Suite.
Create a Class
Create a java class to be tested say MessageUtil.java in
C:\ > JUNIT_WORKSPACE
/*
* This class prints the given message on console.
*/
public class MessageUtil {
    private String message;

    // Constructor
    // @param message to be printed
    public MessageUtil(String message) {
     this.message = message;
    }

    // prints the message
    public String printMessage() {
     System.out.println(message);
     return message;
    }

    // add "Hi!" to the message
    public String salutationMessage() {
     message = "Hi!" + message;
     System.out.println(message);
     return message;
    }
}

No comments:
Post a Comment