Saturday, January 21, 2017

JUnit - Overview

Testing is the process of checking the functionality of an application to ensure it runs as per requirements. Unit testing comes into picture at the developers’ level; it is the testing of single entity (class or method). Unit testing plays a critical role in helping a software company deliver quality products to its customers.
Unit testing can be done in two ways − manual testing and automated testing.

JUnit - Environment Setup

Try it Online Option

We have set up the Java Programming environment online, so that you can compile and execute all the available examples online. It gives you confidence in what you are reading and enables you to verify the programs with different options. Feel free to modify any example and execute it online.

JUnit - Test Framework

JUnit is a Regression Testing Framework used by developers to implement unit testing in Java, and accelerate programming speed and increase the quality of code. JUnit Framework can be easily integrated with either of the following −

JUnit - Basic Usage

Let us now have a basic example to demonstrate the step-by-step process of using JUnit.

Create a Class

Create a java class to be tested, say, MessageUtil.java in C:\>JUNIT_WORKSPACE

JUnit - API

The most important package in JUnit is junit.framework, which contains all the core classes. Some of the important classes are as follows −

JUnit - Writing a Test

Here we will see one complete example of JUnit testing using POJO class, Business logic class, and a test class, which will be run by the test runner.
Create EmployeeDetails.java in C:\>JUNIT_WORKSPACE, which is a POJO class.

JUnit - Using Assertion

Assertion

All the assertions are in the Assert class.
public class Assert extends java.lang.Object
This class provides a set of assertion methods, useful for writing tests. Only failed assertions are recorded. Some of the important methods of Assert class are as follows −

JUnit - Execution Procedure

This chapter explains the execution procedure of methods in JUnit, which defines the order of the methods called. Discussed below is the execution procedure of the JUnit test API methods with example.
Create a java class file named ExecutionProcedureJunit.java in C:\>JUNIT_WORKSPACE to test annotation.

JUnit - Executing Tests

The test cases are executed using JUnitCore class. JUnitCore is a facade for running tests. It supports running JUnit 4 tests, JUnit 3.8.x tests, and mixtures. To run tests from the command line, run java org.junit.runner.JUnitCore <TestClass>. For one-shot test runs, use the static method runClasses(Class[]).
Following is the declaration for org.junit.runner.JUnitCore class:

JUnit - Suite Test

Test suite is used to bundle a few unit test cases and run them together. In JUnit, both @RunWith and @Suite annotations are used to run the suite tests. This chapter takes an example having two test classes, TestJunit1 & TestJunit2, that run together using Test Suite.

JUnit - Ignore Test

Sometimes it so happens that our code is not completely ready while running a test case. As a result, the test case fails. The @Ignore annotation helps in this scenario.

JUnit - Time Test

JUnit provides a handy option of Timeout. If a test case takes more time than the specified number of milliseconds, then JUnit will automatically mark it as failed. The timeout parameter is used along with @Test annotation. Let us see the @Test(timeout) in action.

JUnit - Exceptions Test

JUnit provides an option of tracing the exception handling of code. You can test whether the code throws a desired exception or not. The expected parameter is used along with @Test annotation. Let us see @Test(expected) in action.

JUnit - Parameterized Test

JUnit 4 has introduced a new feature called parameterized tests. Parameterized tests allow a developer to run the same test over and over again using different values. There are five steps that you need to follow to create a parameterized test.

JUnit - Plug with ANT

We will have an example to demonstrate how to run JUnit using ANT. Follow the steps given below.

Step 1: Download Apache Ant

JUnit - Plug with Eclipse

To set up JUnit with eclipse, follow the steps given below.

Step 1: Download JUnit Archive

Download a JUnit jar based on the operating system you have on your system.

JUnit - Extensions

Following are the JUnit extensions −
  • Cactus
  • JWebUnit
  • XMLUnit
  • MockObject

JUnit Questions and Answers

JUnit Questions and Answers has been designed with a special intention of helping students and professionals preparing for various Certification Exams and Job Interviews. This section provides a useful collection of sample Interview Questions and Multiple Choice Questions (MCQs) and their answers with appropriate explanations.

JUnit - Quick Guide

JUnit - Overview

Testing is the process of checking the functionality of an application to ensure it runs as per requirements. Unit testing comes into picture at the developers’ level; it is the testing of single entity (class or method). Unit testing plays a critical role in helping a software company deliver quality products to its customers.
Unit testing can be done in two ways − manual testing and automated testing.

JUnit - Useful Resources

The following resources contain additional information on JUnit. Please use them to get more in-depth knowledge on this topic.

Discuss JUnit

JUnit is a unit testing framework for Java programming language. JUnit has been important in the development of test-driven development, and is one of a family of unit testing frameworks collectively known as xUnit, that originated with JUnit. This tutorial explains the use of JUnit in your project unit testing, while working with Java. After completing this tutorial you will gain sufficient knowledge in using JUnit testing framework from where you can take yourself to next levels.

JSP - Overview

What is JavaServer Pages?

JavaServer Pages (JSP) is a technology for developing web pages that support dynamic content which helps developers insert java code in HTML pages by making use of special JSP tags, most of which start with <% and end with %>.

JSP - Environment Setup

A development environment is where you would develop your JSP programs, test them and finally run them.
This tutorial will guide you to setup your JSP development environment which involves following steps:

JSP - Architecture

The web server needs a JSP engine ie. container to process JSP pages. The JSP container is responsible for intercepting requests for JSP pages. This tutorial makes use of Apache which has built-in JSP container to support JSP pages development.

JSP - Life Cycle

The key to understanding the low-level functionality of JSP is to understand the simple life cycle they follow.
A JSP life cycle can be defined as the entire process from its creation till the destruction which is similar to a servlet life cycle with an additional step which is required to compile a JSP into servlet.
The following are the paths followed by a JSP

JSP - Syntax

This tutorial will give basic idea on simple syntax (ie. elements) involved with JSP development:

The Scriptlet:

A scriptlet can contain any number of JAVA language statements, variable or method declarations, or expressions that are valid in the page scripting language.

JSP - Directives

JSP directives provide directions and instructions to the container, telling it how to handle certain aspects of JSP processing.

JSP - Actions

JSP actions use constructs in XML syntax to control the behavior of the servlet engine. You can dynamically insert a file, reuse JavaBeans components, forward the user to another page, or generate HTML for the Java plugin.

JSP - Implicit Objects

JSP Implicit Objects are the Java objects that the JSP Container makes available to developers in each page and developer can call them directly without being explicitly declared. JSP Implicit Objects are also called pre-defined variables.
JSP supports nine Implicit Objects which are listed below:

JSP - Client Request

When a browser requests for a web page, it sends lot of information to the web server which can not be read directly because this information travel as a part of header of HTTP request. You can check HTTP Protocol for more information on this.

JSP - Server Response

When a Web server responds to a HTTP request to the browser, the response typically consists of a status line, some response headers, a blank line, and the document. A typical response looks like this:
HTTP/1.1 200 OK
Content-Type: text/html

JSP - Http Status Codes

The format of the HTTP request and HTTP response messages are similar and will have following structure:
  • An initial status line + CRLF ( Carriage Return + Line Feed ie. New Line )
  • Zero or more header lines + CRLF
  • A blank line ie. a CRLF

JSP - Form Processing

You must have come across many situations when you need to pass some information from your browser to web server and ultimately to your backend program. The browser uses two methods to pass this information to web server. These methods are GET Method and POST Method.

JSP - Filters

Servlet and JSP Filters are Java classes that can be used in Servlet and JSP Programming for the following purposes:
  • To intercept requests from a client before they access a resource at back end.
  • To manipulate responses from server before they are sent back to the client.

JSP - Cookies Handling

Cookies are text files stored on the client computer and they are kept for various information tracking purpose. JSP transparently supports HTTP cookies using underlying servlet technology.
There are three steps involved in identifying returning users:

JSP - Session Tracking

HTTP is a "stateless" protocol which means each time a client retrieves a Web page, the client opens a separate connection to the Web server and the server automatically does not keep any record of previous client request.
Still there are following three ways to maintain session between web client and web server:

JSP - File Uploading

A JSP can be used with an HTML form tag to allow users to upload files to the server. An uploaded file could be a text file or binary or image file or any document.

JSP - Handling Date

One of the most important advantages of using JSP is that you can use all the methods available in core Java. This tutorial would take you through Java provided Date class which is available in java.util package, this class encapsulates the current date and time.

JSP - Page Redirecting

Page redirection is generally used when a document moves to a new location and we need to send the client to this new location or may be because of load balancing, or for simple randomization.

JSP - Hits Counter

A hit counter tells you about the number of visits on a particular page of your web site. Usually you attach a hit counter with your index.jsp page assuming people first land on your home page.
To implement a hit counter you can make use of Application Implicit object and associated methods getAttribute() and setAttribute().

JSP - Auto Refresh

Consider a webpage which is displaying live game score or stock market status or currency exchange ration. For all such type of pages, you would need to refresh your web page regularly using refresh or reload button with your browser.

JSP - Sending Email

To send an email using a JSP is simple enough but to start with you should have JavaMail API and Java Activation Framework (JAF) installed on your machine.

JSP - Standard Tag Library (JSTL) Tutorial

The JavaServer Pages Standard Tag Library (JSTL) is a collection of useful JSP tags which encapsulates core functionality common to many JSP applications.

JSP - Database Access

This tutorial assumes you have good understanding on how JDBC application works. Before starting with database access through a JSP, make sure you have proper JDBC environment setup along with a database.
For more detail on how to access database using JDBC and its environment setup you can go through our JDBC Tutorial.

JSP - XML Data

When you send XML data via HTTP, it makes sense to use JSP to handle incoming and outgoing XML documents for example RSS documents. As an XML document is merely a bunch of text, creating one through a JSP is no more difficult than creating an HTML document.

JSP - JavaBeans

A JavaBean is a specially constructed Java class written in the Java and coded according to the JavaBeans API specifications.
Following are the unique characteristics that distinguish a JavaBean from other Java classes:

JSP - Custom Tags

A custom tag is a user-defined JSP language element. When a JSP page containing a custom tag is translated into a servlet, the tag is converted to operations on an object called a tag handler. The Web container then invokes those operations when the JSP page's servlet is executed.

JSP - Expression Language (EL)

JSP Expression Language (EL) makes it possible to easily access application data stored in JavaBeans components. JSP EL allows you to create expressions both (a) arithmetic and (b) logical. Within a JSP EL expression, you can use integers, floating point numbers, strings, the built-in constants true and false for boolean values, and null.

JSP - Exception Handling

When you are writing JSP code, a programmer may leave a coding errors which can occur at any part of the code. You can have following type of errors in your JSP code:

JSP - Debugging

It is always difficult to testing/debugging a JSP and servlets. JSP and Servlets tend to involve a large amount of client/server interaction, making errors likely but hard to reproduce.
Here are a few hints and suggestions that may aid you in your debugging.

JSP - Security

JavaServer Pages and servlets make several mechanisms available to Web developers to secure applications. Resources are protected declaratively by identifying them in the application deployment descriptor and assigning a role to them.

JSP - Internationalization| i18n| l10n

Before we proceed, let me explain three important terms:
  • Internationalization (i18n): This means enabling a web site to provide different versions of content translated into the visitor's language or nationality.

JSP Questions and Answers

JSP Questions and Answers has been designed with a special intention of helping students and professionals preparing for various Certification Exams and Job Interviews. This section provides a useful collection of sample Interview Questions and Multiple Choice Questions (MCQs) and their answers with appropriate explanations.

JSP - Quick Guide

What is JavaServer Pages?

JavaServer Pages (JSP) is a technology for developing web pages that support dynamic content which helps developers insert java code in HTML pages by making use of special JSP tags, most of which start with <% and end with %>.

JSP - Useful Resources

If you want to list down your website, book or any other resource on this page then please contact at webmaster@tutorialspoint.com

Discuss JSP

JavaServer Pages (JSP) is a server-side programming technology that enables the creation of dynamic, platform-independent method for building Web-based applications. JSP have access to the entire family of Java APIs, including the JDBC API to access enterprise databases. This tutorial will teach you how to use Java Server Pages to develop your web applications in simple and easy steps.

JSON - Overview

JSON or JavaScript Object Notation is a lightweight text-based open standard designed for human-readable data interchange. Conventions used by JSON are known to programmers, which include C, C++, Java, Python, Perl, etc.

JSON - Syntax

Let's have a quick look at the basic syntax of JSON. JSON syntax is basically considered as a subset of JavaScript syntax; it includes the following −

JSON - DataTypes

JSON format supports the following data types −
Type Description
Number double- precision floating-point format in JavaScript
String double-quoted Unicode with backslash escaping

JSON - Objects

Creating Simple Objects

JSON objects can be created with JavaScript. Let us see the various ways of creating JSON objects using JavaScript −

JSON - Schema

JSON Schema is a specification for JSON based format for defining the structure of JSON data. It was written under IETF draft which expired in 2011. JSON Schema −

JSON - Comparison with XML

JSON and XML are human readable formats and are language independent. They both have support for creation, reading and decoding in real world situations. We can compare JSON with XML, based on the following factors −

JSON with PHP

This chapter covers how to encode and decode JSON objects using PHP programming language. Let's start with preparing the environment to start our programming with PHP for JSON.

JSON with Perl

This chapter covers how to encode and decode JSON objects using Perl programming language. Let's start with preparing the environment to start our programming with Perl for JSON.

JSON with Python

This chapter covers how to encode and decode JSON objects using Python programming language. Let's start with preparing the environment to start our programming with Python for JSON.

JSON with Ruby

This chapter covers how to encode and decode JSON objects using Ruby programming language. Let's start with preparing the environment to start our programming with Ruby for JSON.

JSON with Java

This chapter covers how to encode and decode JSON objects using Java programming language. Let's start with preparing the environment to start our programming with Java for JSON.

JSON with Ajax

AJAX is Asynchronous JavaScript and XML, which is used on the client side as a group of interrelated web development techniques, in order to create asynchronous web applications. According to the AJAX model, web applications can send and retrieve data from a server asynchronously without interfering with the display and the behavior of the existing page.

JSON - Useful Resources

The following resources contain additional information on JSON. Please use them to get more in-depth knowledge on this.

Discuss JSON

JSON or JavaScript Object Notation is a lightweight text-based open standard designed for human-readable data interchange. The JSON format was originally specified by Douglas Crockford, and is described in RFC 4627. The official Internet media type for JSON is application/json. The JSON filename extension is .json. This tutorial will help you understand JSON and its use within various programming languages such as PHP, PERL, Python, Ruby, Java, etc.

JPA - Introduction

Any enterprise application performs database operations by storing and retrieving vast amounts of data. Despite all the available technologies for storage management, application developers normally struggle to perform database operations efficiently.

JPA - Architecture

Java Persistence API is a source to store business entities as relational entities. It shows how to define a Plain Oriented Java Object (POJO) as an entity and how to manage entities with relations.

JPA - ORM Components

Most contemporary applications use relational database to store data. Recently, many vendors switched to object database to reduce their burden on data maintenance. It means object database or object relational technologies are taking care of storing, retrieving, updating, and maintenance. The core part of this object relational technologies are mapping orm.xml file. As xml does not require compilation, we can easily make changes to multiple data sources with less administration.

Object Relational Mapping

Object Relational Mapping (ORM) briefly tells you about what is ORM and how it works. ORM is a programming ability to covert data from object type to relational type and vice versa.
The main feature of ORM is mapping or binding an object to its data in the database. While mapping we have to consider the data, type of data and its relations with its self-entity or entity in any other table.

Advanced Features

  • Idiomatic persistence : It enables you to write the persistence classes using object oriented classes.
  • High Performance : It has many fetching techniques and hopeful locking techniques.
  • Reliable : It is highly stable and eminent. Used by many industrial programmers.

ORM Architecture

Here follow the ORM architecture.
Object Relational Mapping 
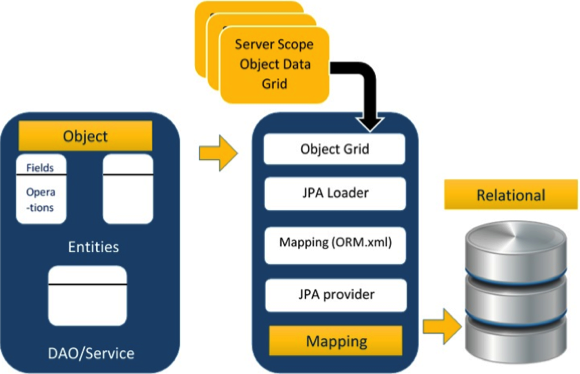
The above architecture explains how object data is stored into relational database in three phases.

Phase1

The first phase, named as the Object data phase contains POJO classes, service interfaces and classes. It is the main business component layer, which has business logic operations and attributes.
For example let us take an employee database as schema-
  • Employee POJO class contain attributes such as ID, name, salary, and designation. And methods like setter and getter methods of those attributes.
  • Employee DAO/Service classes contains service methods such as create employee, find employee, and delete employee.

Phase 2

The second phase named as mapping or persistence phase which contains JPA provider, mapping file (ORM.xml), JPA Loader, and Object Grid.
  • JPA Provider : The vendor product which contains JPA flavor (javax.persistence). For example Eclipselink, Toplink, Hibernate, etc.
  • Mapping file : The mapping file (ORM.xml) contains mapping configuration between the data in a POJO class and data in a relational database.
  • JPA Loader : The JPA loader works like cache memory, which can load the relational grid data. It works like a copy of database to interact with service classes for POJO data (Attributes of POJO class).
  • Object Grid : The Object grid is a temporary location which can store the copy of relational data, i.e. like a cache memory. All queries against the database is first effected on the data in the object grid. Only after it is committed, it effects the main database.

Phase 3

The third phase is the Relational data phase. It contains the relational data which is logically connected to the business component. As discussed above, only when the business component commit the data, it is stored into the database physically. Until then the modified data is stored in a cache memory as a grid format. Same is the process for obtaining data.
The mechanism of the programmatic interaction of above three phases is called as object relational mapping.

Mapping.xml

The mapping.xml file is to instruct the JPA vendor for mapping the Entity classes with database tables.
Let us take an example of Employee entity which contains four attributes. The POJO class of Employee entity named Employee.java is as follows:
public class Employee {

   private int eid;
   private String ename;
   private double salary;
   private String deg;

   public Employee(int eid, String ename, double salary, String deg) {
      super( );
      this.eid = eid;
      this.ename = ename;
      this.salary = salary;
      this.deg = deg;
   }

   public Employee( ) {
      super();
   }

   public int getEid( ) {
      return eid;
   }
   
   public void setEid(int eid) {
      this.eid = eid;
   }
   
   public String getEname( ) {
      return ename;
   }
   
   public void setEname(String ename) {
      this.ename = ename;
   }

   public double getSalary( ) {
      return salary;
   }
   
   public void setSalary(double salary) {
      this.salary = salary;
   }

   public String getDeg( ) {
      return deg;
   }
   
   public void setDeg(String deg) {
      this.deg = deg;
   }
}
The above code is the Employee entity POJO class. It contain four attributes eid, ename, salary, and deg. Consider these attributes are the table fields in the database and eid is the primary key of this table. Now we have to design hibernate mapping file for it. The mapping file named mapping.xml is as follows:
<? xml version="1.0" encoding="UTF-8" ?>

<entity-mappings xmlns="http://java.sun.com/xml/ns/persistence/orm"
   xmlns:xsi="http://www.w3.org/2001/XMLSchema-instance"
   xsi:schemaLocation="http://java.sun.com/xml/ns/persistence/orm    
   http://java.sun.com/xml/ns/persistence/orm_1_0.xsd"
   version="1.0">
      
   <description> XML Mapping file</description>
      
   <entity class="Employee">        
      <table name="EMPLOYEETABLE"/>
      <attributes>
      
         <id name="eid">
            <generated-value strategy="TABLE"/>
         </id>

         <basic name="ename">
            <column name="EMP_NAME" length="100"/>
         </basic>
         
         <basic name="salary">
         </basic>
         
         <basic name="deg">
         </basic>
         
      </attributes>
   </entity>
   
</entity-mappings>
The above script for mapping the entity class with database table. In this file
  • <entity-mappings> : tag defines the schema definition to allow entity tags into xml file.
  • <description> : tag defines description about application.
  • <entity> : tag defines the entity class which you want to convert into table in a database. Attribute class defines the POJO entity class name.
  • <table> : tag defines the table name. If you want to keep class name as table name then this tag is not necessary.
  • <attributes> : tag defines the attributes (fields in a table).
  • <id> : tag defines the primary key of the table. The <generated-value> tag defines how to assign the primary key value such as Automatic, Manual, or taken from Sequence.
  • <basic> : tag is used for defining remaining attributes for table.
  • <column-name> : tag is used to define user defined table field name.

Annotations

Generally Xml files are used to configure specific component, or mapping two different specifications of components. In our case, we have to maintain xml separately in a framework. That means while writing a mapping xml file we need to compare the POJO class attributes with entity tags in mapping.xml file.
Here is the solution: In the class definition, we can write the configuration part using annotations. The annotations are used for classes, properties, and methods. Annotations starts with ‘@’ symbol. Annotations are declared before the class, property or method is declared. All annotations of JPA are defined in javax.persistence package.
Here follows the list of annotations used in our examples
Annotation Description
@Entity This annotation specifies to declare the class as entity or a table.
@Table This annotation specifies to declare table name.
@Basic This annotation specifies non constraint fields explicitly.
@Embedded This annotation specifies the properties of class or an entity whose value instance of an embeddable class.
@Id This annotation specifies the property, use for identity (primary key of a table) of the class.
@GeneratedValue This annotation specifies, how the identity attribute can be initialized such as Automatic, manual, or value taken from sequence table.
@Transient This annotation specifies the property which in not persistent i.e. the value is never stored into database.
@Column This annotation is used to specify column or attribute for persistence property.
@SequenceGenerator This annotation is used to define the value for the property which is specified in @GeneratedValue annotation. It creates a sequence.
@TableGenerator This annotation is used to specify the value generator for property specified in @GeneratedValue annotation. It creates a table for value generation.
@AccessType This type of annotation is used to set the access type. If you set @AccessType(FIELD) then Field wise access will occur. If you set @AccessType(PROPERTY) then Property wise assess will occur.
@JoinColumn This annotation is used to specify an entity association or entity collection. This is used in many- to-one and one-to-many associations.
@UniqueConstraint This annotation is used to specify the field, unique constraint for primary or secondary table.
@ColumnResult This annotation references the name of a column in the SQL query using select clause.
@ManyToMany This annotation is used to define a many-to-many relationship between the join Tables.
@ManyToOne This annotation is used to define a many-to-one relationship between the join Tables.
@OneToMany This annotation is used to define a one-to-many relationship between the join Tables.
@OneToOne This annotation is used to define a one-to-one relationship between the join Tables.
@NamedQueries This annotation is used for specifying list of named queries.
@NamedQuery This annotation is used for specifying a Query using static name.

Java Bean Standard

Java class, encapsulates the instance values and behaviors into a single unit callled object. Java Bean is a temporary storage and reusable component or an object. It is a serializable class which has default constructor and getter & setter methods to initialize the instance attributes individually.

Bean Conventions

  • Bean contains the default constructor or a file that contains serialized instance. Therefore, a bean can instantiate the bean.
  • The properties of a bean can be segregated into Boolean properties and non-Boolean properties.
  • Non-Boolean property contains getter and setter methods.
  • Boolean property contain setter and is method.
  • Getter method of any property should start with small lettered ‘get’ (java method convention) and continued with a field name that starts with capital letter. E.g. the field name is ‘salary’ therefore the getter method of this field is ‘getSalary ()’.
  • Setter method of any property should start with small lettered ‘set’ (java method convention), continued with a field name that starts with capital letter and the argument value to set to field. E.g. the field name is ‘salary’ therefore the setter method of this field is ‘setSalary (double sal)’.
  • For Boolean property, is method to check if it is true or false. E.g. the Boolean property ‘empty’, the is method of this field is ‘isEmpty ()’.

JPA - Installation

This chapter takes you through the process of setting up JPA on Windows and Linux based systems. JPA can be easily installed and integrated with your current Java environment following a few simple steps without any complex setup procedures. User administration is required while installation.

JPA - Entity Managers

This chapter takes you through simple example with JPA. Let us consider employee management as example. It means the employee management is creating, updating, finding, and deleting an employee. As mentioned above we are using MySQL database for database operations.
The main modules for this example are as follows:

JPA - JPQL

This chapter tells you about JPQL and how it works with persistence units. In this chapter, examples follow the same package hierarchy, which we used in the previous chapter as follows:

JPA - Advanced Mappings

JPA is a library which is released with java specification. Therefore, it supports all object oriented concepts for entity persistence. Till now we are done with the basics of object relational mapping. This chapter takes you through the advanced mappings between objects and relational entities.

JPA - Entity Relationships

This chapter takes you through the relationships between Entities. Generally the relations are more effective between tables in the database. Here the entity classes are treated as relational tables (concept of JPA), therefore the relationships between Entity classes are as follows:

JPA - Criteria API

The Criteria API is a predefined API used to define queries for entities. It is the alternative way of defining a JPQL query. These queries are type-safe, and portable and easy to modify by changing the syntax. Similar to JPQL it follows abstract schema (easy to edit schema) and embedded objects. The metadata API is mingled with criteria API to model persistent entity for criteria queries.

Java DIP - Useful Resources

The following resources contain additional information on JPA. Please use them to get more in-depth knowledge on this.

Discuss JPA

Java Persistence API is a collection of classes and methods to persistently store the vast amounts of data into a database which is provided by the Oracle Corporation. This tutorial provides you the basic understanding of Persistence (storing the copy of database object into temporary memory), and we will learn the understanding of JAVA Persistence API (JPA).

JOGL - Overview

This chapter introduces OpenGL, its functions, the OpenGL bindings in java (GL4java, LWJGL, JOGL), and the advantages of JOGL over other OpenGL bindings.

JOGL - Installation

This chapter covers setting up of the environment to use JOGL on your system using different Integrated Development Environments (IDEs).

JOGL - API for Basic Template

Using JOGL programming, it is possible to draw various graphical shapes such as straight lines, triangles, 3D shapes including special effects such as rotation, lighting, colors, etc. To draw objects in JOGL first of all we have to construct a basic JOGL frame. Below given are the classes required to construct a basic frame.

JOGL - Canvas with AWT

This chapter explains you how to draw a JOGL basic frame using Canvas with AWT frame. In here we will construct a AWT Frame and add the canvas object to the AWT frame using the add() method of the frame class.

JOGL - Canvas with Swing

This chapter explains you how to draw a JOGL basic frame using Canvas, and JFrame class of javax.swing package. In here we will instantiate a JFrame and add the canvas object to the instance of JFrame using the add() method.

JOGL - GLJPanel Class

This chapter explains you how to draw a JOGL basic frame using GLJpanel class. It is a lightweight Swing component which provides OpenGL rendering support. It is provided for compatibility with Swing. In here we will instantiate a JFrame and add the GLJpanel object to the instance of JFrame using the add() method.

JOGL - Drawing Basics

OpenGL API has provided primitive methods for drawing basic graphical elements such as point, vertex, line etc. Using these methods, you can develop shapes such as triangle, polygon and circle. In both, 2D and 3D dimensions. This chapter teaches you how to draw a basic line using JOGL in a Java program.

JOGL - Drawing with GL Lines

In the Previous chapter we have learned how draw a basic line using JOGL. We draw lines by passing a predefined field, Gl_lines to glBegin() method.
This chapter provides examples to draw shapes like triangle, rhombus and a house, using glBegin() method and GL_Lines.

JOGL - Pre Defined Shapes

In the Previous chapters we have learned how draw a shapes such as line, triangle, rhombus using JOGL. We draw lines by passing a predefined field, Gl_lines to glBegin() method.
Other than GL_LINES, the glBegin() method accepts eight more parameters. You can use them to draw different shapes.

JOGL - Transformation

OpenGL provides more features such as applying colors to an object, scaling, lighting, rotating an object, etc. This chapter describes some of the transformations on objects using JOGL.

JOGL - Coloring

This chapter teaches you how to apply colours to the objects using JOGL. To apply colour to an object, use the method glColor() of GL2. Below given is the syntax for using glColor method.

JOGL - Scaling

This chapter teaches you how to scale an object ie., increase or decrease the size of an object using JOGL.
Scaling an object is done by using the glScalef(float x, float y, float z) method of GLMatrixFunc interface. This method accepts three floating point parameters, using which we specify the scale factors along the x, y, and z axes respectively.

JOGL - Rotation

In this chapter we explained you how to rotate an object using JOGL. Rotation of objects can be done along any of the three axes, using the glRotatef(float angle, float x, float y, float z) method of GLMatrixFunc interface. You need to pass an angle of rotation and x, y, z axes as parameters to this method.
The following steps guide you to rotate an object successfully −

JOGL - Lighting

This chapter explains you how to apply lighting effect to an object using JOGL.
To set lighting, initially enable lighting using the glEnable() method. Then apply lighting for the objects, using the glLightfv(int light, int pname, float[] params, int params_offset) method of GLLightingFunc interface. This method takes four parameters.

JOGL - 3D Basics

In previous chapters we have seen how to create 2d objects, apply effects to it, and transform the object. This chapter teaches you how to draw a line with 3rd dimension, and some shapes.

JOGL - 3D Triangle

In previous chapter we have seen how to draw 3d shapes, this chapter teaches you how to draw 3d triangle and rotate it.
Below given is the program to draw a 3d triangle an rotate it.

JOGL - 3D Cube

In the previous chapters we have seen how to draw 3d triangle and rotate it. Now in this chapter you can learn how to a 3d cube, how to rotate it, how to attach an image on it. In the same way, This chapter provides examples to draw a 3D cube and apply colours to it and attach image to it.

JOGL - Appendix

GPU − Graphical processing unit, it is a special electronic device that accelerates the rendering of images.
JNI − Java Native Interface. Using which, java access native methods.

JOGL - Useful Resources

The following resources contain additional information on JOGL. Please use them to get more in-depth knowledge on this topic.

Discuss JOGL

Java binding for OpenGL (JOGL) is an open source library for binding OpenGL graphics in Java. This tutorial provides a basic understanding of JOGL library and its features. It also explains how to develop 2D and 3D graphics applications using JOGL.