Before going into the details of JMeter, let us first understand a few jargons associated with the testing of any application.

Friday, January 20, 2017
jMeter - Environment
JMeter is a framework for Java, so the very first requirement is to have JDK installed in your machine.
System Requirement
jMeter - Build Test Plan
What is a Test Plan?
A Test Plan can be viewed as a container for running tests. It defines what to test and how to go about it. A complete test plan consists of one or more elements such as thread groups, logic controllers, sample-generating controllers, listeners, timers, assertions, and configuration elements. A test plan must have at least one thread group.jMeter - Test Plan Elements
A JMeter Test Plan comprises of test elements discussed below. A Test
Plan comprises of at least one Thread Group. Within each Thread Group,
we may place a combination of one or more of other elements − Sampler,
Logic Controller, Configuration Element, Listener, and Timer. Each
Sampler can be preceded by one or more Pre-processor element, followed
by Post-processor element, and/or Assertion element. Let us see each of
these elements in detail −
jMeter - Web Test Plan
Let us build a simple test plan which tests a web page. We write a
test plan in Apache JMeter so that we can test the performance of the
web page shown by the URL − http://www.tutorialspoint.com/.
jMeter - Database Test Plan
In this chapter, we will see how to create a simple test plan to test
the database server. For our test purpose we use the MYSQL database
server. You can use any other database for testing. For installation and
table creation in MYSQL please refer MYSQL Tutorial.
jMeter - FTP Test Plan
In this chapter, we will see how to test a FTP site using JMeter. Let us create a Test Plan to test the FTP site.
Rename Test Plan
jMeter - Webservice Test Plan
In this chapter, we will learn how to create a Test Plan to test a
WebService. For our test purpose, we have created a simple webservice
project and deployed it on the Tomcat server locally.
jMeter - JMS Test Plan
In this chapter, we will learn how to write a simple test plan to
test Java Messaging Service (JMS). JMS supports two types of messaging −
jMeter - Monitor Test Plan
In this chapter, we will discuss how to create a Test Plan using
JMeter to monitor webservers. The uses of monitor tests are as follows −
jMeter - Listeners
Listeners provide access to the information JMeter gathers about the
test cases while JMeter runs. The results or information gathered by
listeners can be shown in the form of −
jMeter - Functions
JMeter Functions and User Variables
JMeter functions are special values that can populate fields of any Sampler or other element in a test tree.- A function call looks like this −
jMeter - Regular Expressions
Regular expressions are used to search and manipulate text, based on
patterns. JMeter interprets forms of regular expressions or patterns
being used throughout a JMeter test plan, by including the pattern
matching software Apache Jakarta ORO.
jMeter - Best Practices
JMeter has some limitations especially when it is run in a
distributed environment. Following these guidelines will assist in
creating a real and continuous load −
jMeter - Useful Resources
The following resources contain additional information on JMeter. Please use them to get more in-depth knowledge on this topic.
Discuss jMeter
jMeter is an open source testing software. It is 100% pure Java
application for load and performance testing. jMeter is designed to
cover various categories of tests such as load testing, functional
testing, performance testing, regression testing, etc., and it requires
JDK 5 or higher. This tutorial provides an in-depth coverage of jMeter
framework including its test plans, listeners, functions, and regular
expressions.
JFreeChart - Overview
A chart is a graphical representation of information. There are
various tools available, which can be used to create different types of
charts.
This tutorial helps you to understand what exactly the JfreeChart is, why is it required and the various ways to create different types of charts within a Java based application or independently.
This tutorial helps you to understand what exactly the JfreeChart is, why is it required and the various ways to create different types of charts within a Java based application or independently.
JFreeChart Installation
This chapter takes you through the process of setting up JFreeChart
on Windows and Linux. User administration is needed while installing the
JFreeChart. The JFreeChart is famous for its efficient chart creation,
and user-friendly installation setup.
JFreeChart Architecture
This chapter explains basic class level and application level
architectures of JFreeChart to give you an idea about how JFreeChart
interacts with different classes and how it fits in your Java based
application.
JFreeChart Referenced APIs
In this chapter, we will discuss about some important packages,
classes and methods from JFreeChart library. These packages, classes and
methods are the most frequently used while creating a variety of charts
using JFreeChart library.
JFreeChart - Pie Chart
In a pie chart, the arc length of each sector is proportional to the
quantity it represents. This chapter demonstrates how we can use
JFreeChart to create Pie Chart from a given set of business data.
JFreeChart - Bar Chart
This chapter demonstrates how we can use JFreeChart to create Bar Chart from a given set of business data.
A bar chart uses different orientation (horizontal or vertical) bars to show comparisons in various categories. One axis (domain axis) of the chart shows the specific domain being compared, and the other axis (range axis) represents discrete values.
A bar chart uses different orientation (horizontal or vertical) bars to show comparisons in various categories. One axis (domain axis) of the chart shows the specific domain being compared, and the other axis (range axis) represents discrete values.
JFreeChart - Line Chart
A line chart or line graph displays information as a series of data
points (markers) connected by straight line segments. Line Chart shows
how the data changes at equal time frequency. This chapter demonstrates
how we can use JFreeChart to create Line Chart from a given set of business data.
JFreeChart - XY Chart
The xy chart (scatter) is based on one data series consisting of a
list of x and y values. Each value pair (x,y) is a point in a coordinate
system. Here, one value determines the horizontal (X) position, and the
other determines the vertical (Y) position. This chapter demonstrates
how we can use JFreeChart to create XY Chart from a given set of business data.
JFreeChart - 3D Pie/Bar Chart
The 3D charts are the ones, which appear in a three-dimensional
format. You can use these charts to provide better display and clear
information. A 3D Pie chart is same as the pie chart additionally with a
nice 3D effect. A 3D effect can achieved by adding a little extra code
which will take care of creating 3D effect in a pie chart.
JFreeChart - Bubble Chart
This chapter demonstrates how you can use JFreeChart to create Bubble Chart
from a given set of business data. A bubble chart displays information
in three-dimensional way. A bubble is plotted at the place where (x, y)
coordinate intersect. The size of the bubble is considered as range or
quantity of X and Y axis.
JFreeChart - TimeSeries Chart
A time series chart displays sequence of data points, which varies at
equal intervals of time. This chapter demonstrates how we can use
JFreeChart to create Time Series Chart from a given set of business data.
JFreeChart - File Interface
So far we studied how to create various types of charts using
JFreeChart APIs using static data. But in production environment, data
is provided in the form of text file with a predefined format, or it
comes directly from the database.
JFreeChart - Database Interface
This chapter explains how you can read simple data from a database
table and then use JFreeChart to create a chart of your choice.
JFreeChart - Useful Resources
The following resources contain additional information on JFreeChart.
Please use them to get more in-depth knowledge on this topic.
Useful Links on JFreeChart
- JFreeChart − Official website on JFreeChart.
- JFreeChart Documentation − JFreeChart (JFreeChart Class Library (version x.x.x))
- JFreeChart @ Wikipedia − Brief description of JFreeChart on wikipedia.
- JFreeChart (FSE) − This is a development version of JFreeChart that has been branched from the JFreeChart 1.0.x series
Useful Books on Java


Discuss JFreeChart
This tutorial describes various ways to incorporate JFreeChart in
Java based standalone and web based applications. It will give you a
quick start with JFreeChart and make you comfortable with JFreeChart
programming with Java applications.
JDBC - Introduction
What is JDBC?
JDBC stands for Java Database Connectivity, which is a standard Java API for database-independent connectivity between the Java programming language and a wide range of databases.The JDBC library includes APIs for each of the tasks mentioned below that are commonly associated with database usage.
JDBC - SQL Syntax
Structured Query Language (SQL) is a
standardized language that allows you to perform operations on a
database, such as creating entries, reading content, updating content,
and deleting entries.
SQL is supported by almost any database you will likely use, and it allows you to write database code independently of the underlying database.
SQL is supported by almost any database you will likely use, and it allows you to write database code independently of the underlying database.
JDBC - Environment Setup
To start developing with JDBC, you should setup your JDBC environment
by following the steps shown below. We assume that you are working on a
Windows platform.
JDBC - Sample, Example Code
This chapter provides an example of how to create a simple JDBC
application. This will show you how to open a database connection,
execute a SQL query, and display the results.
All the steps mentioned in this template example, would be explained in subsequent chapters of this tutorial.
All the steps mentioned in this template example, would be explained in subsequent chapters of this tutorial.
JDBC - Driver Types
What is JDBC Driver?
JDBC drivers implement the defined interfaces in the JDBC API, for interacting with your database server.For example, using JDBC drivers enable you to open database connections and to interact with it by sending SQL or database commands then receiving results with Java.
JDBC - Database Connections
After you've installed the appropriate driver, it is time to establish a database connection using JDBC.
The programming involved to establish a JDBC connection is fairly simple. Here are these simple four steps
The programming involved to establish a JDBC connection is fairly simple. Here are these simple four steps
JDBC - Statements, PreparedStatement and CallableStatement
Once a connection is obtained we can interact with the database. The JDBC Statement, CallableStatement, and PreparedStatement
interfaces define the methods and properties that enable you to send
SQL or PL/SQL commands and receive data from your database.
JDBC - Result Sets
The SQL statements that read data from a database query, return the
data in a result set. The SELECT statement is the standard way to select
rows from a database and view them in a result set. The java.sql.ResultSet interface represents the result set of a database query.
JDBC - Data Types
The JDBC driver converts the Java data type to the appropriate JDBC
type, before sending it to the database. It uses a default mapping for
most data types. For example, a Java int is converted to an SQL INTEGER.
Default mappings were created to provide consistency between drivers.
JDBC - Transactions
If your JDBC Connection is in auto-commit mode, which it is by default, then every SQL statement is committed to the database upon its completion.
That may be fine for simple applications, but there are three reasons why you may want to turn off the auto-commit and manage your own transactions −
That may be fine for simple applications, but there are three reasons why you may want to turn off the auto-commit and manage your own transactions −
JDBC - Exceptions Handling
Exception handling allows you to handle exceptional conditions such as program-defined errors in a controlled fashion.
JDBC - Batch Processing
Batch Processing allows you to group related SQL statements into a batch and submit them with one call to the database.
When you send several SQL statements to the database at once, you reduce the amount of communication overhead, thereby improving performance.
When you send several SQL statements to the database at once, you reduce the amount of communication overhead, thereby improving performance.
JDBC - Stored Procedure
We have learnt how to use Stored Procedures in JDBC while discussing the JDBC - Statements chapter. This chapter is similar to that section, but it would give you additional information about JDBC SQL escape syntax.
JDBC - Streaming ASCII and Binary Data
A PreparedStatement object has the ability to use input and output
streams to supply parameter data. This enables you to place entire files
into database columns that can
hold large values, such as CLOB and BLOB data types.
JDBC - Create Database Example
This tutorial provides an example on how to create a Database using
JDBC application. Before executing the following example, make sure you
have the following in place −
JDBC - Select Database Example
This chapter provides an example on how to select a Database using
JDBC application. Before executing the following example, make sure you
have the following in place −
JDBC - Drop Database Example
This chapter provides an example on how to drop an existing Database
using JDBC application. Before executing the following example, make
sure you have the following in place −
JDBC - Create Tables Example
This chapter provides an example on how to create a table using JDBC
application. Before executing the following example, make sure you have
the following in place −
JDBC - Drop Tables Example
This chapter provides an example on how to delete a table using JDBC
application. Before executing the following example, make sure you have
the following in place −
JDBC - Insert Records Example
This chapter provides an example on how to insert records in a table
using JDBC application. Before executing following example, make sure
you have the following in place −
JDBC - Select Records Example
This chapter provides an example on how to select/ fetch records from
a table using JDBC application. Before executing the following example,
make sure you have the following in place −
JDBC - Update Records Example
This chapter provides an example on how to update records in a table
using JDBC application. Before executing the following example, make
sure you have the following in place −
JDBC - Delete Records Example
This chapter provides an example on how to delete records from a
table using JDBC application. Before executing following example, make
sure you have the following in place −
JDBC - WHERE Clause Example
This chapter provides an example on how to select records from a
table using JDBC application. This would add additional conditions using
WHERE clause while selecting records from the table. Before executing
the following example, make sure you have the following in place −
JDBC - Like Clause Example
This chapter provides an example on how to select records from a
table using JDBC application. This would add additional conditions using
LIKE clause while selecting records from the table. Before executing
the following example, make sure you have the following in place −
JDBC - Sorting Data Example
This chapter provides an example on how to sort records from a table using JDBC application. This would use asc and desc
keywords to sort records in ascending or descending order. Before
executing the following example, make sure you have the following in
place −
JDBC Questions and Answers
JDBC Questions and Answers has been designed with a special intention of helping students and professionals preparing for various Certification Exams and Job Interviews.
This section provides a useful collection of sample Interview Questions
and Multiple Choice Questions (MCQs) and their answers with
appropriate explanations.
JDBC - Useful Resources
The following resources contain additional information on JDBC Please use them to get more in-depth knowledge on this topic.
Discuss JDBC
JDBC API is a Java API that can access any kind of tabular data,
especially data stored in a Relational Database. JDBC works with Java on
a variety of platforms, such as Windows, Mac OS, and the various
versions of UNIX.
JDB - Introduction
Debugging is a technical procedure to find and remove bugs or defects
in a program and get expected results. Debugging includes testing and
monitoring. It is very complex when the subunits of a program are
tightly coupled.
JDB - Installation
This chapter explains how to install JDB on Windows and Linux based
systems. JDB is a part of JDK. Therefore, JDK installation is enough for
using JDB in command prompt.
JDB - Syntax
This chapter explains the syntax of JDB command. The syntax contains four sections listed as follows:
- JDB
- option
- class
- arguments
JDB - Options
This chapter describes the important options available in JDB that are submitted as arguments with the jdb command.
JDB - Session
This chapter describes how to start a JDB session in different ways.
JDB launch is the frequently used technique to start a JDB session.
There are two different ways to start a JDB session:
There are two different ways to start a JDB session:
JDB - Basic Commands
This chapter takes you through the basic commands of JDB. After
launching a session, these commands are used for debugging a program.
The following is the list of commands used for debugging.
The following is the list of commands used for debugging.
JDB - Breakpoints
This chapter explains the concept of breakpoints and how to set
breakpoints in a program. A breakpoint introduces an explicit stop or
pause in the execution of a program at a particular line of code while
debugging. It is useful to acquire knowledge about variables in the
program in its execution.
JDB - Stepping
This chapter explains how to use the concept of Stepping in debugging
a program. Stepping is the debugger feature that lets you execute the
code by stepping through line by line. Using this, you can examine each
line of the code to ensure they are behaving as intended.
JDB - Exception
This chapter explains how to handle the exception class using JDB.
Generally, whenever a program raises an exception without a catch
statement, then the VM prints the exception line, the cause of the
exception, and exits.
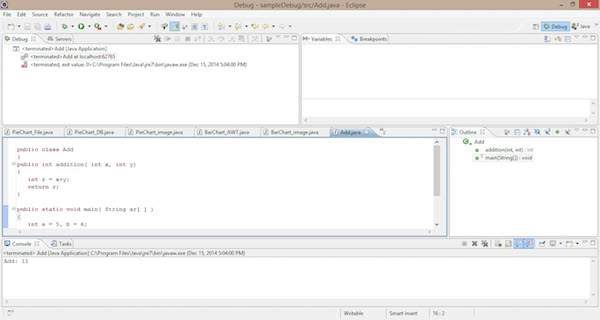
JDB - In Eclipse
This chapter explains how to use JDB in Eclipse. Before proceeding
further, you need to install Eclipse Indigo. Follow the steps given
below to install Eclipse Indigo on your system.
On the Eclipse IDE, go to Window -> Open perspective -> Debug. Now you get the debug perspective for the program Add.java. You get to see the following window.
 Observe the following options in the given screenshot:
Start debugging : Follow the instructions given below to start debugging.
Right click on the code -> click Debug as -> click 1 Java application.
The process of debugging starts as shown in the following screenshot. It contains some selected options, highlighted using numeric digits.
 Follow the given steps and sections to debug your code in eclipse IDE. By default, every IDE contains this debugging process.
Step 1: Download and Install Eclipse
You can download Eclipse from the following link: http://www.eclipse.org/downloads/packages/eclipse-ide-java-ee-developers/indigosr2Step 2: Create a New Project and a New Class
- Create a new Java project by following the options File-> New -> Java project.
- Name it as “sampledebug”.
- Create a new class by right clicking on the samplebebug project.
- Select options ->new -> class
- Name it as “Add.java”
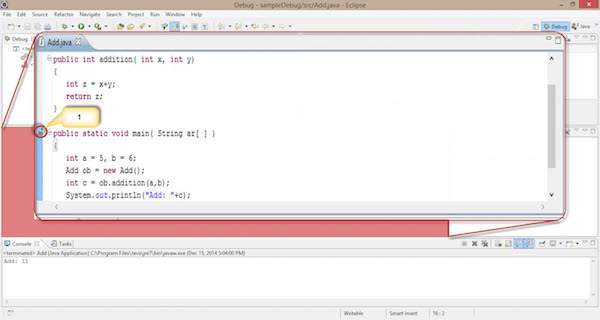
Add.java
public class Add
{
   public int addition( int x, int y)
   {
      int z = x + y;
      return z;
   }
   public static void main( String ar[ ] )
   {
      int a = 5, b = 6;
      Add ob = new Add();

      int c = ob.addition(a,b);
      System.out.println("Add: " + c);
   }
}
Step 3: Open the Debug Perspective
Follow the instructions given below to open the debug perspective.On the Eclipse IDE, go to Window -> Open perspective -> Debug. Now you get the debug perspective for the program Add.java. You get to see the following window.
Sections in Debug Perspective
The sections in the Debug perspective are as follows:Coding Section
Java code is displayed in this section. It is the code you want to debug, that is, Add.java. Here we can add a breakpoint on a line by double clicking in front of the line. You find the blue bubble with an arrow symbol to point out the breakpoint of that line. See the following screenshot; you can find the selected area with a red circle pointed as “1”.- Double click here. You can set the breakpoint for this line.
Breakpoint Section
This section defines the list of breakpoints that are set to the program code. Here we can add, delete, find, and manage the breakpoints. The following screenshot shows the breakpoint section.
Observe the following options in the given screenshot:- Using the check box in the left, we can select or deselect a breakpoint. Here, we use one breakpoint, i.e., Add class-main() method.
- The single cross icon “X” is used to delete the selected breakpoint.
- The double cross icon “XX” is used to delete all the breakpoints in your code.
- The arrow pointer is used to point to the code where the selected breakpoint is applied.
- Hitcount : It shows how many times the control hits this breakpoint. It is used for recursive logic.
- Suspend thread : We can suspend the current thread by selecting it.
- Suspend VM : We can suspend the VM by selecting it.
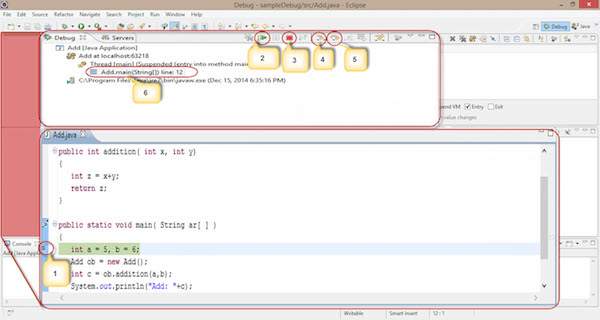
Debug Section
This section is used for the process of debugging. It contains options that are used in debugging.Start debugging : Follow the instructions given below to start debugging.
Right click on the code -> click Debug as -> click 1 Java application.
The process of debugging starts as shown in the following screenshot. It contains some selected options, highlighted using numeric digits.
- We apply a breakpoint on the Add class main() method. When we start debugging, the controller gets stuck at the first line of the main() method.
- It is used to Resume the debugging process and skip the current breakpoint. It works similar to the cont command in the JDB command line.
- It is used to stop the debugging process.
- It works similar to the step in process in the JDB command line. It is used for moving the control to the next line, i.e., point “1” moves to the next line.
- It works similar to the step over process in the JDB command line.
- It is used to see on which line the breakpoint is applied.
Follow the given steps and sections to debug your code in eclipse IDE. By default, every IDE contains this debugging process.JDB - Useful Resources
The following resources contain additional information on JDB. Please use them to get more in-depth knowledge on this topic.
Discuss JDB
The Java Debugger, commonly known as jdb, is a useful tool to detect
bugs in Java programs. This is a brief tutorial that provides a basic
overview of how to use this tool in practice. In addition, the tutorial
also covers how to debug a program through stepping, breakpoints, and
managing exceptions.
jBPM5 - Overview
JBPM stands for "Java Business Process Management". It is a JBoss
product which is an open source framework. Before moving further, let us
first define a business process.
jBPM5 - Eclipse Plugin
The following are the Prerequisites to install jBPM Plugin −
- Java 1.5 (or higher) SE JDK
- Eclipse 4.2 or any version and the jBPM plugin
jBPM5 - Hello World!
Here in this chapter, we will write our first program "Hello World" using jBPM. Follow the steps given below −
Go to File → New → Drools Project −
Go to File → New → Drools Project −
jBPM5 - Components
BPMS core is the heart of the BPM. The following illustration depicts the BPMS core and its components.
jBPM5 - Workflow Components
The following screenshot show the various workflow components
available in jBPM 5. Using these components, you can create a workflow
to orchestrate your process.
jBPM5 - Draw & Validate a Workflow
To draw a workflow, you can use any of the components available in
the palette as described in above article. All the workflow will have
one start but it can have multiple end.
With the help of screenshots, I will depict you how to create a workflow.
With the help of screenshots, I will depict you how to create a workflow.
jBPM5 - Example
We will take an example in this chapter to explain how to put jBPM
into practice. The task at hand is to use jBPM to decide whether a
passenger will board a flight or a train, depending upon his income.
jBPM5 - Useful Resources
The following resources contain additional information on jBPM5. Please use them to get more in-depth knowledge on this.
Discuss jBPM5
Organizations throughout the world have been searching for a structured
approach of designing their actions or transactions which can be
transformed by implementing them using automated solutions. jBPM is one
such tool that helps business automation needs of an organization. This
tutorial provides an overview of how to use jBPM 5 in practice.
JavaMail API - Overview
The JavaMail API provides a platform-independent and
protocol-independent framework to build mail and messaging applications.
The JavaMail API provides a set of abstract classes defining objects
that comprise a mail system. It is an optional package (standard
extension) for reading, composing, and sending electronic messages.
JavaMail API - Environment Setup
To send an e-mail using your Java Application is simple enough but to start with you should have JavaMail API and Java Activation Framework (JAF) installed on your machine.
JavaMail API - Core Classes
The JavaMail API consists of some interfaces and classes used to
send, read, and delete e-mail messages. Though there are many packages
in the JavaMail API, will cover the main two packages that are used in
Java Mail API frequently: javax.mail and javax.mail.internet package. These packages contain all the JavaMail core classes. They are:
JavaMail API - Sending Emails
Now that we have a fair idea about JavaMail API and its core classes,
let us now write a simple programs which will send simple email, email
with attachments, email with HTML content and email with inline images.
Basic steps followed in all the above scenarios are as below:
Basic steps followed in all the above scenarios are as below:
JavaMail API - Checking Emails
There are two aspects to which needs to understood before proceeding with this chapter. They are Check and Fetch.
- Checking an email in JavaMail is a process where we open
the respective folder in the mailbox and get each message. Here we only
check the header of each message i.e the From, To, subject. Content is not read.
JavaMail API - Fetching Emails
In the previous chapter we learnt how to check emails. Now let us see
how to fetch each email and read its content. Let us write a Java class
FetchingEmail which will read following types of emails:
JavaMail API - Authentication
In the previous chapters Checking Emails and Fetching Emails,
we passed authorization credentials (user ad password) along with host,
when connecting to store of your mailbox. Instead we can configure the Properties to have the host, and tell the Session about your custom Authenticator instance. This is shown in the example below:
JavaMail API - Replying Emails
In this chapter we will see how to reply to an email using JavaMail API. Basic steps followed in the program below are:
- Get the Session object with POP and SMPT server details in the properties. We would need POP details to retrieve messages and SMPT details to send messages.
JavaMail API - Forwarding Emails
In this chapter we will see how to forward an email using JavaMail API. Basic steps followed in the program below are:
- Get the Session object with POP and SMPT server details in the properties. We would need POP details to retrieve messages and SMPT details to send messages.
JavaMail API - Deleting Emails
In this chapter we will see how to delete an email using JavaMail API. Deleting messages involves working with the Flags associated with the messages. There are different flags for different states, some system-defined and some user-defined. The predefined flags are defined in the inner class Flags.Flag and are listed below:
JavaMail API - Gmail SMPT Server
In all previous chapters we used JangoSMPT server to send emails. In this chapter we will learn about SMPT server provided by Gmail. Gmail (among others) offers use of their public SMTP server free of charge.
JavaMail API - Folder Management
So far, we’ve worked in our previous chapters mostly with the INBOX
folder. This is the default folder in which most mail resides. Some
systems might call it as INBOX and some other might call it by some
other name. But,you can always access it from the JavaMail API using the
name INBOX.
JavaMail API - Quota Management
A quota in JavaMail is a limited or fixed number or amount of messages in a email store. Each Mail service request counts toward the JavaMail API Calls quota. An email service can apply following quota criterion:
JavaMail API - Bounced Messages
A message can be bounced for several reasons. This problem is discussed in depth at rfc1211. Only a server can determine the existence of a particular mailbox or user name. When the server detects an error, it will return a message indicating the reason for the failure to the sender of the original message.
JavaMail API - SMTP Servers
SMTP is an acronym for Simple Mail Transfer Protocol. It is an Internet standard for electronic mail (e-mail) transmission across Internet Protocol (IP) networks. SMTP uses TCP port 25. SMTP connections secured by SSL are known by the shorthand SMTPS, though SMTPS is not a protocol in its own right.
JavaMail API - IMAP Servers
IMAP is Acronym for Internet Message Access Protocol. It is an
Application Layer Internet protocol that allows an e-mail client to
access e-mail on a remote mail server. An IMAP server typically listens
on well-known port 143. IMAP over SSL (IMAPS) is assigned to port number
993.
JavaMail API - POP3 Servers
Post Office Protocol (POP) is an application-layer Internet standard protocol used by local e-mail clients to retrieve e-mail from a remote server over a TCP/IP connection. POP supports simple download-and-delete requirements for access to remote mailboxes. A POP3 server listens on well-known port 110.
JavaMail API - Useful Resources
If you want to list down your website, book or any other resource on
this page, then please contact at webmaster@tutorialspoint.com
Useful Websites on JavaMail API
- Download JavaMail - Download JavaMail API and associated documentation.
- Download JavaBeans Activation Framework (JAF) - Download JavaMail API and associated documentation
- Java 2 SDK, Standard Edition - Official site for Java 2 SDK, Standard Edition.
- Free Java Download - Download Java for your desktop computer now!
Discuss JavaMail API
The JavaMail API provides a platform-independent and
protocol-independent framework to build mail and messaging applications.
The JavaMail API provides a set of abstract classes defining objects
that comprise a mail system. It is an optional package (standard
extension) for reading, composing, and sending electronic messages.
Subscribe to:
Posts (Atom)