Joomla is an open source Content Management System (CMS),
which is used to build websites and online applications. It is free and
extendable which is separated into front-end and back-end templates
(administrator). Joomla is developed using PHP, Object Oriented
Programming, software design patterns and MySQL (used for storing the
data).

Friday, February 24, 2017
Joomla - Installation
System Requirements for Joomla 3.x
- Database − MySQL 5.1 +
- Web Server −
- WAMP (Windows)
- LAMP (Linux)
- XAMP (Multi-platform)
- MAMP (Macintosh)
- Nginx
- Microsoft IIS
Joomla - Architecture
Joomla is a Model-View-Controller web application. In this chapter,
we are going to discuss about the architectural style of Joomla. The
following diagram shows the architecture of Joomla.
Joomla - Control Panel
The Control Panel provides default features and functions of
Joomla to access through clickable icons, menu bar etc. When you login
to the Joomla administrative panel, you will get the screen as shown
below. Important icons of control panel and their functions are marked
in the following screen −
Joomla - Toolbar
In this chapter we will study about the various toolbar options in Joomla. Given below is a list of toolbars −
- Article Manager Toolbar
- Category Manager Toolbar
- Media Manager Toolbar
- Menu Manager Toolbar
- Module Manager Toolbar
Joomla - Menus
Menu manager allows creating custom menus for your website and allows navigation through your website.
Step (1) − Click on Menus → Menu Manager in Joomla administrator, you will get the following screen −
Step (1) − Click on Menus → Menu Manager in Joomla administrator, you will get the following screen −
Joomla - Content Menu
In this chapter, we will study about menus present under the Joomla content. A drop-down menu is displayed when you click on Content Menu.
Joomla - Components Menu
In this chapter, we will study about Components Menu in Joomla. Click on Components Menu, a dropdown menu as shown below will be displayed −
Joomla - Extensions Menu
In this chapter, we will study about Extensions Menu in Joomla. Click on Extensions, a dropdown menu as shown below will be displayed −
Joomla - Help Menu
In this chapter, we will study about menus present in the Help Menu in Joomla. Click on Help, a dropdown menu as shown below will be displayed −
Joomla - Create Menus
In this chapter, we will study the step-by-step procedure of how to Create Menus in Joomla. Menus are the important part and help to navigate through your website easily.
Step (1) − Click Menus → Menu Manager → Add New Menu as shown below.
Create Menus
Here are a few simple steps to create menus in Joomla.Step (1) − Click Menus → Menu Manager → Add New Menu as shown below.
Joomla - Adding Menu Items
In this chapter, we will study the step-by-step procedure of how to add new menu items in Joomla. Menu items can be created in the main menu (menu1), which we have already created in chapter Joomla - Create Menus.
Joomla - Modify Menu Items
In this chapter we will study the simple steps to modify menu items in Joomla. You can learn how to create menu in the chapter Joomla − Create Menu. You can also learn how to add menu items in a menu bar in the chapter Joomla − Adding Menu Items.
Step (1) − Click on Menus → Menu1 (Menu1 was created in the chapter Joomla - Create Menu) as shown below.
Step (1) − Click on Menus → Menu1 (Menu1 was created in the chapter Joomla - Create Menu) as shown below.
Joomla - Creating Submenus
In this chapter, we will study about Creating Submenus in
Joomla step by step. Submenu is a menu accessed from a general menu, it
can be either shown as one menu with more than two levels or as separate
menu modules.
Joomla - Create Modules
In this chapter, we will study about Creating Modules in Joomla. Modules are the extensions which are flexible and lightweight and useful for page rendering.
Step (1) − Create a folder called mod_firstmodule in your Joomla → modules folder.
Create Modules
Following are the simple steps to create modules in Joomla.Step (1) − Create a folder called mod_firstmodule in your Joomla → modules folder.
Joomla - Breadcrumb Module
In this chapter, we will study about Breadcrumb Module in
Joomla. A Breadcrumb is used to display the hierarchical representation
of the navigation links so that the users can easily understand where
they are in the website and allow them to navigate back.
Joomla - Feed Display Module
In this chapter, we will study about Feed Display Module in
Joomla. Feed Display Module is used to show the RSS News Feeds from a
website. It is a way to provide user with the updated content from other
resources.
Joomla - Footer Module
In this chapter, we will study about Footer Module in Joomla. Footer displays the information of Joomla license and the copyright of the website.
Step (1) − Click Extension → Module Manager in Joomla administrator. After clicking on Module Manager you will get the following screen.
Footer Module
Following are the simple steps to edit an existing Footer Module in Joomla.Step (1) − Click Extension → Module Manager in Joomla administrator. After clicking on Module Manager you will get the following screen.
Joomla - Latest News Module
In this chapter, we will study about Latest News Module in Joomla. Latest News Module is used to display the most recent published article in a list.
Step (1) − Click Extension → Module Manager in Joomla administrator control panel. Following screen will be displayed −
Latest News Module
Following are the simple steps to edit an existing Latest News Module in Joomla.Step (1) − Click Extension → Module Manager in Joomla administrator control panel. Following screen will be displayed −
Joomla - Search Module
In this chapter, we will study about Search Module in Joomla. Search Module is used to display a search box, where the user types a particular name to search the website.
Step (1) − Click Extension → Module Manager in Joomla administrator control panel, you get the following screen −
Search Module
Following are the simple steps to edit an existing Search Module in Joomla.Step (1) − Click Extension → Module Manager in Joomla administrator control panel, you get the following screen −
Joomla - Random Image Module
In this chapter, we will study about Random Image Module in Joomla. Random Image Module is used to display the images randomly from the selected directory.
Step (1) − Click Extension → Module Manager in Joomla administrator, the following screen will be displayed −
Random Image Module
Following are the simple steps to edit an existing Random Image Module in Joomla.Step (1) − Click Extension → Module Manager in Joomla administrator, the following screen will be displayed −
Joomla - Who's Online Module
In this chapter, we will study about Who's Online Module in Joomla. This module helps to display the user's information who are accessing the website.
Step (1) − Click Extension → Module Manager in Joomla administrator, the following screen will be displayed.
Who's Online Module
Following are the simple steps to edit an existing Who's Online Module in Joomla.Step (1) − Click Extension → Module Manager in Joomla administrator, the following screen will be displayed.
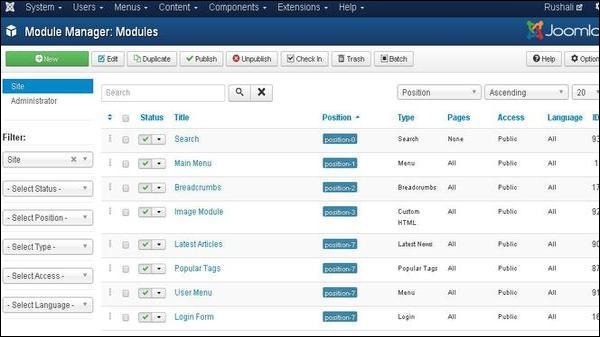
Joomla - Syndicate Module
In this chapter, we will study about Syndicate Module in
Joomla. Syndicate module helps in creating an RSS Feed link for the
page. It allows creating a Newsfeed by the user for the current page.
Step (1) − Click Extension → Module Manager in Joomla administrator,the following screen will be displayed.
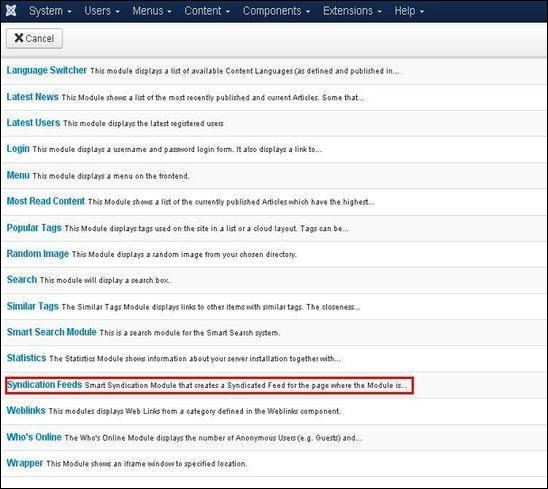
 Step (2) − Next, click on New button and the following screen will get displayed. On this page, click on the Syndication Feeds.
 Step (3) − Next, click on Syndication Feeds, the existing Syndicate module will get displayed as shown below.
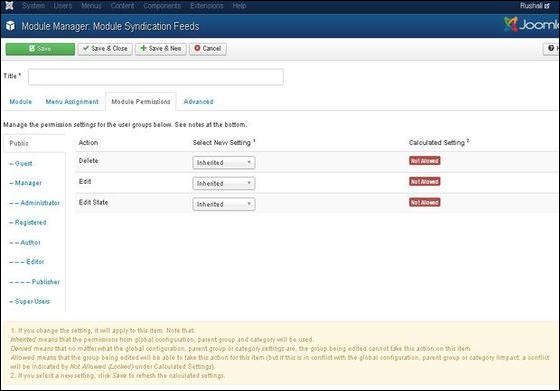
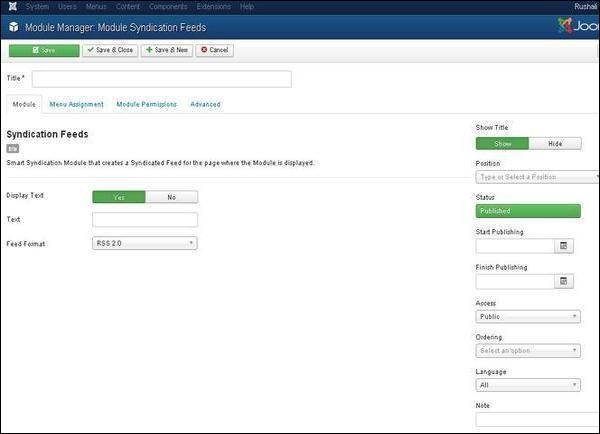 By default, the Module tab is displayed. Below, we have mentioned the details of the fields present in the Module tab.
Syndicate Module
Following are the simple steps to edit an existing Syndicate Module in Joomla.Step (1) − Click Extension → Module Manager in Joomla administrator,the following screen will be displayed.
Step (2) − Next, click on New button and the following screen will get displayed. On this page, click on the Syndication Feeds.
Step (3) − Next, click on Syndication Feeds, the existing Syndicate module will get displayed as shown below.
By default, the Module tab is displayed. Below, we have mentioned the details of the fields present in the Module tab.- Title − Displays the title of Module.
- Display Text − Text gets displayed by selecting option such as Yes or No.
- Text − The entered text will get displayed next to the icon when the Display Text is set as Yes. If the field is left empty then it will display a default text.
- Feed Format − The syndication Feed format is selected i.e. RSS 2.0 or Atom 1.0.
- Show Title − Displays the title of the module in the front end.
- Position − It will select the position of the module to be displayed.
- Status − It displays the status of the article such as Published, Unpublished and Trashed.
- Start Publishing − It will start publishing at the assigned date and time.
- Finish Publishing − It will finish publishing on the assigned date and time.
- Access − It allows access only to selected users from the dropdown list such as Guest, Public, Super Users, Registered and Special option to view the items.
- Ordering − Displays the dropdown of all modules present in the position.
- Language − It specifies the language of the site. It provides either ALL or English (UK) options.
- Note − It is used to enter the text information.
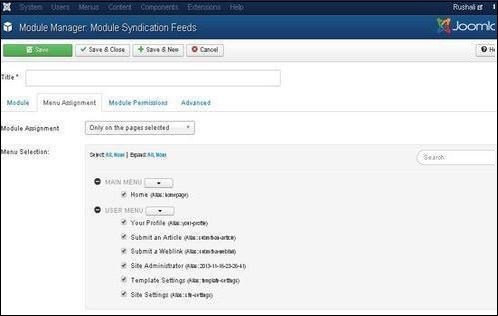
- Module Assignment − Select the option to view the item from the dropdown list such as on all pages, no pages, only on the pages selected or on all pages except those selected.
- Menu Selection− After selecting the option only on the pages selected or on all pages except those selected, it will display all menu items present in Joomla. It will allow assigning module to some and not all pages.
- Delete − It allows users in group to delete the content present in the module.
- Edit − It allows users in group to edit the content present in the module.
- Edit State − It allows users in the group to change the state of content present in the module.
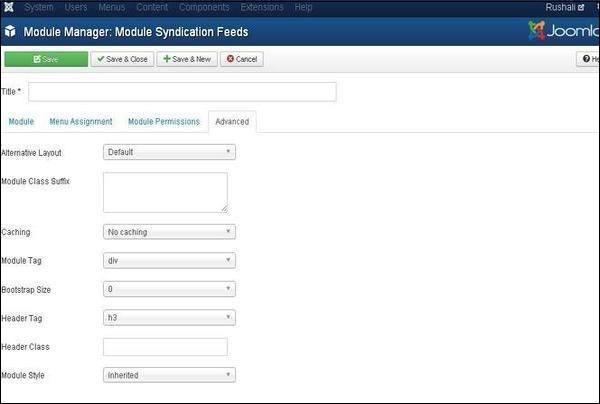
- Alternative Layout − Selects the layout to use for this module, which you have already defined as one or more layouts for module in Joomla or template.
- Module Class Suffix − Setting this parameter causes Joomla to either add a new CSS class or modify the existing CSS class for the div element for this specific module.
- Caching − Caches the content of the module. Use Global is used to cache settings from global configuration. No Caching is used, whether to cache the content of the module or not.
- Cache Time − Specifies the time in minutes before the module is re-cached.
- Module Tag − Specifies the HTML tag for the modules.
- Bootstrap Size − Selects width of the module built in bootstrap.
- Header Tag − Modules uses the HTML header tags.
- Header Class − Optional CSS classes are added in the module header.
- Module Style − Overrides the template style for its position.
Toolbar
Following are the details about the function tabs present on the toolbar of Syndicate module.- Save − Saves your modules.
- Save & Close − Saves the modules and will close the current screen.
- Save & New − Saves the modules and opens a new creating module screen.
- Cancel − Cancels the created modules in Joomla.
Joomla - Donation Module
In this chapter, we will study about Donation Module in Joomla.
Step (1) − Click Extension → Module Manager in Joomla administrator, the following screen will be displayed.
Donation Module
Following are the simple steps to edit an existing Donation Module in Joomla.Step (1) − Click Extension → Module Manager in Joomla administrator, the following screen will be displayed.
Joomla - System Settings
The Global Configuration is used for configuring Joomla site with
your personal settings. To access the system settings, just follow the
following steps −
Step (1) − Go to System → Global Configuration as shown in the following screen.
Step (1) − Go to System → Global Configuration as shown in the following screen.
Joomla - Media Settings
In this chapter, we will study about Joomla Media Settings.
Joomla Media Settings help to configure the global media files options
such like file format, MIME specifications, upload of files, size of
files etc.
Step (1) − Go to System → Global Configuration as shown in the following screen.
Joomla Media Settings
Following are the simple steps used to set the Joomla media options −Step (1) − Go to System → Global Configuration as shown in the following screen.
Joomla - Language Manager
In this chapter, we will study about Joomla Language Manager.
The Joomla language manager option is used to set the Native Title,
Language Code, SEF Prefix, and Image Prefixes of the installed or to be
installed languages.
Joomla - Private Messages
The messaging system allows to send messages to the back- end users of Joomla. You can send, read, write and delete messages.
Step (1) − You can create a new private message as shown in the screen below. Go to Components → Messaging → New Private Message to write a new private message.
Step (1) − You can create a new private message as shown in the screen below. Go to Components → Messaging → New Private Message to write a new private message.
Joomla - Mass Emailing
Mass Mail is used for sending emails to the group of registered users. Users can be selected based on groups.
Step (1) − To use this feature, go to Users → Mass Mail Users as shown in the screen below.
Step (1) − To use this feature, go to Users → Mass Mail Users as shown in the screen below.
Joomla - Cache Management
In this chapter, we will study about Joomla Cache Manager. You
can install the cache controller plug-in which helps to improve the
performance of Joomla. You can also turn off the cache on the particular
pages and component.
Joomla - Users Setting
In this chapter, we will study about Joomla Users Setting. It
gives options on how to configure the new users and provides various
options that help restrict new users from providing unwanted details.
Step (1) − Go to System → Global Configuration as shown in the following screen.
Joomla Users Setting
Following are the simple steps used for to set the Joomla users setting.Step (1) − Go to System → Global Configuration as shown in the following screen.
Joomla - Debug
In this chapter, we will study about Debug in Joomla. By
enabling the debug mode it helps to troubleshoot the various issues of
Joomla. It shows details of how Joomla is rendering Session Data,
Profile Information, Memory Usage and Database Queries.
Joomla - Template Manager
In this chapter, we will study about Template Manager in
Joomla. It manages the various templates that are used in the website.
The templates can be used without changing the content structure of the
website.
Step (1) − Click Extensions → Template Manager as shown below.
Template Manager
Following are the simple steps to edit the Template Manager in Joomla.Step (1) − Click Extensions → Template Manager as shown below.
Joomla - Customize Template
In this chapter, we will study about Template Customize Manager in Joomla. The Customize template allows editing or creating new files in the template.
Step (1) − Click Extensions → Template Manager as shown below.
Customize Template
Following are the simple steps to customize the template in Joomla.Step (1) − Click Extensions → Template Manager as shown below.
Joomla - Adding Template
In this chapter, we will study how to add / install Template in Joomla.
Step (1) − Click on Extensions → Extension Manager as shown below.
Adding Template
Following are the simple steps to add / install template in Joomla.Step (1) − Click on Extensions → Extension Manager as shown below.
Joomla - Creating Template
In this chapter, we will study how to create a template in Joomla.
Step (1) − Create a folder called MyFirstTemplate inside your Joomla → Templates folder. Inside MyFirstTemplate folder, create 2 more folders named as images and CSS to save all the images and CSS files.
Creating Templates
Following are the simple steps to create templates in Joomla −Step (1) − Create a folder called MyFirstTemplate inside your Joomla → Templates folder. Inside MyFirstTemplate folder, create 2 more folders named as images and CSS to save all the images and CSS files.
Joomla - Customize Logo
In this chapter, we will study about how to Customize Logo in Joomla. You can add the logo for your web sites and customize it as per your need.
Step (1) − Click on Extensions → Template Manager.
Joomla Customize Logo
Following are the simple steps used to set the customize logo in Joomla −Step (1) − Click on Extensions → Template Manager.
Joomla - Category Management
In this chapter, we will study about Category Management in Joomla. Category Manager is used to create categories for the article which allow grouping your content better.
Step (1) − Click on Category Manager in Control Panel as shown below.
Category Management
Following are the simple steps to add new category manager in Joomla.Step (1) − Click on Category Manager in Control Panel as shown below.
Joomla - Adding Content
In this chapter, we will study how to add content on the Joomla website.
Step (1) − Click on Content → Article Manager → Add New Article as shown below.
Adding Content
Following are the simple steps to add content in Joomla.Step (1) − Click on Content → Article Manager → Add New Article as shown below.
Joomla - Formatting Content
In this chapter, we will study how to format content on the Joomla website.
Step (1) − Click on Article Manager in Control Panel as shown below.
Formatting Content
Following are the simple steps to format content in Joomla −Step (1) − Click on Article Manager in Control Panel as shown below.
Joomla - Article Metadata
In this chapter, we will study about Article Metadata in Joomla. Metadata describes details of the article in short. It makes it easy to work with a particular data.
Step (1) − Go to System → Global Configuration as shown in the following screen.
Joomla - Article Metadata
Following are the simple steps used to set the Joomla article metadata −Step (1) − Go to System → Global Configuration as shown in the following screen.
Joomla - Adding Banners
In this chapter, we will study about Adding Banners in Joomla. It displays the active banners and allows you to use different banners for advertising on webpage.
Step (1) − Click Components → Banners → Banners in joomla administrator, you will get the following screen.
Adding Banners
Following are the simple steps to add Banners in Joomla.Step (1) − Click Components → Banners → Banners in joomla administrator, you will get the following screen.
Joomla - Adding Contacts
In this chapter, we will study about Adding Contacts in Joomla. It stores the contact details of the company.
Step (1) − Go to System → Global Configuration as shown in the following screen.
Joomla Adding Contacts
Following are the simple steps used to set the Joomla contacts.Step (1) − Go to System → Global Configuration as shown in the following screen.
Joomla - Adding News Feed
In this chapter, we will study about Adding News Feed in Joomla.
Step (1) − Go to System → Global Configuration as shown in the following screen.
Joomla Adding News Feed
Following are the simple steps used to add news feed.Step (1) − Go to System → Global Configuration as shown in the following screen.
Joomla - Adding Forum
In this chapter, we will study about Adding Forum in Joomla. We can install the forum extension in Joomla to share or discuss ideas and views on particular issues.
Step (1) − Click on Install Extensions option in Joomla.
Joomla Adding Forum
Following are the simple steps used to set the Joomla Adding Forum.Step (1) − Click on Install Extensions option in Joomla.
Joomla - Adding Web Links
In this chapter, we will study about Adding Web Links in Joomla. It allows you to insert, remove and edit the links to another webpage in Joomla.
Step (1) − Click Components → Weblinks → Links in Joomla administrator. After clicking on Links, you will get the following screen.
Adding Weblinks
Following are the simple steps to add Weblinks in Joomla −Step (1) − Click Components → Weblinks → Links in Joomla administrator. After clicking on Links, you will get the following screen.
Joomla - Plugin Manager
In this chapter, we will study about Plugin Manager in Joomla. It helps you enable and disable Joomla Plugins. This adds the unique features to an existing web site.
Joomla - Extensions Manager
In this chapter, we will study about Extensions Manager in Joomla. We can install different types of extensions to extend the functionality of the site.
Step (1) − Click on Install Extensions option in Joomla.
Joomla Extensions Manager
Following are the simple steps used to set the Joomla Extensions Manager.Step (1) − Click on Install Extensions option in Joomla.
Joomla - Website Backup
In this chapter, we will study about Website backup in Joomla. It allows backup of files, folders and re-opens it in Joomla.
Step (1) − Click on System → Global Configuration in Joomla administrator. You will get the following screen.
Website Backup
Following are the simple steps used to backup the website in Joomla −Step (1) − Click on System → Global Configuration in Joomla administrator. You will get the following screen.
Joomla - Website SEO
In this chapter, we will study about Website SEO in Joomla. SEO (Search Engine Optimization) is about optimizing a website for search engine. It helps search engines find and rank your site higher than the other sites in response to a search query.
Joomla - Interview Questions
Dear readers, these Joomla Interview Questions have been designed specially to get you acquainted with the nature of questions you may encounter during your interview for the subject of Joomla. As per my experience good interviewers hardly plan to ask any particular question during your interview, normally questions start with some basic concept of the subject and later they continue based on further discussion and what you answer:
Joomla - Quick Guide
Joomla - Overview
Joomla is an open source Content Management System (CMS), which is used to build websites and online applications. It is free and extendable which is separated into front-end and back-end templates (administrator). Joomla is developed using PHP, Object Oriented Programming, software design patterns and MySQL (used for storing the data).Joomla - Useful Resources
The following resources contain additional information on Joomla. Please use them to get more in-depth knowledge on this.
Discuss Joomla
Joomla is an open source Content Management System (CMS), which is used to build websites and online applications. It is free and extendable which is separated into front-end templates and back-end templates (administrator).
JavaScript - Overview
What is JavaScript ?
Javascript is a dynamic computer programming language. It is lightweight and most commonly used as a part of web pages, whose implementations allow client-side script to interact with the user and make dynamic pages. It is an interpreted programming language with object-oriented capabilities.JavaScript - Syntax
JavaScript can be implemented using JavaScript statements that are placed within the <script>... </script> HTML tags in a web page.
You can place the <script> tags, containing your JavaScript, anywhere within you web page, but it is normally recommended that you should keep it within the <head> tags.
You can place the <script> tags, containing your JavaScript, anywhere within you web page, but it is normally recommended that you should keep it within the <head> tags.
Enabling JavaScript in Browsers
All the modern browsers come with built-in support for JavaScript.
Frequently, you may need to enable or disable this support manually.
This chapter explains the procedure of enabling and disabling JavaScript
support in your browsers: Internet Explorer, Firefox, chrome, and
Opera.
JavaScript - Placement in HTML File
There is a flexibility given to include JavaScript code anywhere in
an HTML document. However the most preferred ways to include JavaScript
in an HTML file are as follows −
- Script in <head>...</head> section.
- Script in <body>...</body> section.
- Script in <body>...</body> and <head>...</head> sections.
- Script in an external file and then include in <head>...</head> section.
JavaScript - Variables
JavaScript Datatypes
One of the most fundamental characteristics of a programming language is the set of data types it supports. These are the type of values that can be represented and manipulated in a programming language.JavaScript allows you to work with three primitive data types −
JavaScript - Operators
What is an operator?
Let us take a simple expression 4 + 5 is equal to 9. Here 4 and 5 are called operands and ‘+’ is called the operator. JavaScript supports the following types of operators.JavaScript - if...else Statement
While writing a program, there may be a situation when you need to
adopt one out of a given set of paths. In such cases, you need to use
conditional statements that allow your program to make correct decisions
and perform right actions.
JavaScript - Switch Case
You can use multiple if...else…if statements, as in the
previous chapter, to perform a multiway branch. However, this is not
always the best solution, especially when all of the branches depend on
the value of a single variable.
JavaScript - While Loops
While writing a program, you may encounter a situation where you need
to perform an action over and over again. In such situations, you would
need to write loop statements to reduce the number of lines.
JavaScript supports all the necessary loops to ease down the pressure of programming.
JavaScript supports all the necessary loops to ease down the pressure of programming.
JavaScript - For Loop
The 'for' loop is the most compact form of looping. It includes the following three important parts −
- The loop initialization where we initialize our counter to a starting value. The initialization statement is executed before the loop begins.
JavaScript for...in loop
The for...in loop is used to loop through an object's
properties. As we have not discussed Objects yet, you may not feel
comfortable with this loop. But once you understand how objects behave
in JavaScript, you will find this loop very useful.
JavaScript - Loop Control
JavaScript provides full control to handle loops and switch
statements. There may be a situation when you need to come out of a loop
without reaching its bottom. There may also be a situation when you
want to skip a part of your code block and start the next iteration of
the loop.
JavaScript - Functions
A function is a group of reusable code which can be called anywhere
in your program. This eliminates the need of writing the same code again
and again. It helps programmers in writing modular codes. Functions
allow a programmer to divide a big program into a number of small and
manageable functions.
JavaScript - Events
What is an Event ?
JavaScript's interaction with HTML is handled through events that occur when the user or the browser manipulates a page.When the page loads, it is called an event. When the user clicks a button, that click too is an event. Other examples include events like pressing any key, closing a window, resizing a window, etc.
JavaScript and Cookies
What are Cookies ?
Web Browsers and Servers use HTTP protocol to communicate and HTTP is a stateless protocol. But for a commercial website, it is required to maintain session information among different pages. For example, one user registration ends after completing many pages. But how to maintain users' session information across all the web pages.JavaScript - Page Redirection
What is Page Redirection ?
You might have encountered a situation where you clicked a URL to reach a page X but internally you were directed to another page Y. It happens due to page redirection. This concept is different from JavaScript Page Refresh.JavaScript - Dialog Boxes
JavaScript supports three important types of dialog boxes. These
dialog boxes can be used to raise and alert, or to get confirmation on
any input or to have a kind of input from the users. Here we will
discuss each dialog box one by one.
JavaScript - Void Keyword
void is an important keyword in JavaScript which can be used
as a unary operator that appears before its single operand, which may be
of any type. This operator specifies an expression to be evaluated
without returning a value.
JavaScript - Page Printing
Many times you would like to place a button on your webpage to print
the content of that web page via an actual printer. JavaScript helps you
to implement this functionality using the print function of window object.
The JavaScript print function window.print() prints the current web page when executed. You can call this function directly using the onclick event as shown in the following example.
The JavaScript print function window.print() prints the current web page when executed. You can call this function directly using the onclick event as shown in the following example.
JavaScript - Objects Overview
JavaScript is an Object Oriented Programming (OOP) language. A
programming language can be called object-oriented if it provides four
basic capabilities to developers −
- Encapsulation − the capability to store related information, whether data or methods, together in an object.
JavaScript - The Number Object
The Number object represents numerical date, either integers or floating-point numbers. In general, you do not need to worry about Number objects because the browser automatically converts number literals to instances of the number class.
JavaScript - The Boolean Object
The Boolean object represents two values, either "true" or "false". If value parameter is omitted or is 0, -0, null, false, NaN, undefined, or the empty string (""), the object has an initial value of false.
Syntax
Use the following syntax to create a boolean object.var val = new Boolean(value);
JavaScript - The Strings Object
The String object lets you work with a series of characters;
it wraps Javascript's string primitive data type with a number of helper
methods.
JavaScript - The Arrays Object
The Array object lets you store multiple values in a single
variable. It stores a fixed-size sequential collection of elements of
the same type. An array is used to store a collection of data, but it is
often more useful to think of an array as a collection of variables of
the same type.
JavaScript - The Date Object
The Date object is a datatype built into the JavaScript language. Date objects are created with the new Date( ) as shown below.
Once a Date object is created, a number of methods allow you to operate on it. Most methods simply allow you to get and set the year, month, day, hour, minute, second, and millisecond fields of the object, using either local time or UTC (universal, or GMT) time.
Once a Date object is created, a number of methods allow you to operate on it. Most methods simply allow you to get and set the year, month, day, hour, minute, second, and millisecond fields of the object, using either local time or UTC (universal, or GMT) time.
JavaScript - The Math Object
The math object provides you properties and methods for mathematical constants and functions. Unlike other global objects, Math is not a constructor. All the properties and methods of Math are static and can be called by using Math as an object without creating it.
Regular Expressions and RegExp Object
A regular expression is an object that describes a pattern of characters.
The JavaScript RegExp class represents regular expressions, and both String and RegExp define methods that use regular expressions to perform powerful pattern-matching and search-and-replace functions on text.
The JavaScript RegExp class represents regular expressions, and both String and RegExp define methods that use regular expressions to perform powerful pattern-matching and search-and-replace functions on text.
JavaScript - Document Object Model or DOM
Every web page resides inside a browser window which can be considered as an object.
A Document object represents the HTML document that is displayed in that window. The Document object has various properties that refer to other objects which allow access to and modification of document content.
A Document object represents the HTML document that is displayed in that window. The Document object has various properties that refer to other objects which allow access to and modification of document content.
JavaScript - Errors & Exceptions Handling
There are three types of errors in programming: (a) Syntax Errors, (b) Runtime Errors, and (c) Logical Errors.
For example, the following line causes a syntax error because it is missing a closing parenthesis.
Syntax Errors
Syntax errors, also called parsing errors, occur at compile time in traditional programming languages and at interpret time in JavaScript.For example, the following line causes a syntax error because it is missing a closing parenthesis.
<script type="text/javascript">
JavaScript - Form Validation
Form validation normally used to occur at the server, after the
client had entered all the necessary data and then pressed the Submit
button. If the data entered by a client was incorrect or was simply
missing, the server would have to send all the data back to the client
and request that the form be resubmitted with correct information.
JavaScript - Animation
You can use JavaScript to create a complex animation having, but not limited to, the following elements −
- Fireworks
- Fade Effect
- Roll-in or Roll-out
- Page-in or Page-out
- Object movements
JavaScript - Multimedia
The JavaScript navigator object includes a child object called plugins.
This object is an array, with one entry for each plug-in installed on
the browser. The navigator.plugins object is supported only by Netscape,
Firefox, and Mozilla only.
JavaScript - Debugging
Every now and then, developers commit mistakes while coding. A mistake in a program or a script is referred to as a bug.
The process of finding and fixing bugs is called debugging and is a normal part of the development process. This section covers tools and techniques that can help you with debugging tasks..
The process of finding and fixing bugs is called debugging and is a normal part of the development process. This section covers tools and techniques that can help you with debugging tasks..
JavaScript - Image Map
You can use JavaScript to create client-side image map. Client-side image maps are enabled by the usemap attribute for the <img /> tag and defined by special <map> and <area> extension tags.
The image that is going to form the map is inserted into the page using the <img /> element as normal, except that it carries an extra attribute called usemap.
The image that is going to form the map is inserted into the page using the <img /> element as normal, except that it carries an extra attribute called usemap.
JavaScript - Browsers Compatibility
It is important to understand the differences between different
browsers in order to handle each in the way it is expected. So it is
important to know which browser your web page is running in.
To get information about the browser your webpage is currently running in, use the built-in navigator object.
To get information about the browser your webpage is currently running in, use the built-in navigator object.
Subscribe to:
Posts (Atom)