
By overriding fields() and extraFields() methods, you can
define what data can be put into a response. The difference between
these two methods is that the former defines the default set of fields,
which should be included in the response while the latter defines
additional fields, which may be included in the response if an end user
requests for them via the expand query parameter.
Step 1 − Modify the MyUser model this way.
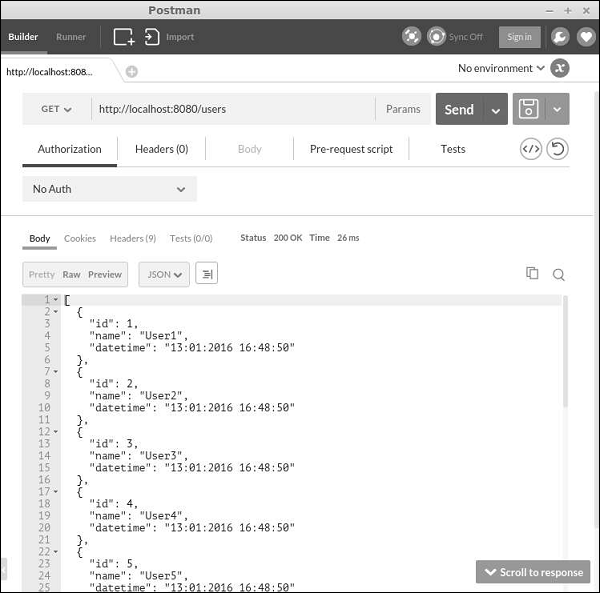
Step 2 − In Postman, run the URL http://localhost:8080/users.
 Step 3 − Now, modify the MyUser model this way.
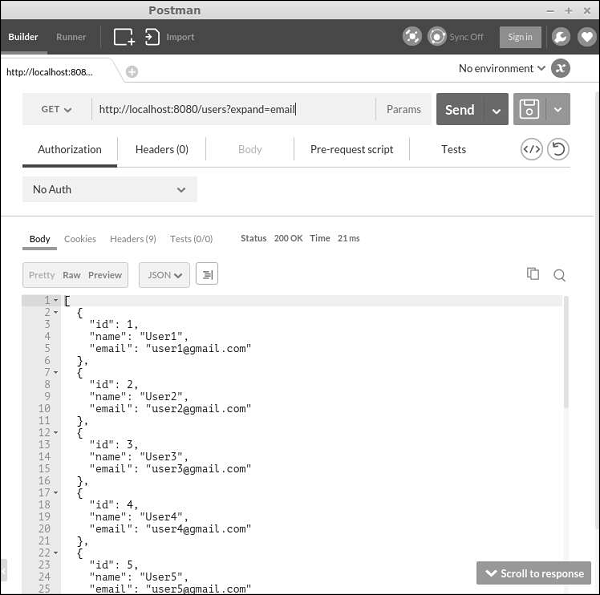
Step 4 − To get data with this field, run http://localhost:8080/users?expand=email.
To disable the “delete” and “create” actions, modify the UserController this way −
Step 1 − Modify the MyUser model this way.
<?php
   namespace app\models;
   use app\components\UppercaseBehavior;
   use Yii;
   /**
   * This is the model class for table "user".
   *@property integer $id
   * @property string $name
   * @property string $email
   */
   class MyUser extends \yii\db\ActiveRecord {
      public function fields() {
         return [
            'id',
            'name',
            //PHP callback
            'datetime' => function($model) {
               return date("d:m:Y H:i:s");
            }
         ];
      }
      /**
      * @inheritdoc
      */
      public static function tableName() {
         return 'user';
      }
      /**
      * @inheritdoc
      */
      public function rules() {
         return [
            [['name', 'email'], 'string', 'max' => 255]
         ];
      }
      /**
      * @inheritdoc
      */
      public function attributeLabels() {
         return [
            'id' => 'ID',
            'name' => 'Name',
            'email' => 'Email',
         ];
      }
   }
?>
Besides default fields: id and name, we have added a custom field – datetime.
Step 2 − In Postman, run the URL http://localhost:8080/users.
Step 3 − Now, modify the MyUser model this way.<?php namespace app\models; use app\components\UppercaseBehavior; use Yii; /** * This is the model class for table "user". * * @property integer $id * @property string $name * @property string $email */ class MyUser extends \yii\db\ActiveRecord { public function fields() { return [ 'id', 'name', ]; } public function extraFields() { return ['email']; } /** * @inheritdoc */ public static function tableName() { return 'user'; } /** * @inheritdoc */ public function rules() { return [ [['name', 'email'], 'string', 'max' => 255] ]; } /** * @inheritdoc */ public function attributeLabels() { return [ 'id' => 'ID', 'name' => 'Name', 'email' => 'Email', ]; } } ?>Notice, that the email field is returned by the extraFields() method.
Step 4 − To get data with this field, run http://localhost:8080/users?expand=email.
Customizing Actions
The yii\rest\ActiveController class provides the following actions −- Index − Lists resources page by page
- View − Returns the details of a specified resource
- Create − Creates a new resource
- Update − Updates an existing resource
- Delete − Deletes the specified resource
- Options − Returns the supported HTTP methods
To disable the “delete” and “create” actions, modify the UserController this way −
<?php
   namespace app\controllers;
   use yii\rest\ActiveController;
   class UserController extends ActiveController {
      public $modelClass = 'app\models\MyUser';
      public function actions() {
         $actions = parent::actions();
         // disable the "delete" and "create" actions
         unset($actions['delete'], $actions['create']);
         return $actions;
      }
   }
?>
Handling Errors
When obtaining a RESTful API request, if there is an error in the request or something unexpected happens on the server, you may simply throw an exception. If you can identify the cause of the error, you should throw an exception along with a proper HTTP status code. Yii REST uses the following statuses −- 200 − OK.
- 201 − A resource was successfully created in response to a POST request. The Location header contains the URL pointing to the newly created resource.
- 204 − The request was handled successfully and the response contains no content.
- 304 − The resource was not modified.
- 400 − Bad request.
- 401 − Authentication failed.
- 403 − The authenticated user is not allowed to access the specified API endpoint.
- 404 − The resource does not exist.
- 405 − Method not allowed.
- 415 − Unsupported media type.
- 422 − Data validation failed.
- 429 − Too many requests.
- 500 − Internal server error.
No comments:
Post a Comment