
A widget is a reusable client-side code, which contains HTML, CSS, and JS. This code includes minimal logic and is wrapped in a yii\base\Widget object. We can easily insert and apply this object in any view.
Step 1 − To see widgets in action, create an actionTestWidget function in the SiteController with the following code.
Step 2 − Now, inside the views/site folder, create a View file called testwidget.php.
Some widgets take a block of content. It should be enclosed between yii\base\Widget::begin() and yii\base\Widget::end() functions. For example, the following widget displays a contact form −
Step 1 − Create a components folder in the project root. Inside that folder, create a file called FirstWidget.php with the following code.
 Step 4 − To enclose the content between the begin() and end() calls, you should modify the FirstWidget.php file.
Step 1 − To see widgets in action, create an actionTestWidget function in the SiteController with the following code.
public function actionTestWidget() {
   return $this->render('testwidget');
}
In the above example, we just returned a View called “testwidget”.
Step 2 − Now, inside the views/site folder, create a View file called testwidget.php.
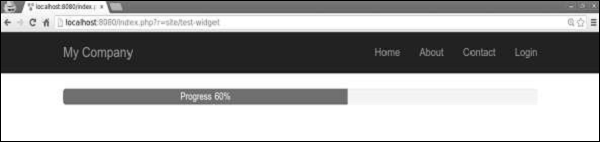
<?php
   use yii\bootstrap\Progress;
?>
<?= Progress::widget(['percent' => 60, 'label' => 'Progress 60%']) ?>
Step 3 − If you go to http://localhost:8080/index.php?r=site/test-widget, you will see the progress bar widget.
Using Widgets
To use a widget in a View, you should call the yii\base\Widget::widget() function. This function takes a configuration array for initializing the widget. In the previous example, we inserted a progress bar with percent and labelled parameters of the configuration object.Some widgets take a block of content. It should be enclosed between yii\base\Widget::begin() and yii\base\Widget::end() functions. For example, the following widget displays a contact form −
<?php $form = ActiveForm::begin(['id' => 'contact-form']); ?>
   <?= $form->field($model, 'name') ?>
   <?= $form->field($model, 'email') ?>
   <?= $form->field($model, 'subject') ?>
   <?= $form->field($model, 'body')->textArea(['rows' => 6]) ?>
   <?= $form->field($model, 'verifyCode')->widget(Captcha::className(), [
      'template' =>
         '<div class="row">
            <div class = "col-lg-3">{image}</div>
            <div class = "col-lg-6">{input}</div>
         </div>',
   ]) ?>
   <div class = "form-group">
      <?= Html::submitButton('Submit', ['class' => 'btn btn-primary',
         'name' => 'contact-button']) ?>
   </div>
<?php ActiveForm::end(); ?>
Creating Widgets
To create a widget, you should extend from yii\base\Widget. Then you should override the yii\base\Widget::init() and yii\base\Widget::run() functions. The run() function should return the rendering result. The init() function should normalize the widget properties.Step 1 − Create a components folder in the project root. Inside that folder, create a file called FirstWidget.php with the following code.
<?php
   namespace app\components;
   use yii\base\Widget;
   class FirstWidget extends Widget {
      public $mes;
      public function init() {
         parent::init();
         if ($this->mes === null) {
            $this->mes = 'First Widget';
         }
      }
      public function run() {
         return "<h1>$this->mes</h1>";
      }
   }
?>
Step 2 − Modify the testwidget view in the following way.
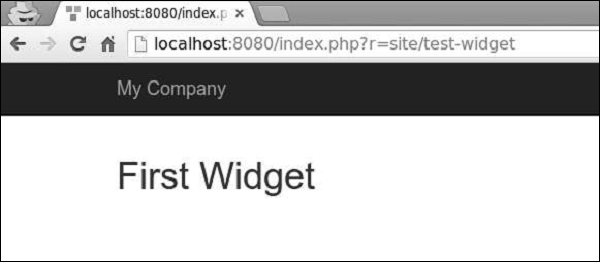
<?php
   use app\components\FirstWidget;
?>
<?= FirstWidget∷widget() ?>
Step 3 − Go to http://localhost:8080/index.php?r=site/test-widget. You will see the following.
Step 4 − To enclose the content between the begin() and end() calls, you should modify the FirstWidget.php file.<?php namespace app\components; use yii\base\Widget; class FirstWidget extends Widget { public function init() { parent::init(); ob_start(); } public function run() { $content = ob_get_clean(); return "<h1>$content</h1>"; } } ?>Step 5 − Now h1 tags will surround all the content. Notice that we use the ob_start() function to buffer the output. Modify the testwidget view as given in the following code.
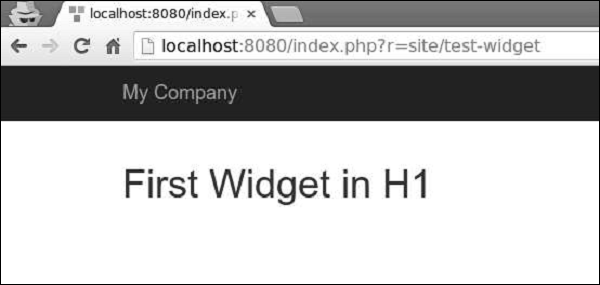
<?php
   use app\components\FirstWidget;
?>
<?php FirstWidget::begin(); ?>
   First Widget in H1
<?php FirstWidget::end(); ?>
You will see the following output −
Important Points
Widgets should −- Be created following the MVC pattern. You should keep presentation layers in views and logic in widget classes.
- Be designed to be self-contained. The end developer should be able to design it into a View.
No comments:
Post a Comment