
In this chapter, we will study about Discussion settings in
WordPress. WordPress discussion setting can be defined as the
interaction between the blogger and the visitors. These settings are
done by the admin to have a control over the posts/pages that come in
through users.
Following are the steps to access the Discussion setting −
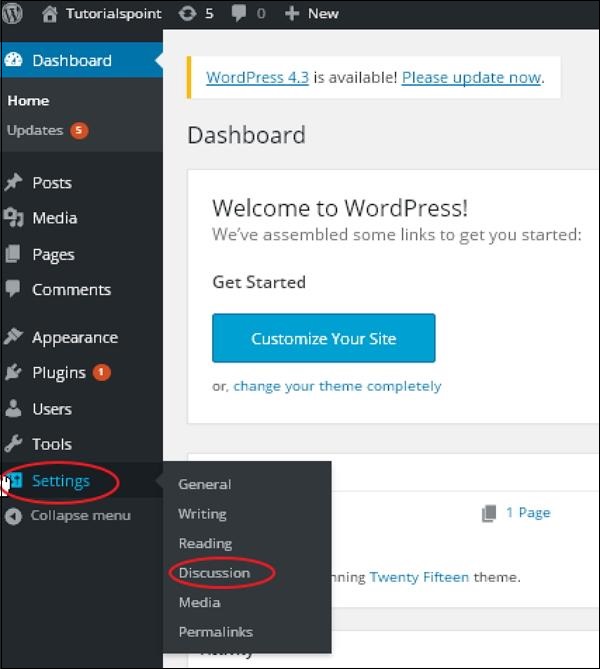
Step (1) − Click on Settings → Discussion option in WordPress.
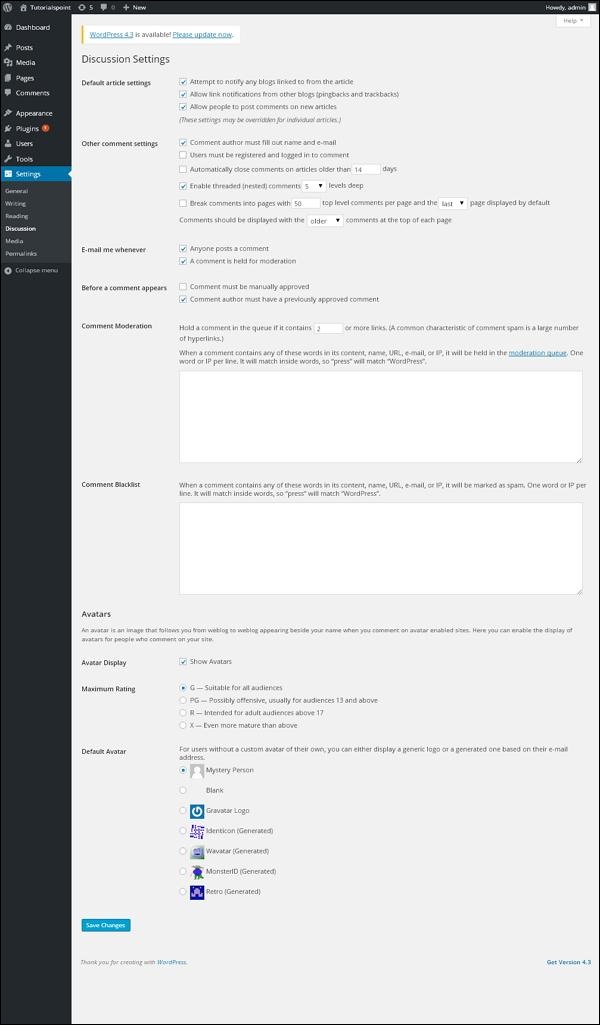
 Step (2) − The Discussion Settings page is displayed as shown in the following snapshot.
 Following fields are seen in Discussion settings.
Following are the steps to access the Discussion setting −
Step (1) − Click on Settings → Discussion option in WordPress.
Step (2) − The Discussion Settings page is displayed as shown in the following snapshot.
Following fields are seen in Discussion settings.- Default article settings − These settings are default to the new pages you create or new posts. This contains three more settings. They are −
- Attempt to notify any blogs linked to from the article − When you publish articles then it sends a notification (sends pings and trackback) to other blogs.
- Allow link notifications from other blogs (pingbacks and trackbacks) − Accepts pings from other blogs.
- Allow people to post comments on new articles − You can allow or disallow other people to comment on your article using this setting.
- Other Comment Settings − This setting has the following options −
- Comment author must fill out name and e-mail − When you check this box, it is mandatory for visitors to fill their name and email address.
- Users must be registered and logged in to comment − If you check this box, only those registered visitors can leave comments, if not checked anyone can leave any number of comments.
- Automatically close comments on articles older than days − This option allows you to accept comments only for a particular time period as per your wish.
- Enable threaded (nested) comments − When you check this option, visitors can reply or have a discussion and get responses.
- Break comments into pages with top level comments per page and the page displayed by default − If your pages are getting a lot of comments then you can split them into different pages by checking this box.
- Comments should be displayed with the comments at the top of each page − You can arrange the comments in the form of ascending or descending order.
- Email me whenever − This setting contains two options, namely −
- Anyone posts a comment − When you check into this box, the author gets an e-mail for every single comment that is posted.
- A comment is held for moderation − This is used in case you do not want your comment to be updated before it's moderated by the admin.
- Before a comment appears − This setting allows how your posts are controlled. There are two more settings as followed −
- Comment must be manually approved − If you check this box then only the approved comments by the admin can be displayed on the posts or pages.
- Comment author must have a previously approved comment − This can be checked when you want to approve a comment of an author whose has commented and his e-mail address matches the e-mail address of the previous posted comment. Otherwise the comment is held for moderation.
- Comment Moderation − Contain only a specific number of links that are allowed into a comment.
- Comment Blacklist − You can input your own spam words which you do not want your visitors to enter into the comments, URL, e-mail etc.; later it would filter the comments.
- Avatars − Avatar is a small image that displays at the
top-right-hand corner of the dashboard screen beside your name. It is
like your profile picture. Here you have a few more options where you
can set your avatar for WordPress site.
- Avatar Display − It displays your avatar besides your name when it is checked.
- Maximum rating − You have a four other options of avatars you can use. They are G, PG, R and X. This is the age section where you select according to which type of audience you want to display your posts.
- Default Avatar − In this option, there are few more types of avatars with images; you can keep these avatars according to your visitors e-mail address.
No comments:
Post a Comment