JSF provides developer a powerful capability to define own custom components which can be used to render custom contents.
Define Custom Component
Defining a custom component in JSF is a two step process
| Step No. | Description |
|---|
| 1a | Create a resources folder.
Create a xhtml file in resources folder with a composite namespace. |
| 1b | Use composite tags composite:interface, composite:attribute and composite:implementation, to define content of the composite component.
Use cc.attrs in composite:implementation to get variable defined using composite:attribute in composite:interface. |
Step 1a: Create custom component : loginComponent.xhtml
Create a folder tutorialspoint in resources folder and create a file loginComponent.xhtml in it
Use composite namespace in html header.
<html xmlns="http://www.w3.org/1999/xhtml"
      xmlns:h="http://java.sun.com/jsf/html"
      xmlns:f="http://java.sun.com/jsf/core"
      xmlns:composite="http://java.sun.com/jsf/composite"
      >
...
</html>
Step 1b: Use composite tags : loginComponent.xhtml
Following table describes use of composite tags.
| S.N. | tag & Description |
|---|
| 1 | composite:interfaceDeclare configurable values to be used in composite:implementatio |
| 2 | composite:attributeConfiguration values are declared using this tag |
| 3 | composite:implementationDeclares JSF
component. Can access the configurable values defined in
composite:interface using #{cc.attrs.attribute-name} expression. |
<composite:interface>
   <composite:attribute name="usernameLabel" />
   <composite:attribute name="usernameValue" />
</composite:interface>
<composite:implementation>
<h:form>
   #{cc.attrs.usernameLabel} :
   <h:inputText id="username" value="#{cc.attrs.usernameValue}" />
</h:form>
Use Custom Component
Using a custom component in JSF is a simple process
| Step No. | Description |
|---|
| 2a | Create a xhtml file and use custom component's namespace.
Namespace will the http://java.sun.com/jsf/<folder-name> where folder-name is folder in resources directory containing the custom compoent |
| 2b | Use the custom component as normal JSF tags |
Step 2a: Use Custom Namespace: home.xhtml
<html xmlns="http://www.w3.org/1999/xhtml"
   xmlns:h="http://java.sun.com/jsf/html"
   xmlns:ui="http://java.sun.com/jsf/facelets">
   xmlns:tp="http://java.sun.com/jsf/composite/tutorialspoint">
Step 2b: Use Custom Tag: home.xhtml and pass values
<h:form>
   <tp:loginComponent
      usernameLabel="Enter User Name: "
      usernameValue="#{userData.name}" />
</h:form>
Example Application
Let us create a test JSF application to test the custom component in JSF.
| Step | Description |
|---|
| 1 | Create a project with a name helloworld under a package com.tutorialspoint.test as explained in the JSF - First Application chapter. |
| 2 | Create resources folder under src > main folder. |
| 3 | Create tutorialspoint folder under src > main > resources folder. |
| 4 | Create loginComponent.xhtml file under src > main > resources > tutorialspoint folder. |
| 5 | Modify UserData.java file as explained below. |
| 6 | Modify home.xhtml as explained below. Keep rest of the files unchanged. |
| 7 | Compile and run the application to make sure business logic is working as per the requirements. |
| 8 | Finally, build the application in the form of war file and deploy it in Apache Tomcat Webserver. |
| 9 | Launch your web application using appropriate URL as explained below in the last step. |
loginComponent.xhtml
<?xml version="1.0" encoding="UTF-8"?>
<!DOCTYPE html PUBLIC "-//W3C//DTD XHTML 1.0 Transitional//EN"
"http://www.w3.org/TR/xhtml1/DTD/xhtml1-transitional.dtd">
<html xmlns="http://www.w3.org/1999/xhtml"
   xmlns:h="http://java.sun.com/jsf/html"
   xmlns:f="http://java.sun.com/jsf/core"
   xmlns:composite="http://java.sun.com/jsf/composite">
   <composite:interface>
      <composite:attribute name="usernameLabel" />
      <composite:attribute name="usernameValue" />
      <composite:attribute name="passwordLabel" />
      <composite:attribute name="passwordValue" />
      <composite:attribute name="loginButtonLabel" />
      <composite:attribute name="loginButtonAction"
         method-signature="java.lang.String login()" />
   </composite:interface>
   <composite:implementation>
      <h:form>
         <h:message for="loginPanel" style="color:red;" />
         <h:panelGrid columns="2" id="loginPanel">
            #{cc.attrs.usernameLabel} :
            <h:inputText id="username" value="#{cc.attrs.usernameValue}" />
            #{cc.attrs.passwordLabel} :
            <h:inputSecret id="password" value="#{cc.attrs.passwordValue}" />
         </h:panelGrid>
         <h:commandButton action="#{cc.attrs.loginButtonAction}"
            value="#{cc.attrs.loginButtonLabel}"/>
      </h:form>
   </composite:implementation>
</html>
UserData.java
package com.tutorialspoint.test;

import java.io.Serializable;

import javax.faces.bean.ManagedBean;
import javax.faces.bean.SessionScoped;

@ManagedBean(name = "userData", eager = true)
@SessionScoped
public class UserData implements Serializable {

   private static final long serialVersionUID = 1L;

   private String name;
   private String password;
   public String getName() {
      return name;
   }
   public void setName(String name) {
      this.name = name;
   }
   public String getPassword() {
      return password;
   }
   public void setPassword(String password) {
      this.password = password;
   }
   public String login(){
      return "result";
   }
}
home.xhtml
<?xml version="1.0" encoding="UTF-8"?>
<!DOCTYPE html PUBLIC "-//W3C//DTD XHTML 1.0 Transitional//EN"
"http://www.w3.org/TR/xhtml1/DTD/xhtml1-transitional.dtd">
<html xmlns="http://www.w3.org/1999/xhtml"
   xmlns:h="http://java.sun.com/jsf/html"
   xmlns:f="http://java.sun.com/jsf/core"
   xmlns:tp="http://java.sun.com/jsf/composite/tutorialspoint">
   <h:head>
      <title>JSF tutorial</title>
   </h:head>
   <h:body>
      <h2>Custom Component Example</h2>
      <h:form>
      <tp:loginComponent
         usernameLabel="Enter User Name: "
         usernameValue="#{userData.name}"
         passwordLabel="Enter Password: "
         passwordValue="#{userData.password}"
         loginButtonLabel="Login"
         loginButtonAction="#{userData.login}" />
      </h:form>
   </h:body>
</html>
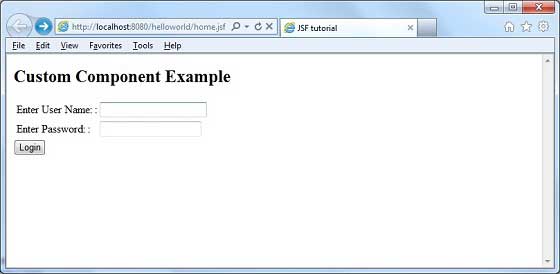
Once you are ready with all the changes done, let us compile and run
the application as we did in JSF - First Application chapter. If
everything is fine with your application, this will produce following
result:


No comments:
Post a Comment