
From Java8 onwards, the JDK (Java Development Kit) includes JavaFX library in it. Therefore, to run JavaFX applications, you simply need to install Java8 or later version in your system.
In addition to it, IDE’s like Eclipse and NetBeans provide support for JavaFX. This chapter teaches you how to set the environment to run JavaFX Applications in various ways.
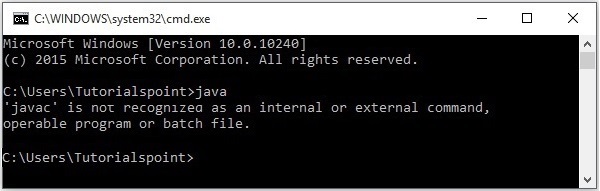
If you haven’t installed Java in your system, the command prompt displays the message shown in the following screenshot.
 Then install Java by following the steps given below.
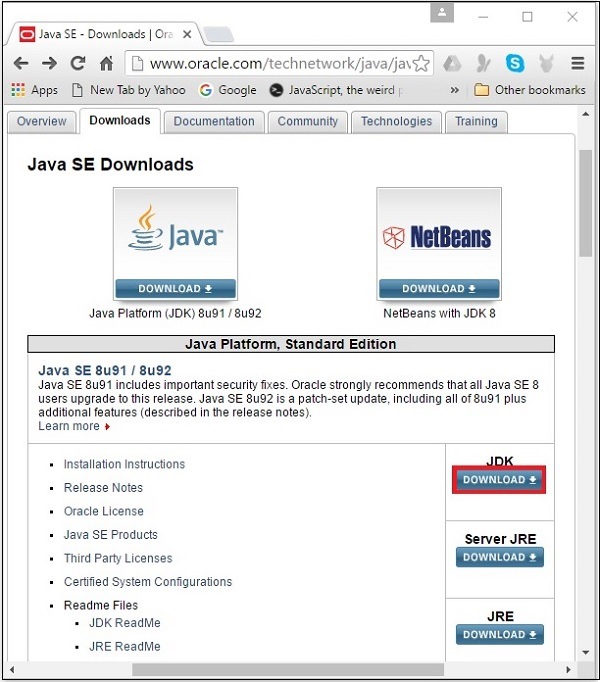
Step 1 − Visit the JavaSE Downloads Page, click on the JDK Download button as highlighted in the following screenshot
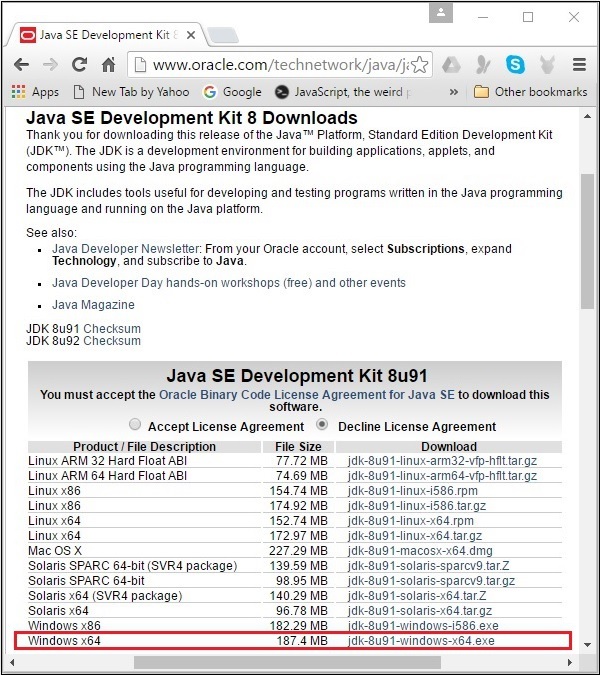
 Step 2 − On clicking the Download button, you will be redirected to the Java SE Development Kit 8 Downloads page. This page provides you links of JDK for various platforms.
Accept the license agreement and download the required software by clicking on its respective link.
For example, if you are working on a windows 64-bit Operating System then you need to download the JDK version highlighted in the following screenshot.
 On clicking the highlighted link, the Java8 Development Kit suitable
for Windows 64-bit Operating System will be downloaded onto your system.
On clicking the highlighted link, the Java8 Development Kit suitable
for Windows 64-bit Operating System will be downloaded onto your system.
Step 3 − Run the downloaded binary executable file to start the installation of JDK8.
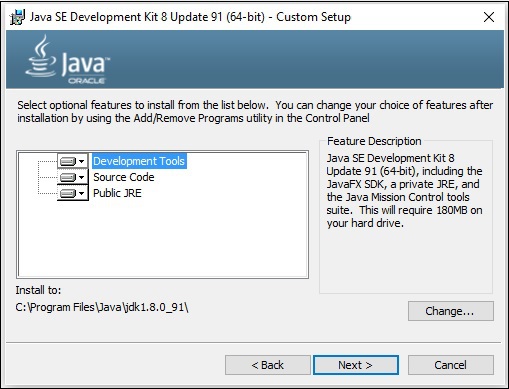
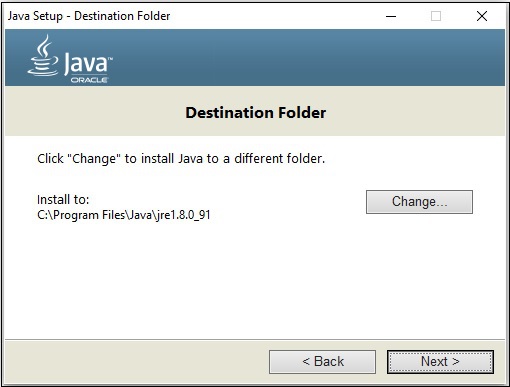
 Step 4 − Choose the Installation Directory.
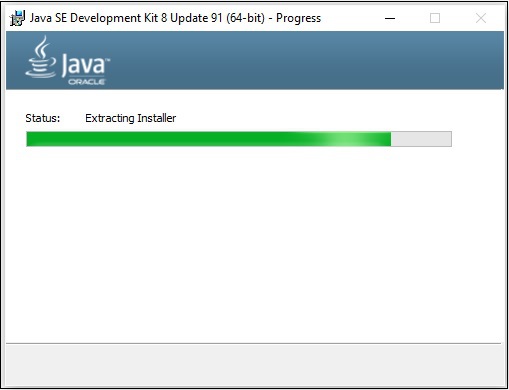
 Step 5 − On selecting the destination folder and clicking
Next, the JavaFX installation process starts displaying the progress bar
as shown in the following screenshot.
Step 5 − On selecting the destination folder and clicking
Next, the JavaFX installation process starts displaying the progress bar
as shown in the following screenshot.
 Step 6 − Change the installation directory if needed, else keep the default ones and proceed further.
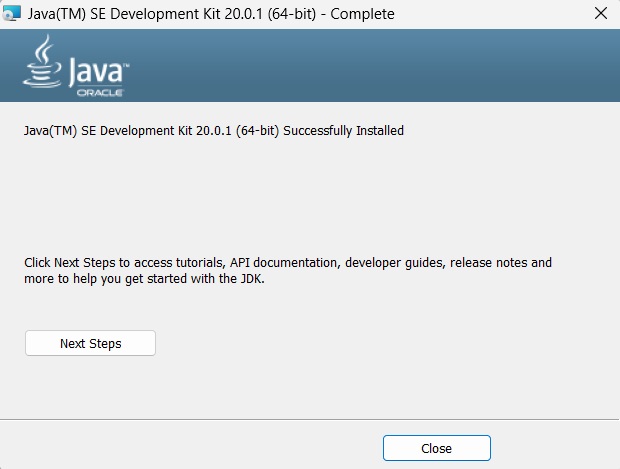
 Step 7 − Finish the installation process by clicking the Close button as shown in the following screenshot.
Now you can follow the steps that are given below −
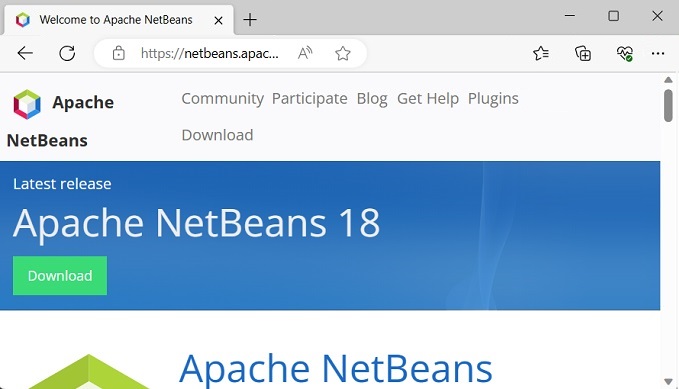
Step 1 − Visit the NetBeans website NetBeans website and click the Download button in order to download the NetBeans software.
 Step 2 − On clicking Download, you will get to the
Downloads page of the NetBeans software, which provides NetBeans bundles
for various Java applications. Download the NetBeans software for JavaSE as shown in the following screenshot.
Step 2 − On clicking Download, you will get to the
Downloads page of the NetBeans software, which provides NetBeans bundles
for various Java applications. Download the NetBeans software for JavaSE as shown in the following screenshot.
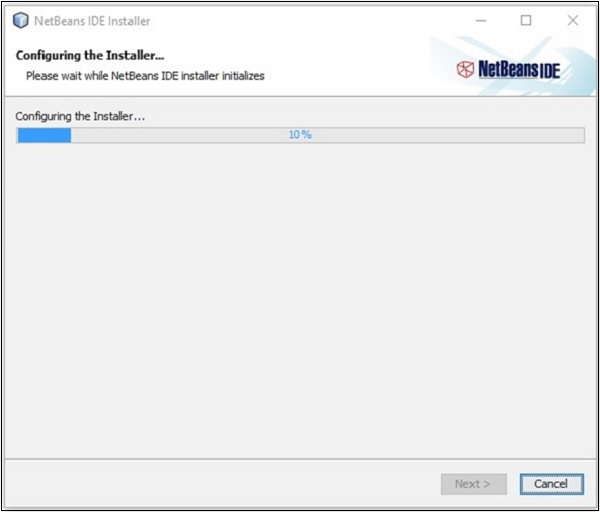
 Step 3 − On clicking this button, a file named netbeans-8.0-windows.exe
will be downloaded onto your system. Run this file in order to install
it. On running this file, a NetBeans installer will start as shown in
the following screenshot.
Step 3 − On clicking this button, a file named netbeans-8.0-windows.exe
will be downloaded onto your system. Run this file in order to install
it. On running this file, a NetBeans installer will start as shown in
the following screenshot.
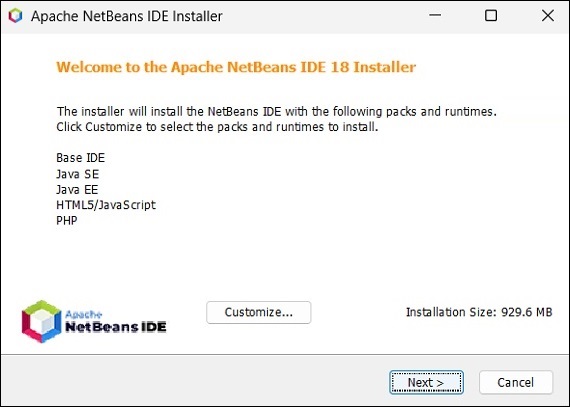
 After completion of the configuration, you will see the Welcome Page of the installer.
Step 4 − Click the Next button and proceed with the installation.
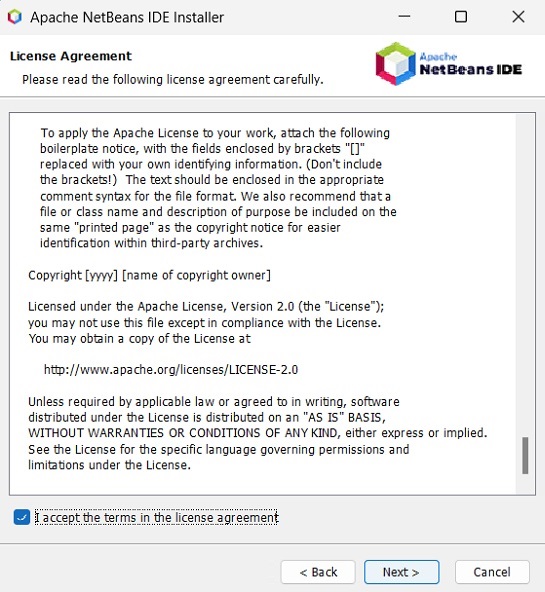
 Step 5 − The next window holds the NETBEANS IDE 8.0 license agreement.
Read it carefully and accept the agreement by checking the checkbox at
“I accept the terms in the license agreement” and then click the Next button.
Step 5 − The next window holds the NETBEANS IDE 8.0 license agreement.
Read it carefully and accept the agreement by checking the checkbox at
“I accept the terms in the license agreement” and then click the Next button.
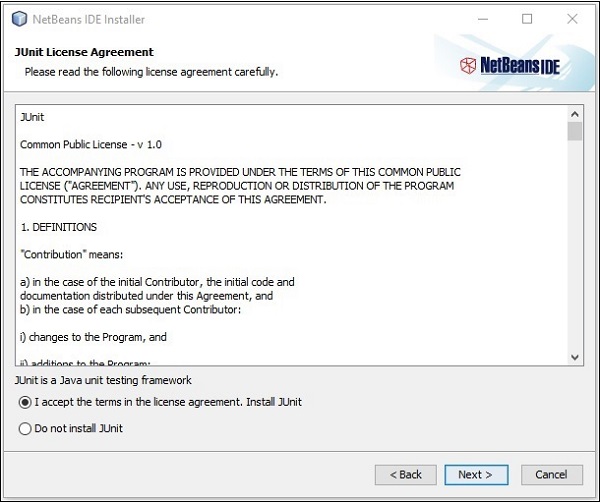
 Step 6 − In the next window, you will encounter the license agreement for Junit, accept it by selecting the radio button at “I accept the terms in the license agreement, Install JUnit” and click on Next.
 Step 7 − Choose the destination directory where you need the
Netbeans 8.0 to be installed. Furthermore, you can also browse through
the directory where Java Development Kit is installed in your system and click on the Next button.
Step 7 − Choose the destination directory where you need the
Netbeans 8.0 to be installed. Furthermore, you can also browse through
the directory where Java Development Kit is installed in your system and click on the Next button.
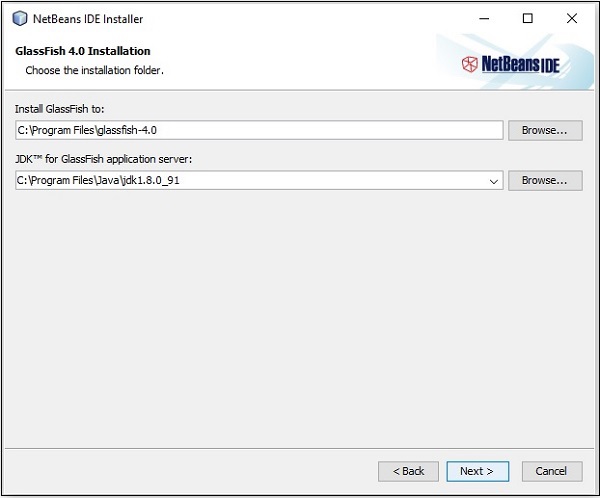
 Step 8 − Similarly, choose the destination directory for Glassfish Server installation. Browse through the Java Development Kit directory (now for Glassfish Reference) and then click Next.
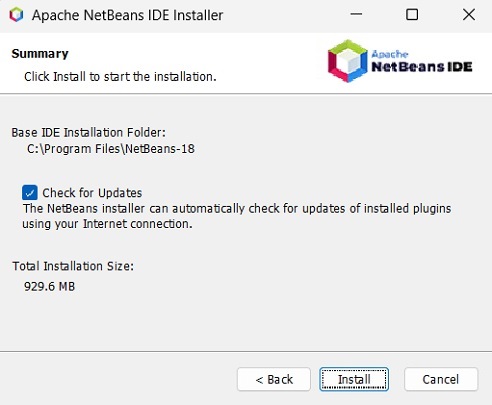
 Step 9 − Check the Check for Updates box for automatic updates and click the Install button to start the installation.
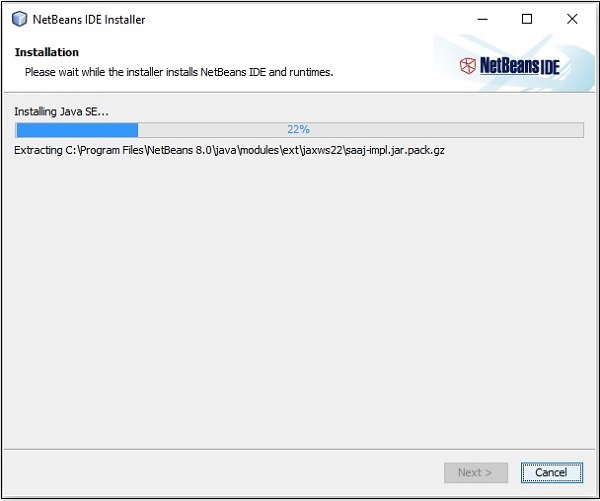
 Step 10 − This step starts the installation of NetBeans IDE 8.0 and it may take a while.
 Step 11 − Once the process is complete, click the Finish button to finish the installation.
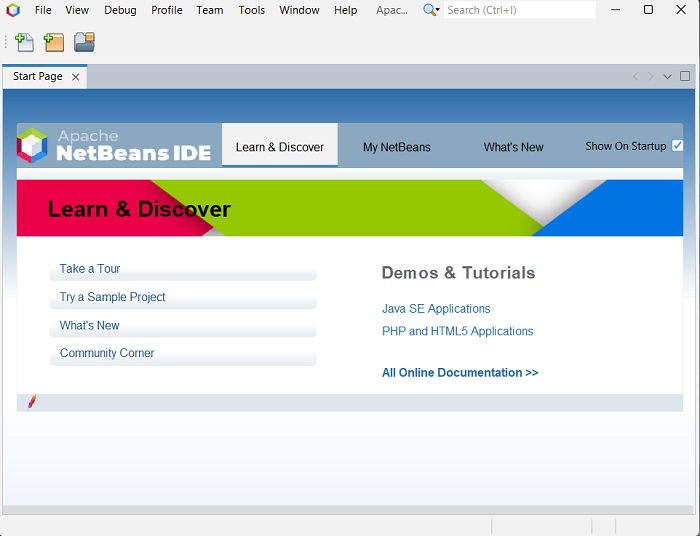
Step 12 − Once you launch the NetBeans IDE, you will see the start page as shown in the following screenshot.
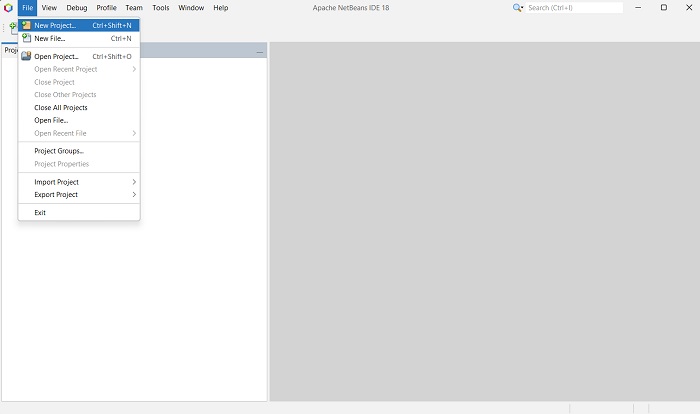
 Step 13 − In the file menu, select New Project… to open the New project wizard as shown in the following screenshot.
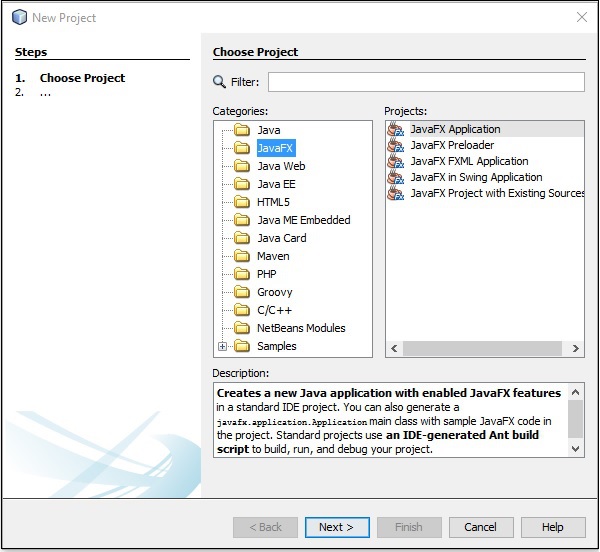
 Step 14 − In the New Project wizard, select JavaFX and click on Next. It starts creating a new JavaFX Application for you.
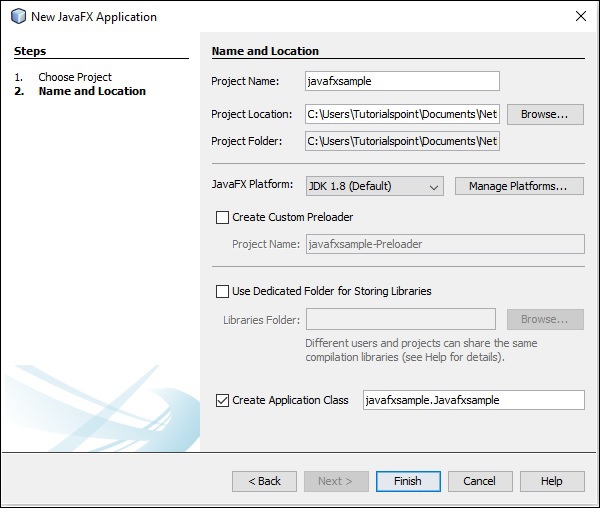
 Step 15 − Select the name of the project and location of the project in the NewJavaFX Application window and then click Finish. It creates a sample application with the given name.
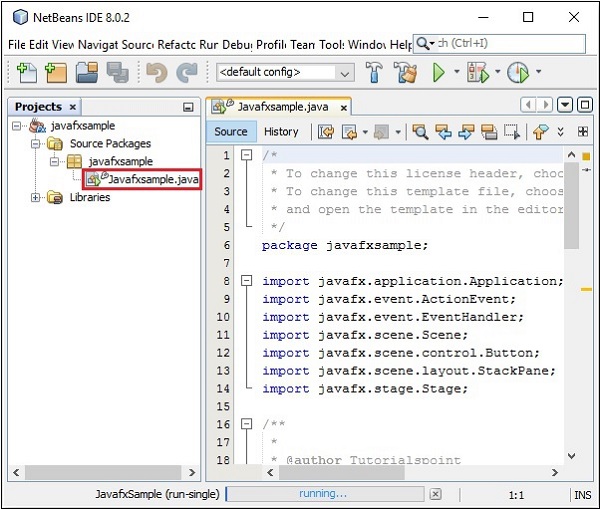
 In this instance, an application with a name javafxsample is created. Within this application, the NetBeans IDE will generate a Java program with the name Javafxsample.java. As shown in the following screenshot, this program will be created inside NetBeans Source Packages → javafxsample.
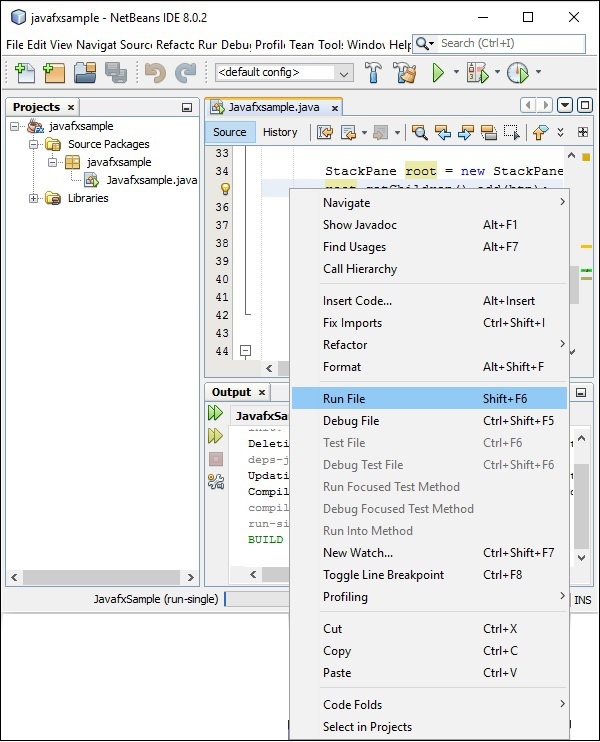
 Step 16 − Right-click on the file and select Run File to run this code as shown in the following screenshot.
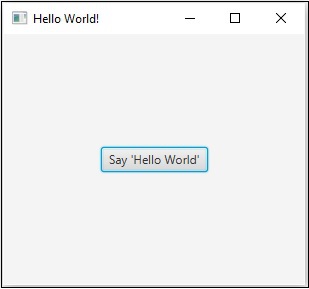
 This automatically created program contains the code which generates a simple JavaFX window having a button with the label Say ‘Hello World’ in it. Every time you click on this button, the string Hello World will be displayed on the console as shown below.
Once Eclipse is installed, follow the steps given below to install e(fx)clipse in your system.
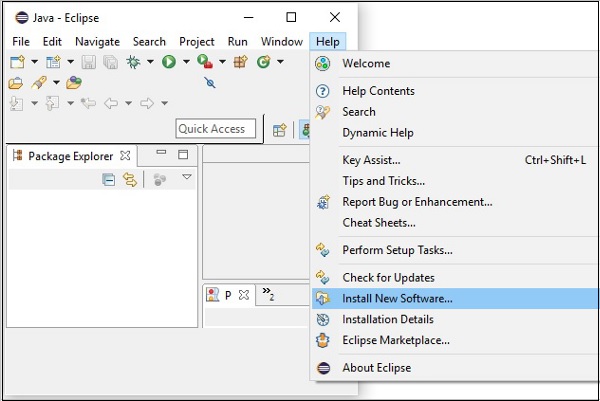
Step 1 − Open Eclipse in the Help menu and select Install New Software… option as shown below.
 Upon clicking, it will display the Available Software window, as shown in the following screenshot.
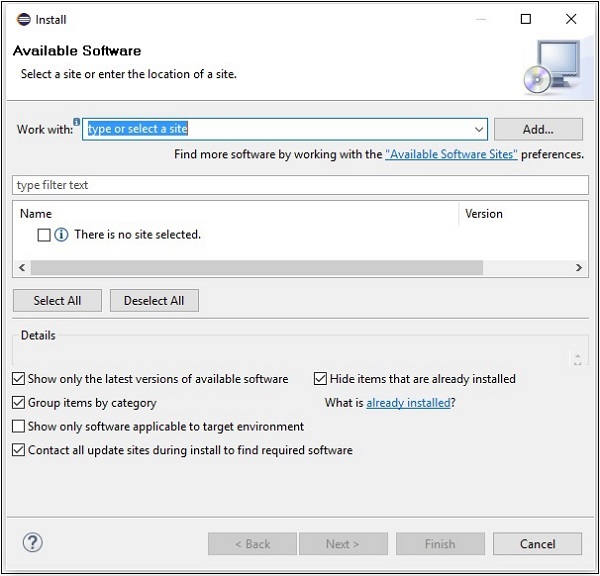 In the text box Work with of this window, you need to provide the link of the plugin for the required software.
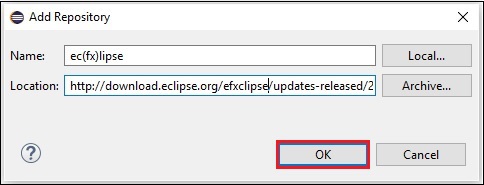
Step 2 − Click the Add… button. Provide the name of the plugin as e(fx)clipse. Next, Provide the following link as a location. http://download.eclipse.org/efxclipse/updates-released/2.3.0/site/
Step 3 − After specifying the name and location of the plugin, click the OK button, as highlighted in the following screenshot.
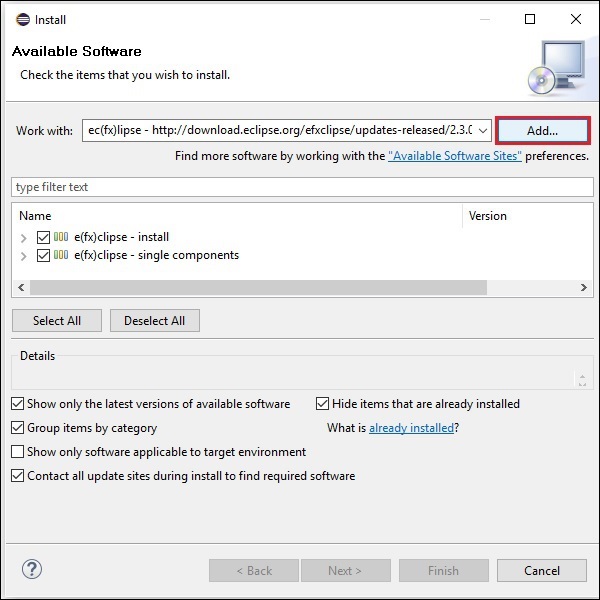
 Step 4 − Soon after you add the plugin, you will find two checkboxes for e(fx)clipse – install and e(fx)clipse – single components. Check both these checkboxes and click the Add… button as shown in the following screenshot.
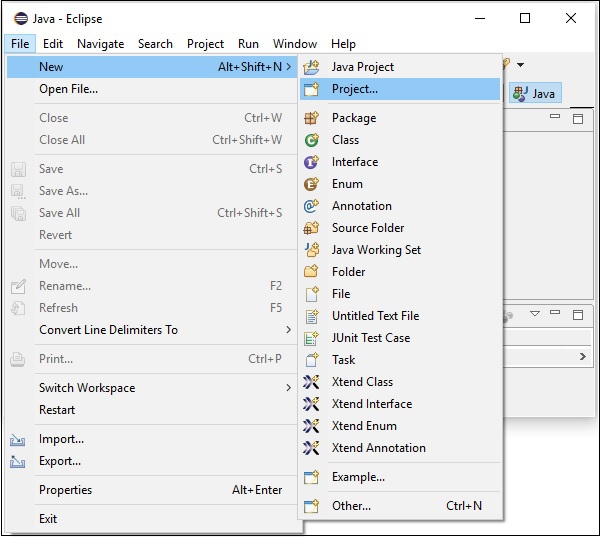
 Step 5 − Next, open your Eclipse IDE. Click the File menu and select Project as shown in the following screenshot.
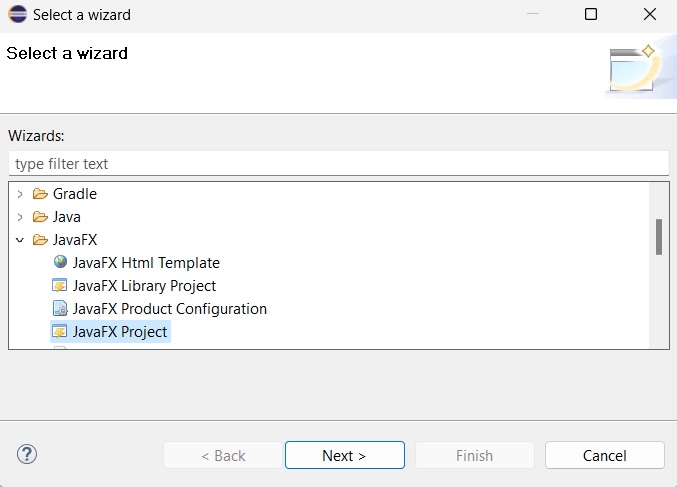
 Step 6 − Then, you will get a window where you can see a list of wizards provided by Eclipse to create a project. Expand the JavaFX wizard, select JavaFX Project and click the Next button as shown in the following screenshot.
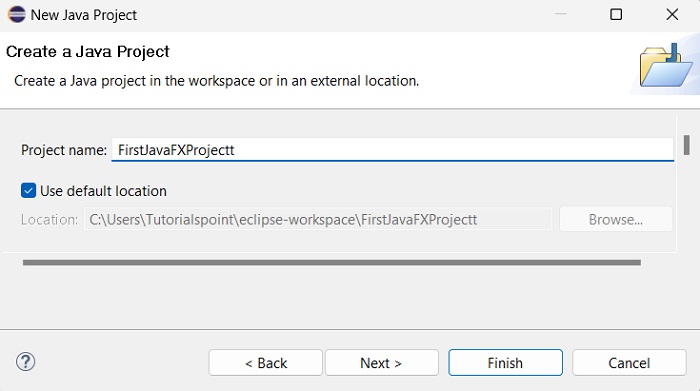
 Step 7 − On clicking Next, a New Project Wizard opens. Here, you can type the required project name and click Finish.
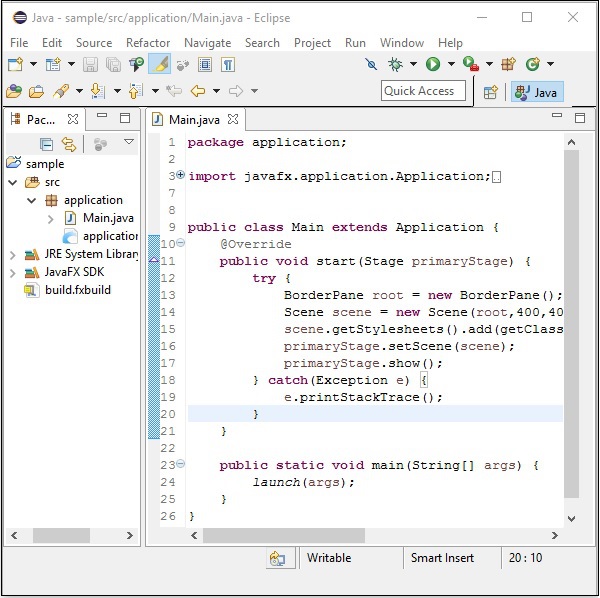
 Step 8 − On clicking Finish, an application is created with the given name (sample). In the sub-package named application, a program with the name Main.java is generated as shown below.
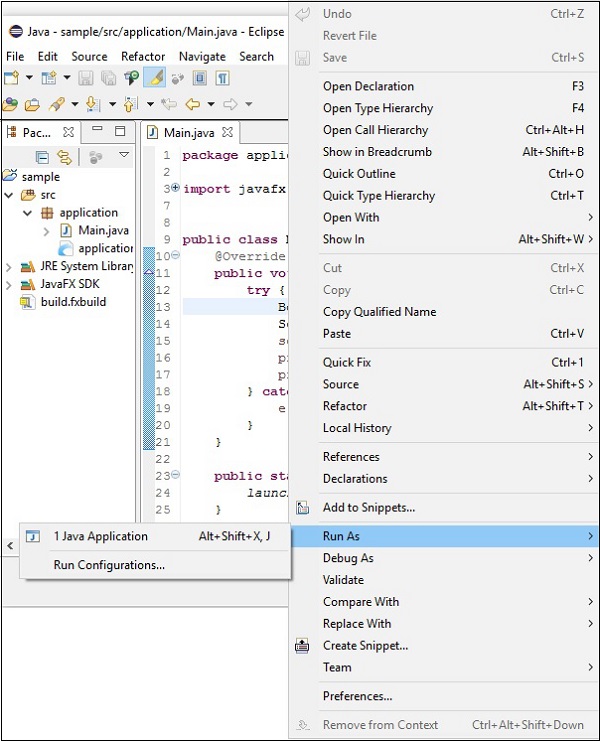
 Step 9 − This automatically generated program contains the code to generate an empty JavaFX window. Right-click on this file, select Run As → Java Application as shown in the following screenshot.
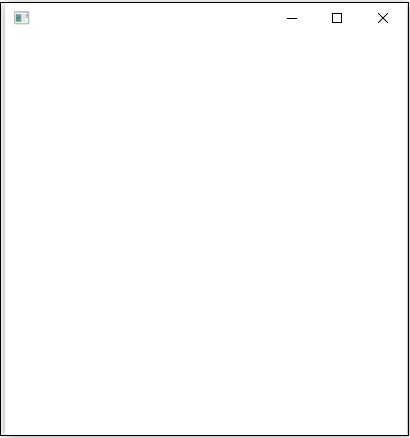
 On executing this application, it gives you an empty JavaFX window as shown below.
 Note − We will discuss more about the code in the later chapters.
In addition to it, IDE’s like Eclipse and NetBeans provide support for JavaFX. This chapter teaches you how to set the environment to run JavaFX Applications in various ways.
Installing Java8
First of all, you will have to verify whether there is Java Installed in your system or not by opening the command prompt and typing the command “Java” in it.If you haven’t installed Java in your system, the command prompt displays the message shown in the following screenshot.
Then install Java by following the steps given below.Step 1 − Visit the JavaSE Downloads Page, click on the JDK Download button as highlighted in the following screenshot
Step 2 − On clicking the Download button, you will be redirected to the Java SE Development Kit 8 Downloads page. This page provides you links of JDK for various platforms.Accept the license agreement and download the required software by clicking on its respective link.
For example, if you are working on a windows 64-bit Operating System then you need to download the JDK version highlighted in the following screenshot.
On clicking the highlighted link, the Java8 Development Kit suitable
for Windows 64-bit Operating System will be downloaded onto your system.Step 3 − Run the downloaded binary executable file to start the installation of JDK8.
Step 4 − Choose the Installation Directory.
Step 5 − On selecting the destination folder and clicking
Next, the JavaFX installation process starts displaying the progress bar
as shown in the following screenshot.
Step 6 − Change the installation directory if needed, else keep the default ones and proceed further.
Step 7 − Finish the installation process by clicking the Close button as shown in the following screenshot.
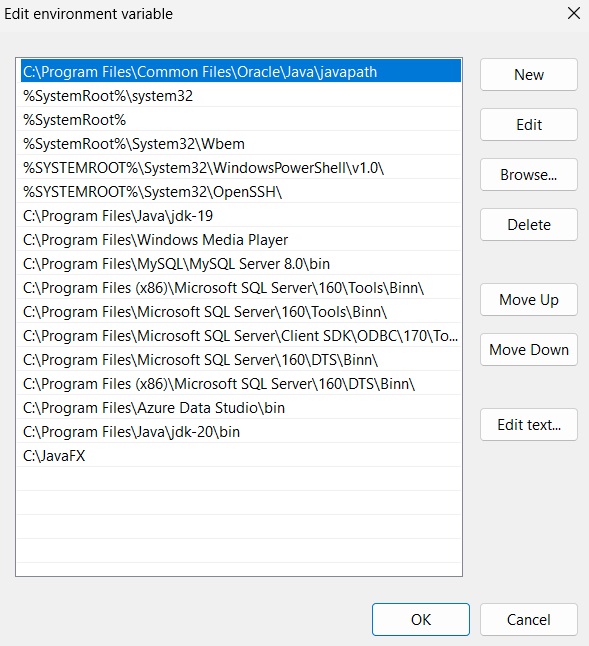
Setting up the Path for Windows
After installing Java, you need to set the path variables. Assume that you have installed Java in C:\Program Files\java\jdk1.8.0_91directory.Now you can follow the steps that are given below −
- Right-click on 'My Computer' and select 'Properties'.
- Click on the 'Environment Variables' button under the 'Advanced' tab.
- Now, alter the 'Path' variable so that it also contains the path to the Java executable. For Example, if the path is currently set to 'C:\WINDOWS\SYSTEM32', then change your path to read 'C:\WINDOWS\SYSTEM32; C:\Program Files\java\ jdk1.8.0_91\bin'.
Setting NetBeans Environment of JavaFX
NetBeans8 provides inbuilt support for JavaFX. On installing this, you can create a JavaFX application without any additional plugins or JAR files. To set up the NetBeans environment, you will need to follow the steps that are given below.Step 1 − Visit the NetBeans website NetBeans website and click the Download button in order to download the NetBeans software.
Step 2 − On clicking Download, you will get to the
Downloads page of the NetBeans software, which provides NetBeans bundles
for various Java applications. Download the NetBeans software for JavaSE as shown in the following screenshot.
Step 3 − On clicking this button, a file named netbeans-8.0-windows.exe
will be downloaded onto your system. Run this file in order to install
it. On running this file, a NetBeans installer will start as shown in
the following screenshot.
After completion of the configuration, you will see the Welcome Page of the installer.Step 4 − Click the Next button and proceed with the installation.
Step 5 − The next window holds the NETBEANS IDE 8.0 license agreement.
Read it carefully and accept the agreement by checking the checkbox at
“I accept the terms in the license agreement” and then click the Next button.
Step 6 − In the next window, you will encounter the license agreement for Junit, accept it by selecting the radio button at “I accept the terms in the license agreement, Install JUnit” and click on Next.
Step 7 − Choose the destination directory where you need the
Netbeans 8.0 to be installed. Furthermore, you can also browse through
the directory where Java Development Kit is installed in your system and click on the Next button.
Step 8 − Similarly, choose the destination directory for Glassfish Server installation. Browse through the Java Development Kit directory (now for Glassfish Reference) and then click Next.
Step 9 − Check the Check for Updates box for automatic updates and click the Install button to start the installation.
Step 10 − This step starts the installation of NetBeans IDE 8.0 and it may take a while.
Step 11 − Once the process is complete, click the Finish button to finish the installation.Step 12 − Once you launch the NetBeans IDE, you will see the start page as shown in the following screenshot.
Step 13 − In the file menu, select New Project… to open the New project wizard as shown in the following screenshot.
Step 14 − In the New Project wizard, select JavaFX and click on Next. It starts creating a new JavaFX Application for you.
Step 15 − Select the name of the project and location of the project in the NewJavaFX Application window and then click Finish. It creates a sample application with the given name.
In this instance, an application with a name javafxsample is created. Within this application, the NetBeans IDE will generate a Java program with the name Javafxsample.java. As shown in the following screenshot, this program will be created inside NetBeans Source Packages → javafxsample.
Step 16 − Right-click on the file and select Run File to run this code as shown in the following screenshot.
This automatically created program contains the code which generates a simple JavaFX window having a button with the label Say ‘Hello World’ in it. Every time you click on this button, the string Hello World will be displayed on the console as shown below.
Installing JavaFX in Eclipse
A plugin named e(fx)clipse is also available in JavaFX. You can use the following steps to set JavaFX in Eclipse. First of all, make sure that you have Eclipse in your system. If not, download and install Eclipse in your system.Once Eclipse is installed, follow the steps given below to install e(fx)clipse in your system.
Step 1 − Open Eclipse in the Help menu and select Install New Software… option as shown below.
Upon clicking, it will display the Available Software window, as shown in the following screenshot.
In the text box Work with of this window, you need to provide the link of the plugin for the required software.Step 2 − Click the Add… button. Provide the name of the plugin as e(fx)clipse. Next, Provide the following link as a location. http://download.eclipse.org/efxclipse/updates-released/2.3.0/site/
Step 3 − After specifying the name and location of the plugin, click the OK button, as highlighted in the following screenshot.
Step 4 − Soon after you add the plugin, you will find two checkboxes for e(fx)clipse – install and e(fx)clipse – single components. Check both these checkboxes and click the Add… button as shown in the following screenshot.
Step 5 − Next, open your Eclipse IDE. Click the File menu and select Project as shown in the following screenshot.
Step 6 − Then, you will get a window where you can see a list of wizards provided by Eclipse to create a project. Expand the JavaFX wizard, select JavaFX Project and click the Next button as shown in the following screenshot.
Step 7 − On clicking Next, a New Project Wizard opens. Here, you can type the required project name and click Finish.
Step 8 − On clicking Finish, an application is created with the given name (sample). In the sub-package named application, a program with the name Main.java is generated as shown below.
Step 9 − This automatically generated program contains the code to generate an empty JavaFX window. Right-click on this file, select Run As → Java Application as shown in the following screenshot.
On executing this application, it gives you an empty JavaFX window as shown below.
Note − We will discuss more about the code in the later chapters.
No comments:
Post a Comment