Flex provides two ways to internationalize a Flex application, We'll
demonstrate use of Compile time Internationalization being most commonly
used among projects.
| Technique | Description |
|---|
| Compile Time Internationalization | This technique is most
prevalent and requires very little overhead at runtime; is a very
efficient technique for translating both constant and parameterized
strings;simplest to implement. Compile Time internationalization uses
standard properties files to store translated strings and parameterized
messages, and these properties files are compiled directly in the
application. |
| Run Time Internationalization | This technique is very
flexible but slower than static string internationalization. You need to
compile the localization properties files separately, leave them
external to application, and load them at run time. |
Workflow of internationalizing a Flex Application
Step 1: Create folder structure
Create a locale folder under src folder of Flex project.This will be
the parent directory for all of the properties files for the locales
that the application will support. Inside the locale folder, create
subfolders, one for each of the application's locales to be supported.
The convention for naming a locale is
{language}_{country code}
For example, en_US represents English of the United States. The
locale de_DE represents German. The sample application will support two
common languages: English, and German
Step 2: Create properties files
Create properties file containing the messages to be used in the application. We've created a
HelloWorldMessages.properties file under
src > locale > en_US folder in our example.
enterName=Enter your name
clickMe=Click Me
applicationTitle=Application Internationalization Demonstration
greeting=Hello {0}
Create properties files containing translated values specific to locale. We've created a
HelloWorldMessages.properties file under
src > locale > de_DE folder
in our example. This file contains translations in german language. _de
specifies the german locale and we're going to support german language
in our application.
If you are creating properties file using Flash Builder then change
the encoding of the file to UTF-8.Select the file and then right-click
in it to open its properties window.Select Text file encoding as
Other UTF-8. Apply and Save the change.
enterName=Geben Sie Ihren Namen
clickMe=Klick mich
applicationTitle=Anwendung Internationalisierung Demonstration
greeting=Hallo {0}
Step 3: Specify Compiler options
- Right-click your project and select Properties.
- Select Flex Compiler, and add the following to the Additional Compiler Arguments settings:
-locale en_US de_DE
- Right-click your project and select Properties.
- Select Flex Build Path, and add the following to the Source Path settings:
src\locale\{locale}
Internalization Example
Now Let us follow the following steps to test Internalization technique in a Flex application:
| Step | Description |
|---|
| 1 | Create a project with a name HelloWorld under a package com.tutorialspoint.client as explained in the Flex - Create Application chapter. |
| 2 | Modify HelloWorld.mxml as explained below. Keep rest of the files unchanged. |
| 3 | Compile and run the application to make sure business logic is working as per the requirements. |
Following is the content of the modified mxml file
src/com.tutorialspoint/HelloWorld.mxml.
<?xml version="1.0" encoding="utf-8"?>
   <s:Application xmlns:fx="http://ns.adobe.com/mxml/2009"
   xmlns:s="library://ns.adobe.com/flex/spark"
   xmlns:mx="library://ns.adobe.com/flex/mx"
   minWidth="500" minHeight="500">
   <fx:Metadata>
      [ResourceBundle("HelloWorldMessages")]
   </fx:Metadata>
   <fx:Style source="/com/tutorialspoint/client/Style.css"/>
   <fx:Script>
      <![CDATA[
         import mx.controls.Alert;
         [Bindable]
         private var locales:Array = [{label:"English", locale:"en_US"},
            {label:"German", locale:"de_DE"}];

         private function comboChangeHandler():void
         {
           resourceManager.localeChain = [localeComboBox.selectedItem.locale];
         }

         protected function clickMe_clickHandler(event:MouseEvent):void
         {
            var name:String = txtName.text;
            var inputArray:Array = new Array();
            inputArray.push(name);
            Alert.show(resourceManager.getString('HelloWorldMessages'
            ,'greeting',inputArray));
         }
      ]]>
   </fx:Script>
   <s:BorderContainer width="500" height="500" id="mainContainer"
      styleName="container">
      <s:VGroup width="100%" height="100%" gap="50"
   horizontalAlign="center" verticalAlign="middle">
         <s:Label id="lblHeader" fontSize="40"
            color="0x777777"
            text ="{resourceManager.getString('HelloWorldMessages'
            ,'applicationTitle')}"
            styleName="heading" width="90%" height="150"/>
         <s:Panel width="300" height="150">
            <s:layout>
               <s:VerticalLayout paddingTop="10" paddingLeft="10" />
            </s:layout>
            <s:HGroup >
               <s:Label
               text="{resourceManager.getString('HelloWorldMessages'
               ,'enterName')}"
               paddingTop="2"/>
               <s:TextInput id="txtName"/>
            </s:HGroup>
            <s:Button
            label="{resourceManager.getString('HelloWorldMessages','clickMe')}"
            click="clickMe_clickHandler(event)" right="10" />
         </s:Panel>
         <mx:ComboBox id="localeComboBox"
         dataProvider="{locales}" change="comboChangeHandler()"/>
      </s:VGroup>
   </s:BorderContainer>
</s:Application>
Once you are ready with all the changes done, let us compile and run the application in normal mode as we did in
Flex - Create Application chapter. If everything is fine with your application, this will produce following result: [
Try it online ]
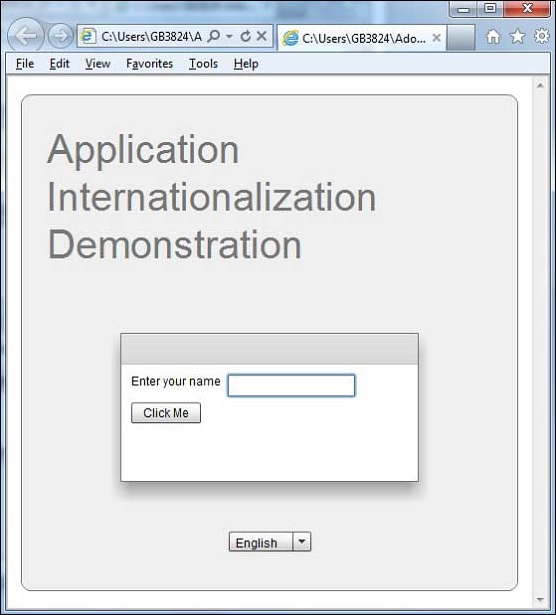
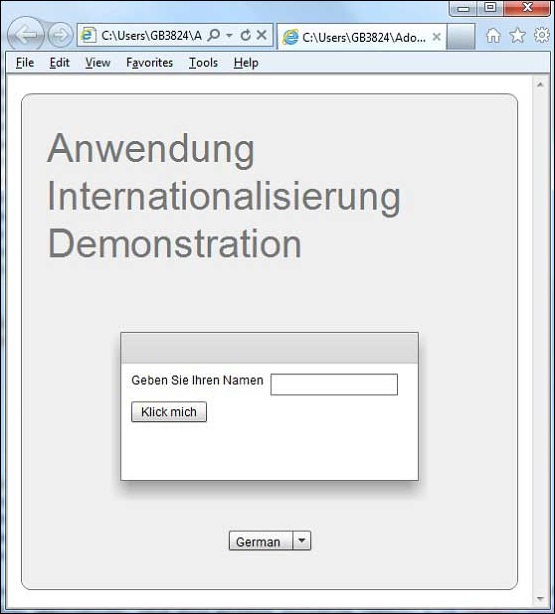
Change the language using language drop down and see the result.

No comments:
Post a Comment