This chapter explains how to set the print area on a spreadsheet. The
usual print area is from left top to right bottom on Excel
spreadsheets. Print area can be customized according to your
requirement. It means you can print a particular range of cells from the
whole spreadsheet, customize the paper size, print the contents with
the grid lines turned on, etc.
The following code is used to set up the print area on a spreadsheet.

The following code is used to set up the print area on a spreadsheet.
import java.io.File;
import java.io.FileOutputStream;
import org.apache.poi.xssf.usermodel.XSSFPrintSetup;
import org.apache.poi.xssf.usermodel.XSSFSheet;
import org.apache.poi.xssf.usermodel.XSSFWorkbook;
public class PrintArea
{
   public static void main(String[] args)throws Exception
   {
      XSSFWorkbook workbook = new XSSFWorkbook();
      XSSFSheet spreadsheet = workbook
      .createSheet("Print Area");
      //set print area with indexes
      workbook.setPrintArea(
      0, //sheet index
      0, //start column
      5, //end column
      0, //start row
      5 //end row
      );
      //set paper size
      spreadsheet.getPrintSetup().setPaperSize(
      XSSFPrintSetup.A4_PAPERSIZE);
      //set display grid lines or not
      spreadsheet.setDisplayGridlines(true);
     //set print grid lines or not
     spreadsheet.setPrintGridlines(true);
     FileOutputStream out = new FileOutputStream(
     new File("printarea.xlsx"));
     workbook.write(out);
     out.close();
     System.out.println("printarea.xlsx written successfully");
   }
}
Let us save the above code as PrintArea.java. Compile and execute it from the command prompt as follows.
$javac PrintArea.java
$java PrintArea
It will generate a file named printarea.xlsx in your current directory and display the following output on the command prompt.
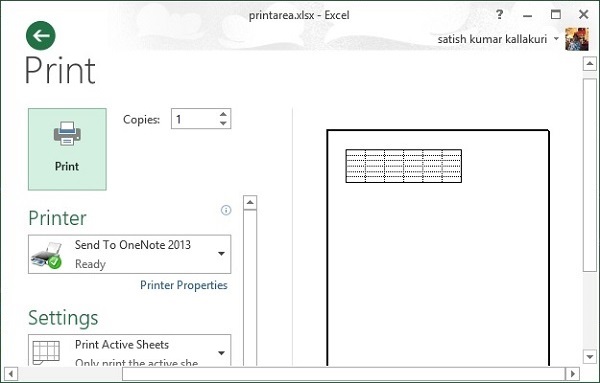
printarea.xlsx written successfullyIn the above code, we have not added any cell values. Hence printarea.xlsx is a blank file. But you can observe in the following figure that the print preview shows the print area with grid lines.


No comments:
Post a Comment