
We'll use Flash Builder 4.5 to create Flex Applications. Let's start with a simple HelloWorld application:
 Select Application Type Web (runs in Adobe Flash Player) if
not selected and leave other default values as such and click Finish
Button. Once your project is created successfully, you will have
following content in your Project Explorer:
Select Application Type Web (runs in Adobe Flash Player) if
not selected and leave other default values as such and click Finish
Button. Once your project is created successfully, you will have
following content in your Project Explorer:
 Here is brief description of all important folders:
Let us modify this file to display custom messages if flash plugin is not installed.
 Run application menu and select HelloWorld application to run the application.
 If everything is fine, you must see browser pop up and application up
and running. If everything is fine with your application, this will
produce following result: [ Try it online ]
If everything is fine, you must see browser pop up and application up
and running. If everything is fine with your application, this will
produce following result: [ Try it online ]
Because you are running your application in flash player, so you will need to install Flash Player plugin for your browser. Simply follow the onscreen instructions to install the plugin. If you already have Flash Player plugin set for your browser, then you should be able to see the following output:
 Congratulations! you have implemented your first application using Flex.
Step 1 - Create Project
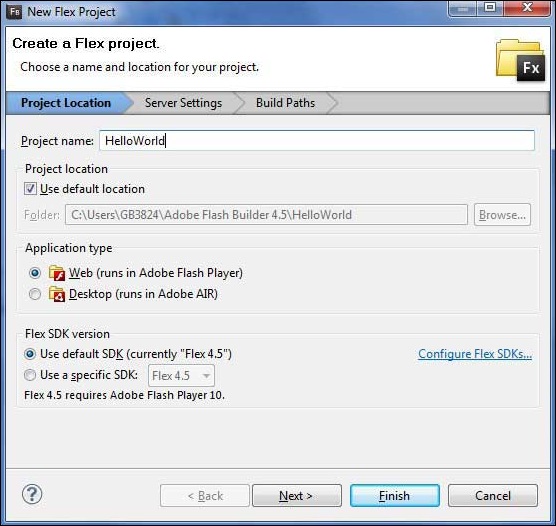
The first step is to create a simple Flex Project using Flash Builder IDE. Launch project wizard using the option File > New > Flex Project. Now name your project as HelloWorld using the wizard window as follows:
Select Application Type Web (runs in Adobe Flash Player) if
not selected and leave other default values as such and click Finish
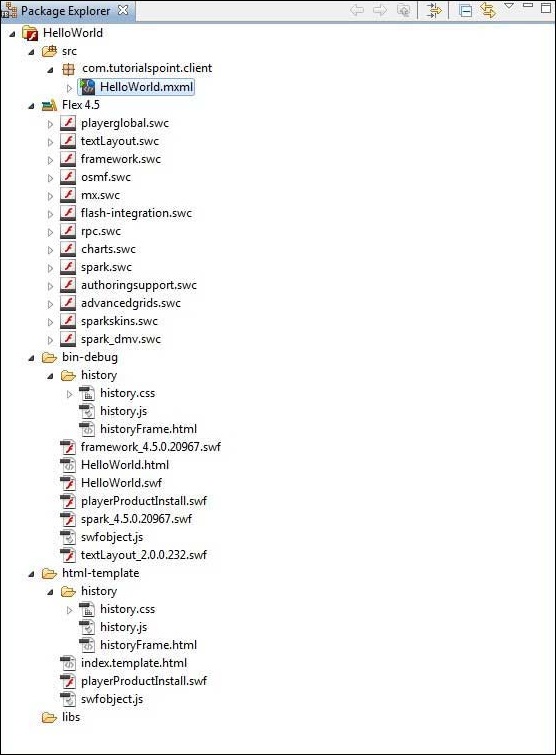
Button. Once your project is created successfully, you will have
following content in your Project Explorer:
Here is brief description of all important folders:| Folder | Location |
|---|---|
| table table-bordered |
|
| bin-debug |
|
| html-template |
|
Step 2 - Create external CSS file
Create a CSS file styles.css for Wrapper HTML page in html-template folder.html, body { height:100%; } body { margin:0; padding:0; overflow:auto; text-align:center; } object:focus { outline:none; } #flashContent { display:none; } .pluginHeader { font-family:Arial, Helvetica, sans-serif; font-size:14px; color:#9b1204; text-decoration:none; font-weight:bold; } .pluginInstallText { font-family:Arial, Helvetica, sans-serif; font-size:12px; color:#000000; line-height:18px; font-style:normal; } .pluginText { font-family:Arial, Helvetica, sans-serif; font-size:12px; color:#000000; line-height:18px; font-style:normal; }
Step 3 - Modify Wrapper HTML page template
Modify Wrapper HTML page template index.template.html in html-template folder. Flash Builder will create a default Wrapper HTML page template html-template/index.template.html, which will be compiled to HelloWorld.html. This file contains placeholders which Flash Builder replaces during compilation process for example flash player version, application name etc.Let us modify this file to display custom messages if flash plugin is not installed.
<!DOCTYPE html PUBLIC "-//W3C//DTD XHTML 1.0 Transitional//EN"
"http://www.w3.org/TR/xhtml1/DTD/xhtml1-transitional.dtd">
<html xmlns="http://www.w3.org/1999/xhtml" lang="en" xml:lang="en">
<head>
<title>${title}</title>
<meta name="google" value="notranslate" />
<meta http-equiv="Content-Type" content="text/html; charset=utf-8" />
<link rel="stylesheet" href="styles.css" type="text/css"></link>
<link rel="stylesheet" type="text/css" href="history/history.css" />
<script type="text/javascript" table table-bordered="history/history.js"></script>
<script type="text/javascript" table table-bordered="swfobject.js"></script>
<script type="text/javascript">
   // For version detection, set to min. required Flash Player version,
   //or 0 (or 0.0.0), for no version detection.
   var swfVersionStr = "${version_major}.${version_minor}.${version_revision}";
   // To use express install, set to playerProductInstall.swf,
   //otherwise the empty string.
   var xiSwfUrlStr = "${expressInstallSwf}";
   var flashvars = {};
   var params = {};
   params.quality = "high";
   params.bgcolor = "${bgcolor}";
   params.allowscriptaccess = "sameDomain";
   params.allowfullscreen = "true";
   var attributes = {};
   attributes.id = "${application}";
   attributes.name = "${application}";
   attributes.align = "middle";
   swfobject.embedSWF(
   "${swf}.swf", "flashContent",
   "${width}", "${height}",
   swfVersionStr, xiSwfUrlStr,
   flashvars, params, attributes);
   // JavaScript enabled so display the flashContent div in case
   //it is not replaced with a swf object.
   swfobject.createCSS("#flashContent", "display:block;text-align:left;");
</script>
</head>
<body>
<div id="flashContent">
   <p style="margin:100px;">
   <table  width="700" cellpadding="10" cellspacing="2" border="0">
      <tr><td class="pluginHeader">Flash Player Required</td></tr>
      <tr><td class="pluginText">The Adobe Flash Player version
      10.2.0 or greater is required.</td></tr>
      <tr><td class = "pluginInstallText" align="left">
         <table border="0" width="100%">
         <tr class = "pluginInstallText" >
         <td>Click here to download and install Adobe Flash Player:</td>
         <td> </td>
         <td align="right"> <script type="text/javascript">
         var pageHost
         =((document.location.protocol == "https:") ? "https://" : "http://");
         document.write("<a target='_blank'"
         +" href='http://get.adobe.com/flashplayer/'><"
         +"img style='border-style: none' table table-bordered='"
         +pageHost
         +"www.adobe.com/images/shared/download_buttons/get_flash_player.gif'"
         +" alt='Get Adobe Flash player' /></a>" );
         </script>
         </td>
         </tr>
         </table>
         </td>
      </tr>
   </table>
   </p>
</div>
<noscript>
   <object classid="clsid:D27CDB6E-AE6D-11cf-96B8-444553540000"
   width="${width}" height="${height}" id="${application}">
   <param name="movie" value="${swf}.swf" />
   <param name="quality" value="high" />
   <param name="bgcolor" value="${bgcolor}" />
   <param name="allowScriptAccess" value="sameDomain" />
   <param name="allowFullScreen" value="true" />
   <!--[if !IE]>-->
   <object type="application/x-shockwave-flash" data="${swf}.swf"
   width="${width}" height="${height}">
   <param name="quality" value="high" />
   <param name="bgcolor" value="${bgcolor}" />
   <param name="allowScriptAccess" value="sameDomain" />
   <param name="allowFullScreen" value="true" />
   <!--<![endif]-->
   <!--[if gte IE 6]>-->
   <p>
      <p style="margin:100px;">
      <table  width="700" cellpadding="10" cellspacing="2" border="0">
      <tr><td class="pluginHeader">Flash Player Required</td></tr>
      <tr><td class="pluginText">The Adobe Flash Player version
      10.2.0 or greater is required.</td></tr>
      <tr><td class = "pluginInstallText" align="left">
         <table border="0" width="100%">
         <tr class = "pluginInstallText" >
         <td>Click here to download and install Adobe Flash Player:</td>
         <td> </td>
         <td align="right"> <script type="text/javascript">
         var pageHost
         = ((document.location.protocol == "https:") ? "https://" : "http://");
         document.write("<a target='_blank'"
         +" href='http://get.adobe.com/flashplayer/'><"
         +"img style='border-style: none' table table-bordered='"
         +pageHost
         +"www.adobe.com/images/shared/download_buttons/get_flash_player.gif'"
         +" alt='Get Adobe Flash player' /></a>" );
         </script>
         </td>
         </tr>
         </table>
         </td>
      </tr>
   </table>
   </p>
   </p>
   <!--<![endif]-->
     <p style="margin:100px;">
      <table  width="700" cellpadding="10" cellspacing="2" border="0">
      <tr><td class="pluginHeader">Flash Player Required</td></tr>
      <tr><td class="pluginText">The Adobe Flash Player version
      10.2.0 or greater is required.</td></tr>
      <tr><td class = "pluginInstallText" align="left">
         <table border="0" width="100%">
         <tr class = "pluginInstallText" >
         <td>Click here to download and install Adobe Flash Player:</td>
         <td> </td>
         <td align="right"> <script type="text/javascript">
         var pageHost
         = ((document.location.protocol == "https:") ? "https://" : "http://");
         document.write("<a target='_blank'"
         +" href='http://get.adobe.com/flashplayer/'><"
         +"img style='border-style: none' table table-bordered='"
         +pageHost
         +"www.adobe.com/images/shared/download_buttons/get_flash_player.gif'"
         +" alt='Get Adobe Flash player' /></a>" );
         </script>
         </td>
         </tr>
         </table>
         </td>
      </tr>
   </table>
   </p>
   <!--[if !IE]>-->
   </object>
   <!--<![endif]-->
   </object>
</noscript>
</body>
</html>
Step 4 - Create internal CSS file
Create a CSS file Style.css for HelloWorld.mxml in table table-bordered/com/tutorialspoint folder. Flex provides similar css styles for its UI Controls as there are css styles for HTML UI controls./* CSS file */ @namespace s "library://ns.adobe.com/flex/spark"; @namespace mx "library://ns.adobe.com/flex/mx"; .heading { fontFamily: Arial, Helvetica, sans-serif; fontSize: 17px; color: #9b1204; textDecoration:none; fontWeight:normal; } .button { fontWeight: bold; } .container { cornerRadius :10; horizontalCenter :0; borderColor: #777777; verticalCenter:0; backgroundColor: #efefef; }
Step 5 - Modify Entry Level Class
Flash Builder will create a default mxml file table table-bordered/com.tutorialspoint/HelloWorld.mxml, which is having root tag <application> container for the application. Let us modify this file to display "Hello,World!":<?xml version="1.0" encoding="utf-8"?> <s:Application xmlns:fx="http://ns.adobe.com/mxml/2009" xmlns:s="library://ns.adobe.com/flex/spark" xmlns:mx="library://ns.adobe.com/flex/mx" width="100%" height="100%" minWidth="500" minHeight="500" initialize="application_initializeHandler(event)"> <fx:Style source="/com/tutorialspoint/client/Style.css"/> <fx:Script> <![CDATA[ import mx.controls.Alert; import mx.events.FlexEvent; protected function btnClickMe_clickHandler(event:MouseEvent):void { Alert.show("Hello World!"); } protected function application_initializeHandler(event:FlexEvent):void { lblHeader.text = "My Hello World Application"; } ]]> </fx:Script> <s:BorderContainer width="500" height="500" id="mainContainer" styleName="container"> <s:VGroup width="100%" height="100%" gap="50" horizontalAlign="center" verticalAlign="middle"> <s:Label id="lblHeader" fontSize="40" color="0x777777" styleName="heading"/> <s:Button label="Click Me!" id="btnClickMe" click="btnClickMe_clickHandler(event)" styleName="button" /> </s:VGroup> </s:BorderContainer> </s:Application>You can create more mxml or actionscript files in the same source directory to define either new applications or to define helper routines.
Step 6 - Build Application
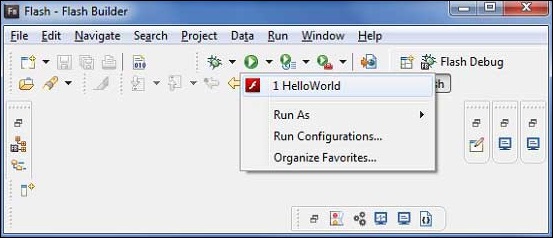
Flash Builder has Build Automatically by default checked. Just check the Problems View if there is any error. Once you are done with the changes, you will not see any errors.Step 7 - Run Application
Now click on
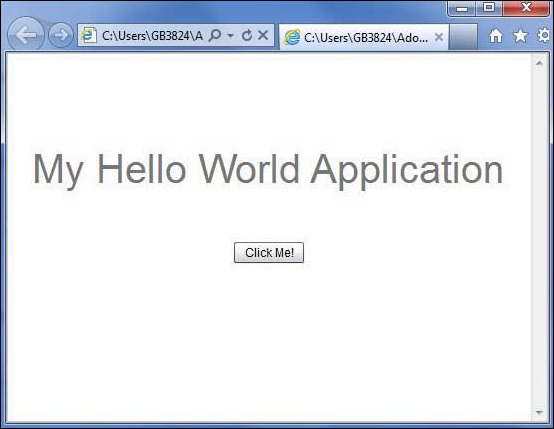
If everything is fine, you must see browser pop up and application up
and running. If everything is fine with your application, this will
produce following result: [ Try it online ]Because you are running your application in flash player, so you will need to install Flash Player plugin for your browser. Simply follow the onscreen instructions to install the plugin. If you already have Flash Player plugin set for your browser, then you should be able to see the following output:
Congratulations! you have implemented your first application using Flex.
No comments:
Post a Comment