
In this chapter we will show you how to work with HTTP requests in Aurelia framework.
Step 1 - Create View
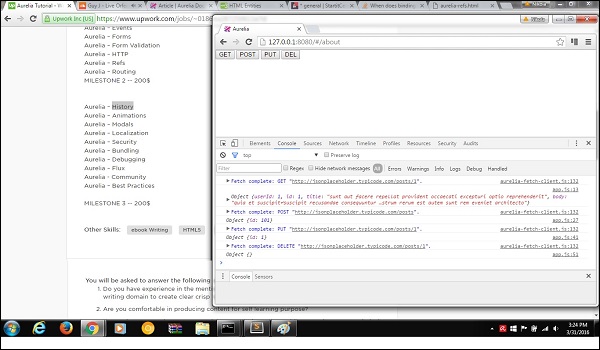
Let's create four buttons that will be used for sending requests to our API.app.html
<template>
   <button click.delegate = "getData()">GET</button>
   <button click.delegate = "postData()">POST</button>
   <button click.delegate = "updateData()">PUT</button>
   <button click.delegate = "deleteData()">DEL</button>
</template>
Step 2 - Create View-model
For sending requests to server Aurelia recommends fetch client. We are creating functions for every requests we need (GET, POST, PUT and DELETE).import 'fetch'; import {HttpClient, json} from 'aurelia-fetch-client'; let httpClient = new HttpClient(); export class App { getData() { httpClient.fetch('http://jsonplaceholder.typicode.com/posts/1') .then(response => response.json()) .then(data => { console.log(data); }); } myPostData = { id: 101 } postData(myPostData) { httpClient.fetch('http://jsonplaceholder.typicode.com/posts', { method: "POST", body: JSON.stringify(myPostData) }) .then(response => response.json()) .then(data => { console.log(data); }); } myUpdateData = { id: 1 } updateData(myUpdateData) { httpClient.fetch('http://jsonplaceholder.typicode.com/posts/1', { method: "PUT", body: JSON.stringify(myUpdateData) }) .then(response => response.json()) .then(data => { console.log(data); }); } deleteData() { httpClient.fetch('http://jsonplaceholder.typicode.com/posts/1', { method: "DELETE" }) .then(response => response.json()) .then(data => { console.log(data); }); } }We can run the app and click GET, POST, PUT and DEL buttons respectively. You can see in console that every request is succesfull, and the result is logged.
No comments:
Post a Comment