
Sass - Overview
What is SASS?
SASS (Syntactically Awesome Stylesheet) is a CSS pre-processor, which helps to reduce repetition with CSS and saves time. It is more stable and powerful CSS extension language that describes the style of a document cleanly and structurally.History
It was initially designed by Hampton Catlin and developed by Natalie Weizenbaum in 2006. Later, Weizenbaum and Chris Eppstein used its initial version to extend the Sass with SassScript.Why to Use SASS?
- It is a pre-processing language which provides indented syntax (its own syntax) for CSS.
- It provides some features, which are used for creating stylesheets that allows writing code more efficiently and is easy to maintain.
- It is a super set of CSS, which means it contains all the features of CSS and is an open source pre-processor, coded in Ruby.
- It provides the document style in a good, structured format than flat CSS. It uses re-usable methods, logic statements and some of the built-in functions such as color manipulation, mathematics and parameter lists.
Features of SASS
- It is more stable, powerful, and compatible with versions of CSS.
- It is a super set of CSS and is based on JavaScript.
- It is known as syntactic sugar for CSS, which means it makes easier way for user to read or express the things more clearly.
- It uses its own syntax and compiles to readable CSS.
- You can easily write CSS in less code within less time.
- It is an open source pre-processor, which is interpreted into CSS.
Advantages of SASS
- It allows writing clean CSS in a programming construct.
- It helps in writing CSS quickly.
- It is a superset of CSS, which helps designers and developers work more efficiently and quickly.
- As Sass is compatible with all versions of CSS, we can use any available CSS libraries.
- It is possible to use nested syntax and useful functions such as color manipulation, mathematics and other values.
Disadvantages of SASS
- It takes time for a developer to learn new features present in this pre-processor.
- If many people are working on the same site, then should use the same preprocessor. Some people use Sass and some people use CSS to edit the files directly. Therefore, it becomes difficult to work on the site.
- There are chances of losing benefits of browser's built-in element inspector.
Sass - Installation
In this chapter, we will learn the step-by-step procedure to install Ruby, which is used for executing the SASS files.System Requirements for SASS
- Operating System − Cross-platform
- Browser Support − IE (Internet Explorer 8+), Firefox, Google Chrome, Safari, Opera
- Programming Language − Ruby
Installation of Ruby
Step 1 − Open the link https://www.ruby-lang.org/en/downloads/, you will see a screen as shown below −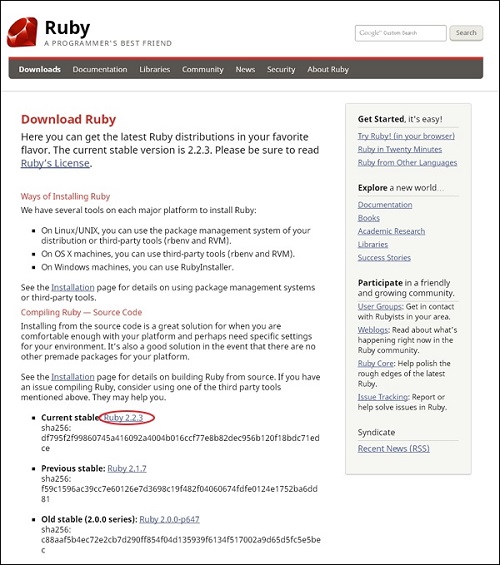 Download the Current stable version of the zip file.
Step 2 − Next, run the setup to install Ruby on the System.
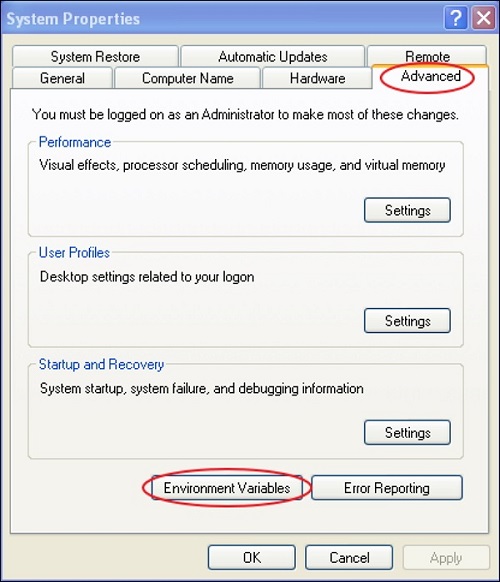
Step 3 − Next, add Ruby bin folder to your PATH User Variable and System Variable to work with gem command.
Path User Variable −
- Right Click the My Computer icon.
- Select Properties.
- Next, click the Advanced tab and click Environment Variables.
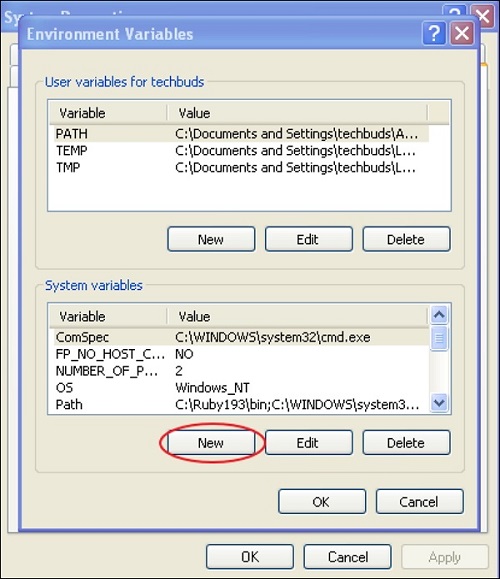
 In the Environment Variables window, double click the PATH as shown in the screenshot given below −
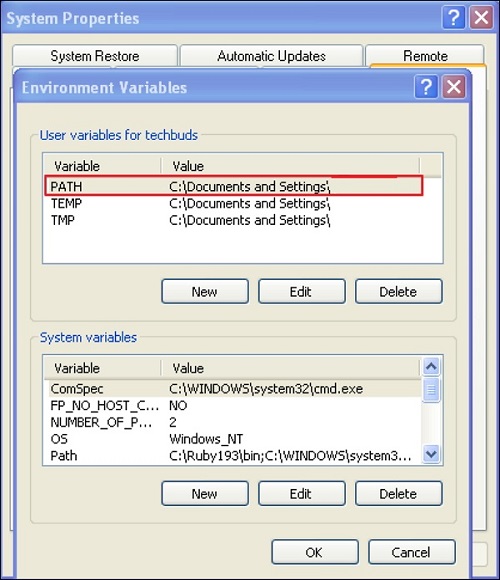 You will get an Edit User Variable box as shown. Add ruby bin folder path in the Variable value field as C:\Ruby\bin. If path is already set for other files, then put semicolon after that and add the Ruby folder path as shown below.
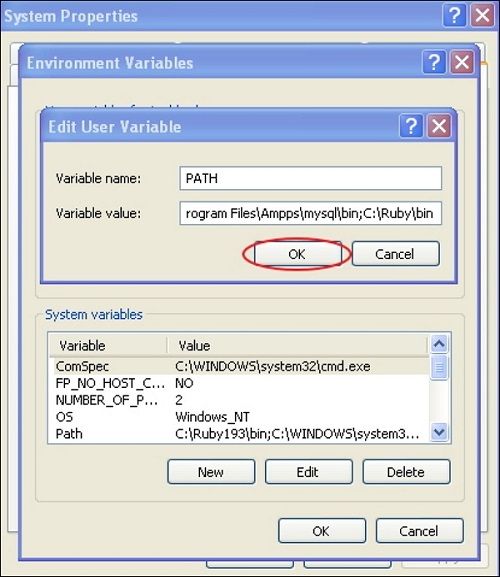 Click the OK button.
System Variable −
- Click the New button.
 Next, the New System Variable block is displayed as shown below.
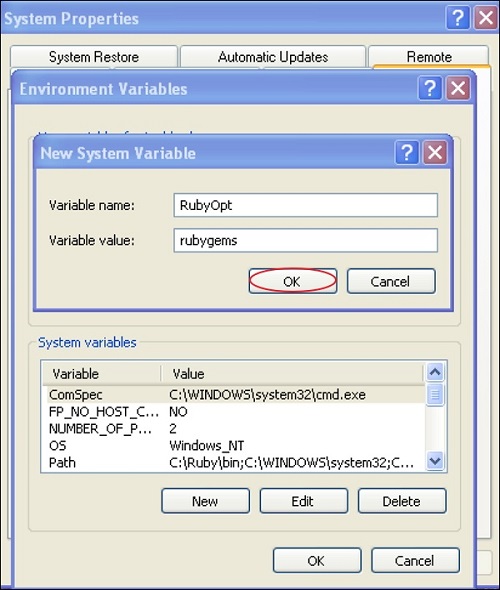 Enter RubyOpt in the Variable name field and rubygems in the Variable value field. After writing the Variable name and value, click the OK button.
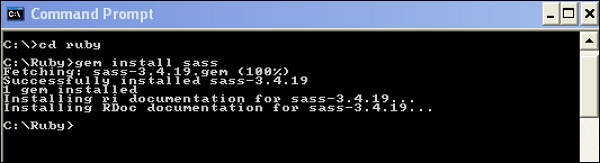
Step 4 − Open the command prompt in your system and enter the following line −
gem install sassStep 5 − Next, you will see the following screen after installing SASS successfully.
Example
The following is a simple example of SASS.<html> <head> <title> Import example of sass</title> <link rel = "stylesheet" type = "text/css" href = "style.css"/> </head> <body> <h1>Simple Example</h1> <h3>Welcome to TutorialsPoint</h3> </body> </html>Now, we will create file as style.scss, which is quite similar to CSS and the only one difference is that it will be saved with .scss extension. Both, .htm and .scss files should be created inside the folder ruby. You can save your .scss file in the folder ruby\lib\sass\ (before this process, create a folder as sass in lib directory).
h1{
   color: #AF80ED;
}

h3{
   color: #DE5E85;
}
You can tell SASS to watch the file and update the CSS whenever SASS file changes, by using the following command −
sass --watch C:\ruby\lib\sass\style.scss:style.css
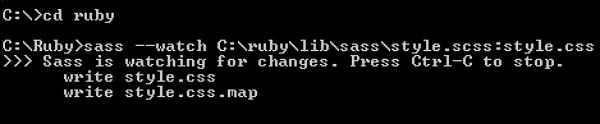 When you run the above command, it will create the style.css file automatically. Whenever you change the SCSS file, the style.css file will be updated automatically.
The style.css file will have the following code when you run the above given command −
style.css
h1 {
   color: #AF80ED;
}
h3 {
   color: #DE5E85;
}
Let us carry out the following steps to see how the above given code works −
- Save the above given code in hello.html file.
- Open this HTML file in a browser.
No comments:
Post a Comment