In this chapter, we will study about Creating Modules in Joomla. Modules are the extensions which are flexible and lightweight and useful for page rendering.
Step (1) − Create a folder called mod_firstmodule in your Joomla → modules folder.
 Step (2) − In the mod_firstmodule folder create a file
called as "helper.php". This file contains class name as helper, it
helps to display the retrieved data in the module output.
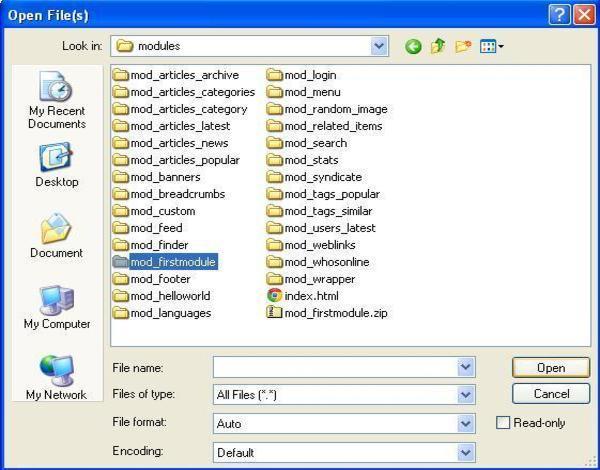
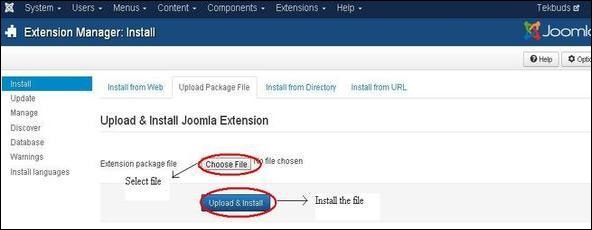
Step (7) − Go to Extension → Extension Manager in Joomla administrator and you will get the following screen. Here you can upload and install your created module files i.e. mod_firstmodule folder. Click on Choose File and select the created module file (compressed one). Click on Upload & Install button to upload the module file.
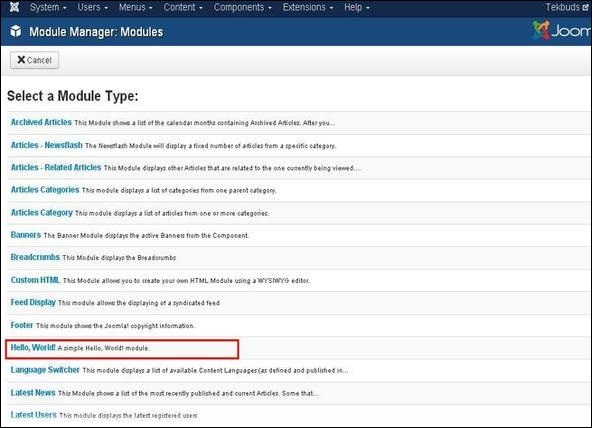
 Step (8) − After upload and installation, go to Module Manager and click on New. There you can view your created module file as shown below.
 Step (9) − You can assign this module similar to the other modules and then publish it.
Create Modules
Following are the simple steps to create modules in Joomla.Step (1) − Create a folder called mod_firstmodule in your Joomla → modules folder.
 Step (2) − In the mod_firstmodule folder create a file
called as "helper.php". This file contains class name as helper, it
helps to display the retrieved data in the module output.
Step (2) − In the mod_firstmodule folder create a file
called as "helper.php". This file contains class name as helper, it
helps to display the retrieved data in the module output.helper.php
<?php
   /**
      * Helper class for Hello World! module
      *
      * @package    Joomla.Tutorials
      * @subpackage Modules
      * @link http://docs.joomla.org/J3.x:Creating_a_simple_module/Developing_a_Basic_Module
      * @license        GNU/GPL, see LICENSE.php
      * mod_helloworld is free software. This version may have been modified pursuant
      * to the GNU General Public License, and as distributed it includes or
      * is derivative of works licensed under the GNU General Public License or
      * other free or open source software licenses.
   */

   class ModHelloWorldHelper {
      /**
         * Retrieves the hello message
         *
         * @param   array  $params An object containing the module parameters
         *
        * @access public
      */

      public static function getHello($params) {
         return 'Hello, World!';
      }
   }

?>
Step (3) − Create a file called as mod_helloworld.php. It is an entry point for the module which performs initialization routines, collects necessary data and displays the module output using template.
mod_helloworld.php
<?php
   /**
      * Hello World! Module Entry Point
      *
      * @package    Joomla.Tutorials
      * @subpackage Modules
      * @license    GNU/GPL, see LICENSE.php
      * @link       http://docs.joomla.org/J3.x:Creating_a_simple_module/Developing_a_Basic_Module
      * mod_helloworld is free software. This version may have been modified pursuant
      * to the GNU General Public License, and as distributed it includes or
      * is derivative of works licensed under the GNU General Public License or
      * other free or open source software licenses.
   */

   // No direct access
   defined('_JEXEC') or die;

   // Include the syndicate functions only once
   require_once dirname(__FILE__) . '/helper.php';

   $hello = modHelloWorldHelper::getHello($params);
   require JModuleHelper::getLayoutPath('mod_helloworld');
?>
Step (4) − Create a mod_helloworld.xml file. This file contains the information about module. This xml file contains information of files that are to be installed in Joomla for the module.
mod_helloworld.xml file
<?xml version = "1.0" encoding = "utf-8"?>

<extension type = "module" version = "3.1.0" client = "site" method="upgrade">

   <name>Hello, World!</name>
   <author>Tutorials Point</author>
   <version>1.0.0</version>
   <description>A simple Hello World! module.</description>

   <files>
      <filename>mod_helloworld.xml</filename>
      <filename module = "mod_helloworld">mod_helloworld.php</filename>
      <filename>index.html</filename>
      <filename>helper.php</filename>
      <filename>tmpl/default.php</filename>
      <filename>tmpl/index.html</filename>
   </files>

   <config>
   </config>

</extension>
Step (5) − Create a simple html file called index.html. The purpose of writing this file is that, the created directories should not be browsed. When a user browses into these directories, the index.html file gets displayed. You can even keep this file empty.
index.html
<html>
   <body> Welcome to Tutorials Point!!!!! </body>
</html>
Step (6) − Create a folder called as tmpl. Place default.php file as shown below and index.html (created in step (5)) under tmpl folder. The default.php file is a template that displays the module output.
default.php
<?php
   /**
      * @package Joomla.Site
      * @subpackage mod_firstmodule
      * @copyright Copyright (C) 2005 - 2012 Open Source Matters, Inc. All rights reserved.
      * @license GNU General Public License version 2 or later; see LICENSE.txt
   */

defined('_JEXEC') or die;
>

<p>Hello World!!!!!!</p>
After you have finished creating all these files, compress the complete folder mod_firstmodule.
Step (7) − Go to Extension → Extension Manager in Joomla administrator and you will get the following screen. Here you can upload and install your created module files i.e. mod_firstmodule folder. Click on Choose File and select the created module file (compressed one). Click on Upload & Install button to upload the module file.
 Step (8) − After upload and installation, go to Module Manager and click on New. There you can view your created module file as shown below.
 Step (9) − You can assign this module similar to the other modules and then publish it.
No comments:
Post a Comment