As power of GWT lies in
Write in Java, Run in JavaScript, we'll be using Java IDE Eclipse to demonstrate our examples. Let's start with a simple
HelloWorld application:
Step 1 - Create Project
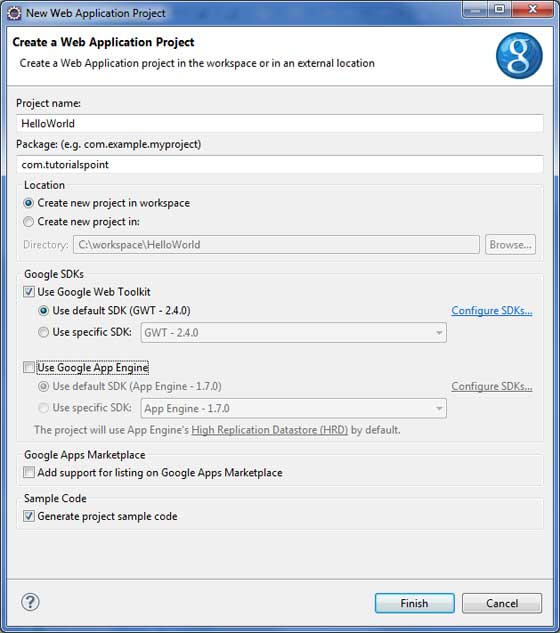
The first step is to create a simple Web Application Project using Eclipse IDE. Launch project wizard using the option
Google Icon  > New Web Application Project...
. Now name your project as
HelloWorld using the wizard window as follows:

Unselect
Use Google App Engine because we're not using it in this project and leave other default values (keep
Generate Sample project code
option checked) as such and click Finish Button. Once your project is
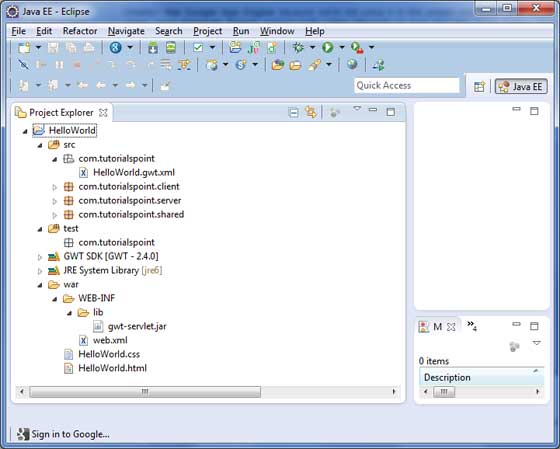
created successfully, you will have following content in your Project
Explorer:

Here is brief description of all important folders:
| Folder | Location |
|---|
| src |
- Source code (java classes) files.
- Client folder containing the client-side specific java classes responsible for client UI display.
- Server folder containing the server-side java classes responsible for server side processing.
- Shared folder containing the java model class to transfer data from server to client and vice versa.
- HelloWorld.gwt.xml, a module descriptor file required for GWT compiler to compile the HelloWorld project.
|
| test |
- Test code (java classes) source files.
- Client folder containing the java classes responsible to test gwt client side code.
|
| war |
- This is the most important part, it represents the actual deployable web application.
- WEB-INF containing compiled classes, gwt libraries, servlet libraries.
- HelloWorld.css, project style sheet.
- HelloWorld.html, hots HTML which will invoke GWT UI Application.
|
Step 2 - Modify Module Descriptor: HelloWorld.gwt.xml
GWT plugin will create a default module descriptor file
src/com.tutorialspoint/HelloWorld.gwt.xml which is given below. For this example we are not modifying it, but you can modify it based on your requirement.
<?xml version="1.0" encoding="UTF-8"?>
<module rename-to='helloworld'>
  <!-- Inherit the core Web Toolkit stuff.                        -->
  <inherits name='com.google.gwt.user.User'/>

  <!-- Inherit the default GWT style sheet.  You can change       -->
  <!-- the theme of your GWT application by uncommenting          -->
  <!-- any one of the following lines.                            -->
  <inherits name='com.google.gwt.user.theme.clean.Clean'/>
  <!-- <inherits name='com.google.gwt.user.theme.chrome.Chrome'/> -->
  <!-- <inherits name='com.google.gwt.user.theme.dark.Dark'/>     -->

  <!-- Other module inherits                                      -->

  <!-- Specify the app entry point class.                         -->
  <entry-point class='com.tutorialspoint.client.HelloWorld'/>

  <!-- Specify the paths for translatable code                    -->
  <source path='client'/>
  <source path='shared'/>

</module>
Step 3 - Modify Style Sheet: HelloWorld.css
GWT plugin will create a default Style Sheet file
war/HelloWorld.css. Let us modify this file to keep our example at simplest level of understaning:
body {
   text-align: center;
   font-family: verdana, sans-serif;
}
h1 {
  font-size: 2em;
  font-weight: bold;
  color: #777777;
  margin: 40px 0px 70px;
  text-align: center;
}
Step 4 - Modify Host File: HelloWorld.html
GWT plugin will create a default HTML host file
war/HelloWorld.html. Let us modify this file to keep our example at simplest level of understaning:
<html>
<head>
<title>Hello World</title>
   <link rel="stylesheet" href="HelloWorld.css"/>
   <script language="javascript" src="helloworld/helloworld.nocache.js">
   </script>
</head>
<body>

<h1>Hello World</h1>
<p>Welcome to first GWT application</p>

</body>
</html>
You can create more static files like HTML, CSS or images in the same
source directory or you can create further sub-directories and move
files in those sub-directories and configure those sub-directories in
module descriptor of the application.
Step 5 - Modify Entry Point: HelloWorld.java
GWT plugin will create a default Java file
src/com.tutorialspoint/HelloWorld.java, which keeps an entry point for the application. Let us modify this file to display "Hello,World!":
package com.tutorialspoint.client;

import com.google.gwt.core.client.EntryPoint;
import com.google.gwt.user.client.Window;

public class HelloWorld implements EntryPoint {
   public void onModuleLoad() {
    Window.alert("Hello, World!");
   }
}
You can create more Java files in the same source directory to define either entry points or to define helper routines.
Step 6 - Compile Application
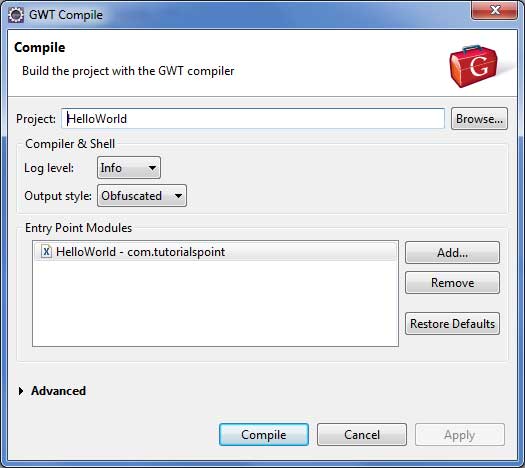
Once you are ready with all the changes done, its time to compile the project. Use the option
Google Icon  > GWT Compile Project...
 to launch GWT Compile dialogue box as shown below:

Keep default values intact and click Compile button. If everything goes fine, you will see following output in Eclipse console
Compiling module com.tutorialspoint.HelloWorld
   Compiling 6 permutations
      Compiling permutation 0...
      Compiling permutation 1...
      Compiling permutation 2...
      Compiling permutation 3...
      Compiling permutation 4...
      Compiling permutation 5...
   Compile of permutations succeeded
Linking into C:\workspace\HelloWorld\war\helloworld
   Link succeeded
   Compilation succeeded -- 33.029s
Step 6 - Run Application
Now click on

Run application menu and select
HelloWorld application to run the application.

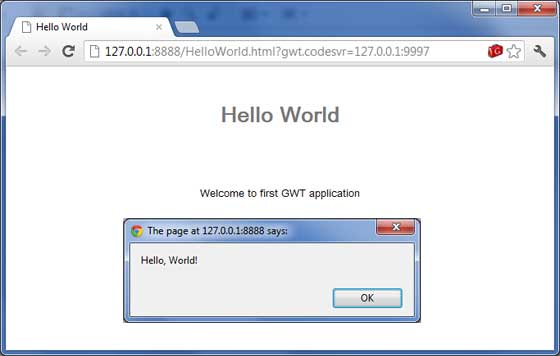
If everything is fine, you must see GWT Development Mode active in
Eclipse containing a URL as shown below. Double click the URL to open
the GWT application.

Because you are running your application in development mode, so you
will need to install GWT plugin for your browser. Simply follow the
onscreen instructions to install the plugin. If you already have GWT
plugin set for your browser, then you should be able to see the
following output:

Congratulations! you have implemented your first application using Google Web Toolkit (GWT).
 > New Web Application Project.... Now name your project as HelloWorld using the wizard window as follows:
 Unselect Use Google App Engine because we're not using it in this project and leave other default values (keep Generate Sample project code
option checked) as such and click Finish Button. Once your project is
created successfully, you will have following content in your Project
Explorer:
 Here is brief description of all important folders:
 > GWT Compile Project... to launch GWT Compile dialogue box as shown below:
 Keep default values intact and click Compile button. If everything goes fine, you will see following output in Eclipse console
 Run application menu and select HelloWorld application to run the application.
 If everything is fine, you must see GWT Development Mode active in
Eclipse containing a URL as shown below. Double click the URL to open
the GWT application.
 Because you are running your application in development mode, so you
will need to install GWT plugin for your browser. Simply follow the
onscreen instructions to install the plugin. If you already have GWT
plugin set for your browser, then you should be able to see the
following output:
 Congratulations! you have implemented your first application using Google Web Toolkit (GWT).
 Unselect Use Google App Engine because we're not using it in this project and leave other default values (keep Generate Sample project code
option checked) as such and click Finish Button. Once your project is
created successfully, you will have following content in your Project
Explorer:
 Here is brief description of all important folders:
 Keep default values intact and click Compile button. If everything goes fine, you will see following output in Eclipse console
 If everything is fine, you must see GWT Development Mode active in
Eclipse containing a URL as shown below. Double click the URL to open
the GWT application.
 Because you are running your application in development mode, so you
will need to install GWT plugin for your browser. Simply follow the
onscreen instructions to install the plugin. If you already have GWT
plugin set for your browser, then you should be able to see the
following output:
 Congratulations! you have implemented your first application using Google Web Toolkit (GWT).
No comments:
Post a Comment