
Magento - Overview
What is E-commerce?
E-commerce (Electronic Commerce) is a type of business that involves the commercial transaction or purchasing or selling of goods and services through electronic channels known as internet. It was first introduced in the year 1960 through EDI (Electronic Data Interchange) on VAN (Value-added network).Using E-commerce, you can sell physical products or services (where the payment is made online).
Following are the categories of E-commerce −
- B2B (Business to Business) − This transaction is between businesses. It is between the wholesaler and the retailer or between the manufacturer and the wholesaler.
- B2C (Business to Consumer) − This transaction is between businesses and consumers. In this type of transaction, merchants sell products to consumers through shopping cart software.
- C2C (Consumer to Consumer) − In this type of transaction, one consumer or customer interacts with other consumers through internet.
- C2B (Consumer to Business) − This transaction is between the consumer or the customer and businesses or organizations where the consumer makes a product that the organization uses it to complete the business.
What is Magento?
Magento is an open source E-commerce software, created by Varien Inc., which is useful for online business. It has a flexible modular architecture. It is scalable and it has many control options that helps the user to build both user-friendly and search engine friendly websites.Magento uses E-commerce platform which offers companies the ultimate E-commerce solutions and extensive support network. Magento allows user to update E-commerce website automatically. It is simple, quick and versatile to use.
Magento was developed by Varien Inc., and it was first released on March 31, 2008.
Why to Use Magento?
- Magento is an open source E-commerce software.
- Magento is scalable and offers small organizations to build business.
- Magento enables searching and sorting of products in several ways.
- Magento easily integrates with many of the third-party sites which are needed to run effective E-commerce website.
Features
- Magento provides different payment methods such as credit cards, PayPal, cheques, money order, Google checkouts, etc.
- Magento enables shipping of products in one order to multiple addresses.
- Magento helps to manage the orders easily by using the admin panel.
- Magento provides order of product status and history of product. It also supports e-mail and RSS feeds.
- Magento supports multiple languages, different currencies and tax rates.
- Magento filters the products and displays in grid or list format.
- Magento makes it easy to browse the products. It has features such as image zoom-in and checking of stock availability.
- Magento has built-in SEO (Search Engine Optimization).
Advantages
- Magento is user friendly E-commerce software.
- Magento is compatible with smartphones, tablets and other mobile devices.
- Magento provides multiple payment options, so every visitor can make payment based on their preferred payment gateway.
- Magento has many extensions which support the development of an online store.
Disadvantages
- Magento uses larger disk space and memory.
- Magento takes longer time to build the customized functionality.
- Magento is very slow compared to other E-commerce sites.
- Magento needs proper hosting environment. If the hosting environment is improper, the user can face many problems.
Magento - Installation
This chapter provides step-by-step procedure for Magento installation. Before installing Magento, you require the following system requirements.System Requirements for Magento
- Database − MySQL 5.1 +
- Web Server −
- Apache 2.x
- Nginx 1.7.x
- Operating System − Cross-platform
- Browser Support − IE (Internet Explorer 7), Firefox, Google chrome
- SSL (Secure Socket Layer) − A valid security certificate is required for HTTPS
- PHP Compatibility − PHP 5.4+
Download Magento
Step (1) − Open the link https://www.magentocommerce.com/products/downloads/magento/, you will get to see the following screen −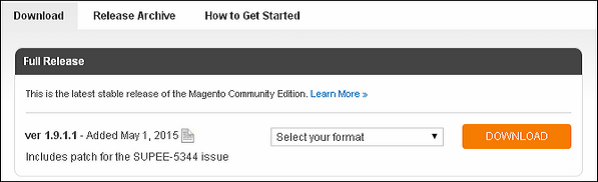 Step (2) − Click on the dropdown menu, the archive file is available in .zip, .tar.gz and .tar.bz2 for downloading.
 Step (3) − Extract the Magento web files from the archive on your computer and upload it into your web server or localhost.
Step (4) − Magento requires MySQL database. So create a new empty database and user/password (for e.g. user as "root" and password as "root" or else you can set as per your convenience) for Magento.
Step (5) − Open your browser and navigate to your Magento file path (for e.g. http://localhost/magento) to start your Magento installation. Then you will get a screen of the Magento installer as shown in the following screenshot.
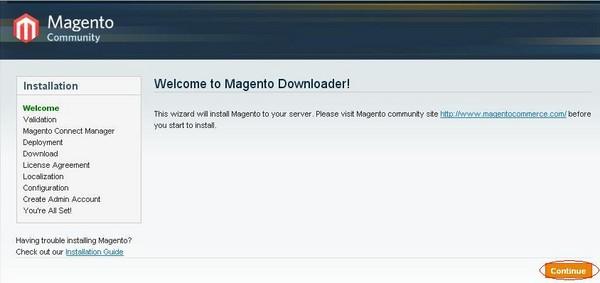 Step (6) − Click on Continue button and you will get Validation for Magento Downloader screen as shown in the following screen.
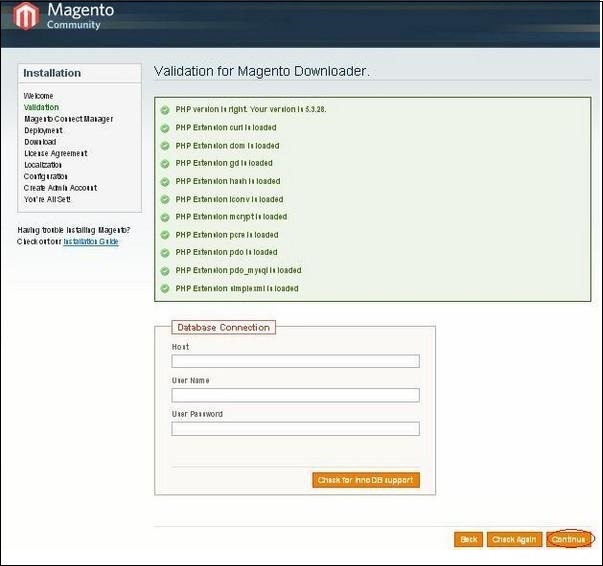 Here, enter the database details, if you want to check for InnoDB support for Magento. Otherwise, click on Continue button to proceed to the next step.
Step (7) − Next, you will get Magento Connect Manager Deployment screen.
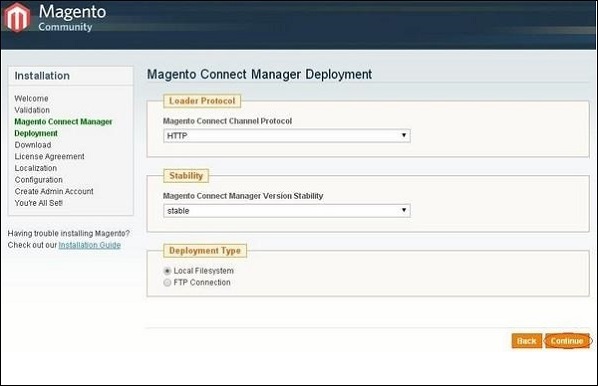 It gives protocol name (HTTP or FTP), stability version such as stable, beta, alpha and deployment type. Select proper options and click on the Continue button. It will start the downloading process for Magento.
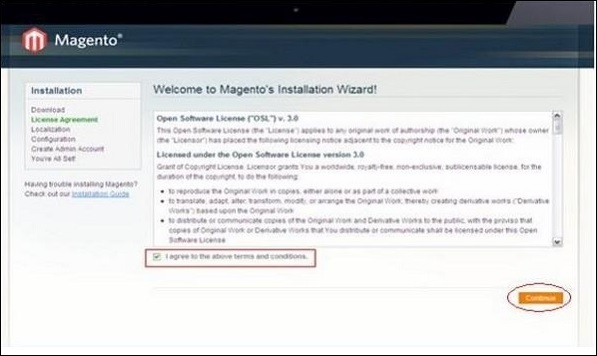
Step (8) − Magento's Installation Wizard screen pops up. Check the I agree to the above terms and conditions checkbox and click on the Continue button.
 Step (9) − Next you will get the Localization screen for selecting the Locale, Time Zone and Currency as shown in the following screen.
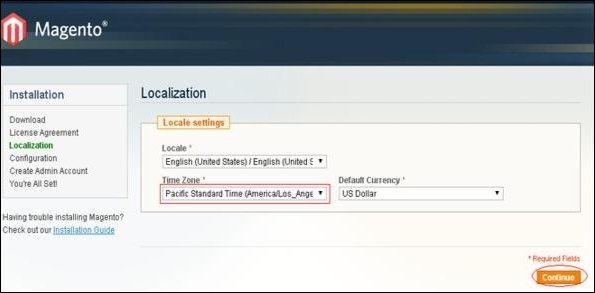 Select proper locale name, time zone and currency and click on the Continue button.
Step (10) − The next screen that pops up is the Configuration screen.
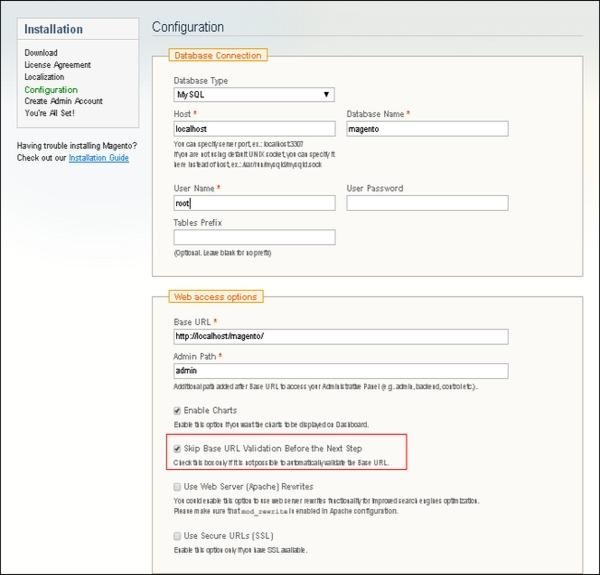 Fill the database information such as Database Type, Host, Database Name, User Name and User Password. If you do not want to validate the Base URL, then tick the Skip Base URL validation before Next Step checkbox and click on the Continue button.
In case the http://localhost/magento doesn't work, use this as base url instead- http://127.0.0.1/magentoThis step will take some time as Magento will be creating the Database Tables.
Step (11) − Now, go to the Create Admin Account screen.
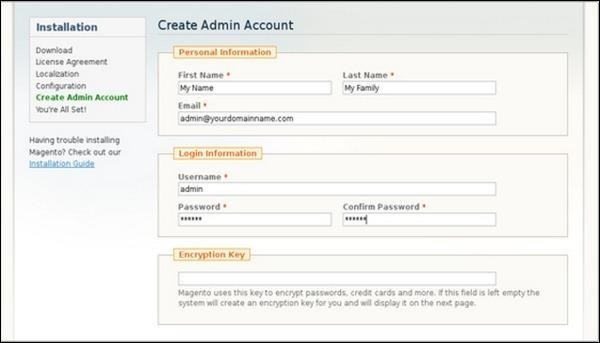 Here enter your personal information such as First Name, Last Name and Email and the Login Information such as Username, Password and Confirm Password for admin to use in backend. Need not worry about Encryption Key field as Magento will generate a key on the next page. After filling all information, click on the Continue button.
Step (12) − Copy the encryption key, which will be used to encrypt passwords, credit cards and other confidential information. Then you can select Frontend or Backend of new Magento website.
Step (13) − After successful installation of Magento, click on the Go to Backend button to login to admin panel.
 Step (14) − After logging in, you will get the Dashboard of Admin panel as shown in the following screen.
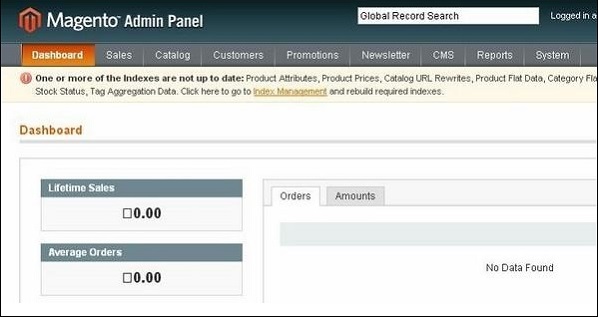
Magento - Architecture
In this chapter, we are going to discuss the architectural style of Magento, for implementing user interfaces. The following diagram shows the architecture of Magento −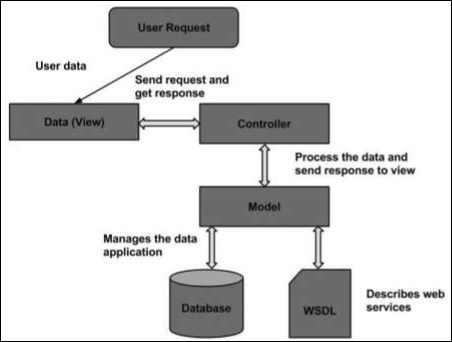 The Magento architecture comes with Models, Views and Controllers.
- User Request − The user sends a request to a server in the form of request message where web browsers, search engines, etc. act like clients.
- View − View represents the data in particular format. It is the user interface which is responsible for displaying the response for user request. It specifies an idea behind the presentation of the model's data to the user. Views are used to reflect "how your data should look like".
- Controller − The controller is responsible for responding to user input and perform interactions on the data model objects. It uses models to process the data and send responses back to the view.
- Model − The model is responsible for managing the data of the application. It contains logic of the data and represents basic data object in the framework. It responds to request from the view and to the instructions from the controller to update itself.
- Database − Database contains the information which is requested from the user. When the user requests data, view sends requests to the controller, the controller requests from the model and the model fetches the required information from the database and responds to the user.
- WSDL − WSDL stands for Web Services Description Language. It is used for describing web services and how to access them.
Magento - Product Overview
Magento Products
Products are the items or things that are sold in Magento. Product can be anything that is capable of satisfying the customer’s needs. This includes both physical products and services.Product Types
Magento provides 6 different types of products. Appropriate selection of product type is essential for accessing the appropriate set of features required to sell the product. Following are the product types available in Magento.- Simple Products
- Grouped Products
- Configurable Products
- Virtual Products
- Bundled Products
- Downloadable Products
Simple Products
These are general product type, which are the most used products. In this section, there are no options for selecting size or color of the product.Example − Coffee cup, DVD's, Camera lens, etc.
Grouped Products
This is a group of simple products. In this type, you cannot specify a specific price for a product; you can just specify the discount.Example − Cell phone + Memory card + Ear phone
Configurable Products
In this type, customer can select products according to their color and size before purchasing.Example − Cell phones obtained in different colors and sizes.
Virtual Products
Virtual products are those which do not have physical counterpart, i.e. these are used for virtual items. These products cannot be shipped or stocked.Example − Online training course
Bundled Products
Bundled products are those products which cannot be sold separately and doesn't give any choice to the end user.Example − Consider you want to buy a cell phone which includes earphone, memory card, battery, charging cable, etc. These are together called bundled products. These products cannot be sold individually but can be sold within the bundle product.
Downloadable Products
Products which are available for download are known as downloadable products.Example − MP3 file, ebook, documents, etc.
Product Attributes
Attribute describes the property of the product. Product attributes helps to set product properties such as color, size width, height, etc. and makes the product unique. You can add as many attributes to your product as required.The following steps describe, how to set up the attributes for products in Magento −
Step (1) − Login to your Magento Admin Panel.
Step (2) − Go to Catalog and select Attributes from the dropdown menu and click on the Manage Attributes option.
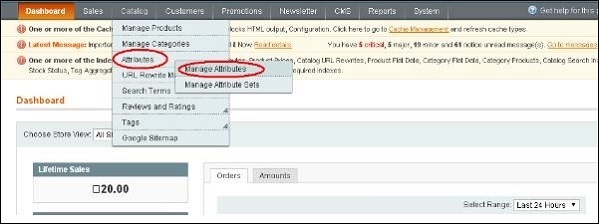 Step (3) − Under Manage Attributes section, you will find different attributes used in the system. For adding new attribute, click on Add New Attribute seen on the top right corner of the screen.
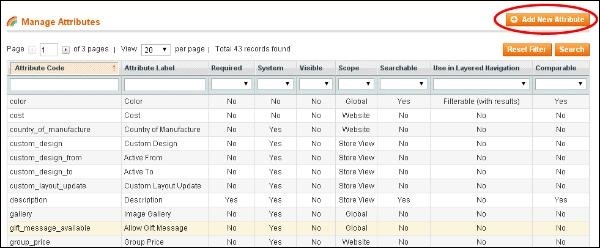 Step (4) − Now you need to set the attribute properties for
your product. After setting up all the required attribute properties,
click on Save Attribute button to store the product information.
Step (4) − Now you need to set the attribute properties for
your product. After setting up all the required attribute properties,
click on Save Attribute button to store the product information.
Magento - Setup Languages
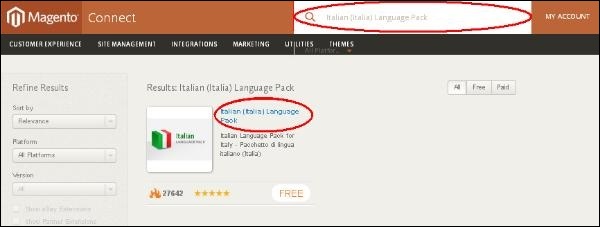
In this chapter, we will see how to use the Multilanguage feature of Magento.Step (1) − Go to the official website of Magento and search for a new language pack using search field. For instance, if you want to search for Italian language, type Italian Language Pack in search box and press enter. It displays the installation package file. Click on it.
 Step (2) − You get a package for installing language. You must login to the site to get a language pack. After you login, you get the Extension Key as shown in the following screen.
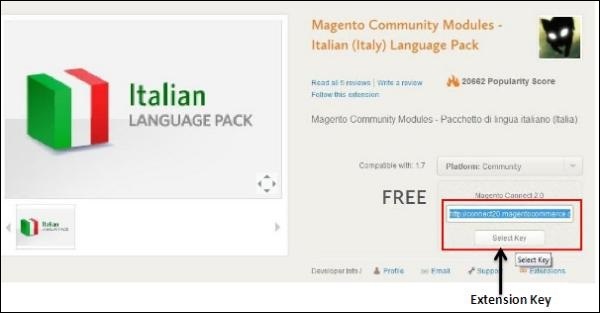 Step (3) − Now login to your Magento Admin Panel and go to the System → Magento Connect → Magento Connect Manager option.
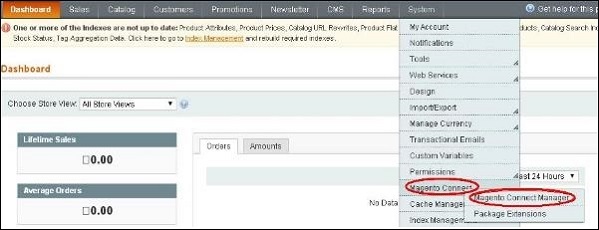 Step (4) − It again asks you to login. Enter your credentials to redirect to Magento Connect Manager window.
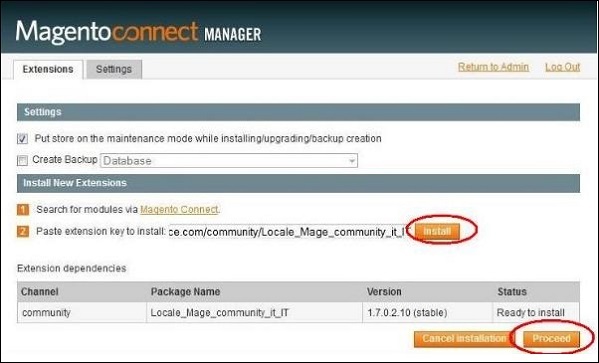
Step (5) − Now under Extensions section, paste the Extension Key (that you had already copied in step 2) and click on Install button. It then displays a status as "Ready to install" and click on Proceed button to install the language.
 Step (6) − It checks for dependencies of packages and displays the message as Cache cleaned successfully. Now go to admin dashboard page by clicking on Return to Admin link.
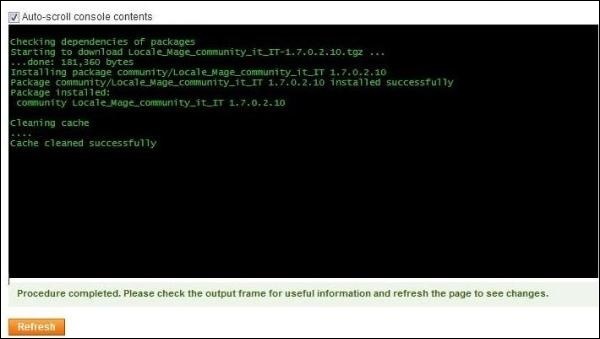 Step (7) − Go to the System menu and click on Manage Stores option.
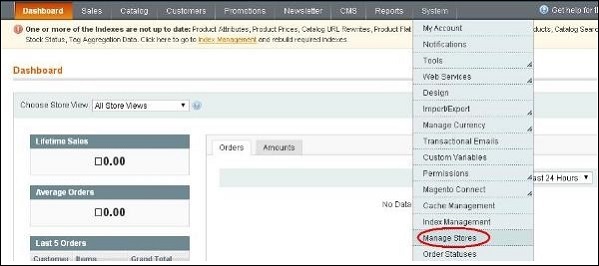 Step (8) − You will get Manage Stores section to create store view as shown in the following screen.
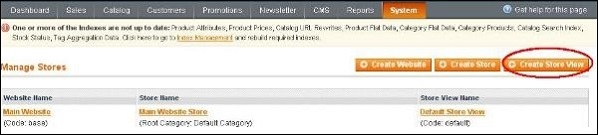 Step (9) − Click on Create Store View button and enter the information for Store, Name, Code, Status and Sort Order fields and click on Save Store View button to store the view as shown in the following screen.
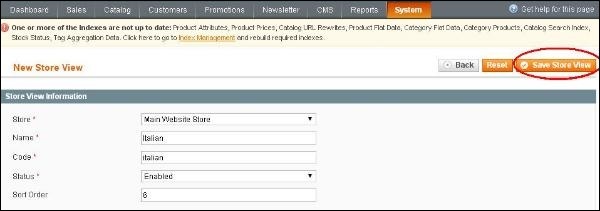 Step (10) − To set up your stored language pack, go to the System menu and click on the Configuration option.
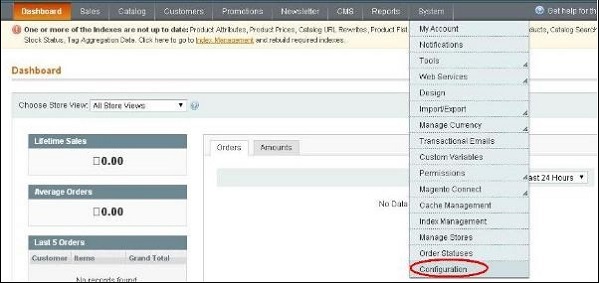 Step (11) − Go to Current Configuration Scope section on the left side of the page and select the Italian option from the dropdown menu.
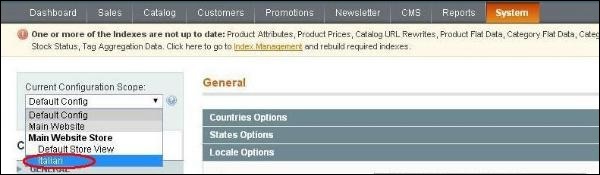 Step (12) − Now under General section, click on Locale Options, uncheck the Use Website checkbox, select the Italian (Italy) option from the dropdown menu of Locale field and click on Save Config button.
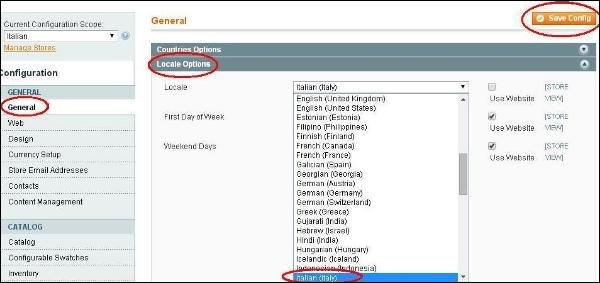 This saves your language in Magento and selected langauge will be assigned in the selected store view.
No comments:
Post a Comment