This chapter takes you through the process of setting up Apache POI
on Windows and Linux based systems. Apache POI can easily be installed
and integrated with your current Java environment, following a few
simple steps without any complex setup procedures. User administration
is required for installation.
Let us now proceed with the steps to install Apache POI.
If the Java installation has been done properly, then it will display the current version and specification of your Java installation. A sample output is given in the following table.
Append the full path of Java compiler location to the System Path.
Execute the command java -version from the command prompt as explained above.
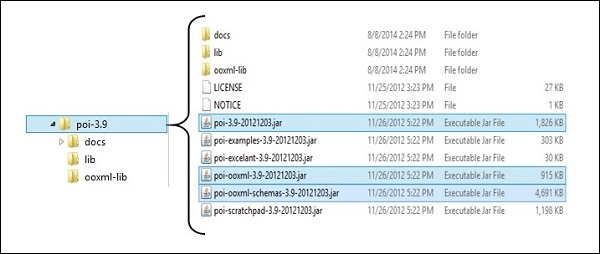
The following images show the directories and the file structures inside the downloaded folder:

 Add the complete path of the five jars as highlighted in the above image to the CLASSPATH.
System Requirements
| JDK | Java SE 2 JDK 1.5 or above |
|---|---|
| Memory | 1 GB RAM (recommended) |
| Disk Space | No minimum requirement |
| Operating System Version | Windows XP or above, Linux |
Step 1: Verify your Java Installation
First of all, you need to have Java Software Development Kit (SDK) installed on your system. To verify this, execute any of the following two commands depending on the platform you are working on.If the Java installation has been done properly, then it will display the current version and specification of your Java installation. A sample output is given in the following table.
| Platform | Command | Sample Output |
|---|---|---|
| Windows | Open Command Console and type: \>java –version |
Java version "1.7.0_60" Java (TM) SE Run Time Environment (build 1.7.0_60-b19) Java Hotspot (TM) 64-bit Server VM (build 24.60-b09,mixed mode) |
| Linux | Open Command terminal and type: $java –version |
java version "1.7.0_25" Open JDK Runtime Environment (rhel-2.3.10.4.el6_4-x86_64) Open JDK 64-Bit Server VM (build 23.7-b01, mixed mode) |
- We assume that the readers of this tutorial have Java SDK version 1.7.0_60 installed on their system.
- In case you do not have Java SDK, download its current version from http://www.oracle.com/technetwork/java/javase/downloads/index.html and install it.
Step 2: Set your Java Environment
Set the environment variable JAVA_HOME to point to the base directory location where Java is installed on your machine. For example,| Platform | Description |
|---|---|
| Windows | Set JAVA_HOME to C:\ProgramFiles\java\jdk1.7.0_60 |
| Linux | Export JAVA_HOME=/usr/local/java-current |
| Platform | Description |
|---|---|
| Windows | Append the String "C:\Program Files\Java\jdk1.7.0_60\bin" to the end of the system variable PATH. |
| Linux | Export PATH=$PATH:$JAVA_HOME/bin/ |
Step 3: Install Apache POI Library
Download the latest version of Apache POI from http://poi.apache.org/download.html and unzip its contents to a folder from where the required libraries can be linked to your Java program. Let us assume the files are collected in a folder on C drive.The following images show the directories and the file structures inside the downloaded folder:

 Add the complete path of the five jars as highlighted in the above image to the CLASSPATH.
| Platform | Description |
|---|---|
| Windows | Append the following strings to the end of the user variable CLASSPATH: “C:\poi-3.9\poi-3.9-20121203.jar;” “C:\poi-3.9\poi-ooxml-3.9-20121203.jar;” “C:\poi-3.9\poi-ooxml-schemas-3.9-20121203.jar;” “C:\poi-3.9\ooxml-lib\dom4j-1.6.1.jar;” “C:\poi-3.9\ooxml-lib\xmlbeans-2.3.0.jar;.;” |
| Linux | Export CLASSPATH=$CLASSPATH: /usr/share/poi-3.9/poi-3.9-20121203.tar: /usr/share/poi-3.9/poi-ooxml-schemas-3.9-20121203.tar: /usr/share/poi-3.9/poi-ooxml-3.9-20121203.tar: /usr/share/poi-3.9/ooxml-lib/dom4j-1.6.1.tar: /usr/share/poi-3.9/ooxml-lib/xmlbeans-2.3.0.tar |

No comments:
Post a Comment