
The RTCPeerConnection API is the core of the peer-to-peer connection
between each of the browsers. To create the RTCPeerConnection objects
simply write
Depending upon whether you are the caller or the callee the RTCPeerConnection object is used in a slightly different way on each side of the connection.
Here is an example of the user's flow −
There will be two text inputs on the page, one for a login and one for a username we want to connect to. Create an index.html file and add the following code −
 The next step is to create an offer to the other peer. Add the following code to your client.js file −
 Now the peer-to-peer connection is established. In the next
tutorials, we will add video and audio streams as well as text chat
support.
Now the peer-to-peer connection is established. In the next
tutorials, we will add video and audio streams as well as text chat
support.
var pc = RTCPeerConnection(config);where the config argument contains at least on key, iceServers. It is an array of URL objects containing information about STUN and TURN servers, used during the finding of the ICE candidates. You can find a list of available public STUN servers at code.google.com
Depending upon whether you are the caller or the callee the RTCPeerConnection object is used in a slightly different way on each side of the connection.
Here is an example of the user's flow −
- Register the onicecandidate handler. It sends any ICE candidates to the other peer, as they are received.
- Register the onaddstream handler. It handles the displaying of the video stream once it is received from the remote peer.
- Register the message handler. Your signaling server should also have a handler for messages received from the other peer. If the message contains the RTCSessionDescription object, it should be added to the RTCPeerConnection object using the setRemoteDescription() method. If the message contains the RTCIceCandidate object, it should be added to the RTCPeerConnection object using the addIceCandidate() method.
- Utilize getUserMedia() to set up your local media stream and add it to the RTCPeerConnection object using the addStream() method.
- Start offer/answer negotiation process. This is the only step where the caller's flow is different from the callee's one. The caller starts negotiation using the createOffer() method and registers a callback that receives the RTCSessionDescription object. Then this callback should add this RTCSessionDescription object to your RTCPeerConnection object using setLocalDescription(). And finally, the caller should send this RTCSessionDescription to the remote peer using the signaling server. The callee, on the other, registers the same callback, but in the createAnswer() method. Notice that the callee flow is initiated only after the offer is received from the caller.
RTCPeerConnection API
Properties
- RTCPeerConnection.iceConnectionState (read only) − Returns
an RTCIceConnectionState enum that describes the state of the
connection. An iceconnectionstatechange event is fired when this value
changes. The possible values −
- new − the ICE agent is waiting for remote candidates or gathering addresses
- checking − the ICE agent has remote candidates, but it has not found a connection yet
- connected − the ICE agent has found a usable connection, but is still checking more remote candidate for better connection.
- completed − the ICE agent has found a usable connection and stopped testing remote candidates.
- failed − the ICE agent has checked all the remote candidates but didn't find a match for at least one component.
- disconnected − at least one component is no longer alive.
- closed − the ICE agent is closed.
- RTCPeerConnection.iceGatheringState (read only) − Returns a RTCIceGatheringState enum that describes the ICE gathering state for the connection −
- new − the object was just created.
- gathering − the ICE agent is in the process of gathering candidates
- complete the ICE agent has completed gathering.
- RTCPeerConnection.localDescription (read only) − Returns an RTCSessionDescription describing the local session. It can be null if it has not yet been set.
- RTCPeerConnection.peerIdentity (read only) − Returns an RTCIdentityAssertion. It consists of an idp(domain name) and a name representing the identity of the remote peer.
- RTCPeerConnection.remoteDescription (read only) − Return an RTCSessionDescription describing the remote session. It can be null if it has not yet been set.
- RTCPeerConnection.signalingState (read only) − Returns an
RTCSignalingState enum that describes the signaling state of the local
connection. This state describes the SDP offer. A signalingstatechange
event is fired when this value changes. The possible values −
- stable − The initial state. There is no SDP offer/answer exchange in progress.
- have-local-offer − the local side of the connection has locally applied a SDP offer.
- have-remote-offer − the remote side of the connection has locally applied a SDP offer.
- have-local-pranswer − a remote SDP offer has been applied, and a SDP pranswer applied locally.
- have-remote-pranswer − a local SDP has been applied, and a SDP pranswer applied remotely.
- closed − the connection is closed.
Event Handlers
Methods
Establishing a Connection
Now let's create an example application. Firstly, run the signaling server we created in the “signaling server” tutorial via “node server”.There will be two text inputs on the page, one for a login and one for a username we want to connect to. Create an index.html file and add the following code −
<html lang = "en">
   <head>
      <meta charset = "utf-8" />
   </head>

   <body>

      <div>
         <input type = "text" id = "loginInput" />
         <button id = "loginBtn">Login</button>
      </div>

      <div>
         <input type = "text" id = "otherUsernameInput" />
         <button id = "connectToOtherUsernameBtn">Establish connection</button>
      </div>

      <script src = "client2.js"></script>

   </body>

</html>
You can see that we've added the text input for a login, the login button, the text input for the other peer username, and the connect-to-him button. Now create a client.js file and add the following code −
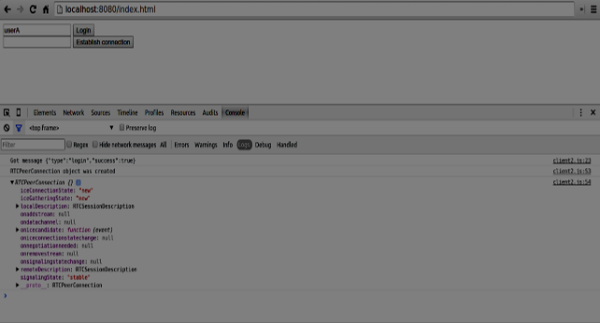
var connection = new WebSocket('ws://localhost:9090');
var name = "";

var loginInput = document.querySelector('#loginInput');
var loginBtn = document.querySelector('#loginBtn');
var otherUsernameInput = document.querySelector('#otherUsernameInput');
var connectToOtherUsernameBtn = document.querySelector('#connectToOtherUsernameBtn');
var connectedUser, myConnection;

//when a user clicks the login button
loginBtn.addEventListener("click", function(event){
   name = loginInput.value;

   if(name.length > 0){
      send({
         type: "login",
         name: name
      });
   }

});

//handle messages from the server
connection.onmessage = function (message) {
   console.log("Got message", message.data);
   var data = JSON.parse(message.data);

   switch(data.type) {
      case "login":
         onLogin(data.success);
         break;
      case "offer":
         onOffer(data.offer, data.name);
         break;
      case "answer":
         onAnswer(data.answer);
         break;
      case "candidate":
         onCandidate(data.candidate);
         break;
      default:
         break;
   }
};

//when a user logs in
function onLogin(success) {

   if (success === false) {
      alert("oops...try a different username");
   } else {
      //creating our RTCPeerConnection object

      var configuration = {
         "iceServers": [{ "url": "stun:stun.1.google.com:19302" }]
      };

      myConnection = new webkitRTCPeerConnection(configuration);
      console.log("RTCPeerConnection object was created");
      console.log(myConnection);

      //setup ice handling
      //when the browser finds an ice candidate we send it to another peer
      myConnection.onicecandidate = function (event) {

         if (event.candidate) {
            send({
               type: "candidate",
               candidate: event.candidate
            });
         }
      };
   }
};

connection.onopen = function () {
   console.log("Connected");
};

connection.onerror = function (err) {
   console.log("Got error", err);
};

// Alias for sending messages in JSON format
function send(message) {

   if (connectedUser) {
      message.name = connectedUser;
   }

   connection.send(JSON.stringify(message));
};
You can see that we establish a socket connection to our signaling server. When a user clicks on the login button the application sends his username to the server. If login is successful the application creates the RTCPeerConnection object and setup onicecandidate handler which sends all found icecandidates to the other peer. Now open the page and try to login. You should see the following console output −
The next step is to create an offer to the other peer. Add the following code to your client.js file −//setup a peer connection with another user connectToOtherUsernameBtn.addEventListener("click", function () { var otherUsername = otherUsernameInput.value; connectedUser = otherUsername; if (otherUsername.length > 0) { //make an offer myConnection.createOffer(function (offer) { console.log(); send({ type: "offer", offer: offer }); myConnection.setLocalDescription(offer); }, function (error) { alert("An error has occurred."); }); } }); //when somebody wants to call us function onOffer(offer, name) { connectedUser = name; myConnection.setRemoteDescription(new RTCSessionDescription(offer)); myConnection.createAnswer(function (answer) { myConnection.setLocalDescription(answer); send({ type: "answer", answer: answer }); }, function (error) { alert("oops...error"); }); } //when another user answers to our offer function onAnswer(answer) { myConnection.setRemoteDescription(new RTCSessionDescription(answer)); } //when we got ice candidate from another user function onCandidate(candidate) { myConnection.addIceCandidate(new RTCIceCandidate(candidate)); }You can see that when a user clicks the “Establish connection” button the application makes an SDP offer to the other peer. We also set onAnswer and onCandidate handlers. Reload your page, open it in two tabs, login with two users and try to establish a connection between them. You should see the following console output −
Now the peer-to-peer connection is established. In the next
tutorials, we will add video and audio streams as well as text chat
support.
No comments:
Post a Comment