
Command Line Options
We have learnt how to start the web2py server using GUI widget in the previous chapter.This widget can be skipped by starting the server from command line prompt.
python web2py.py -a 'your password' -i 127.0.0.1 -p 8000
Whenever web2py server starts, it creates a file "parameters_8000.py" where all the passwords are stored in a hashed form.
For additional security purpose, the following command line can be used −
python web2py.py -a '<recycle>' -i 127.0.0.1 -p 8000For the above scenario, web2py reuses the hashed passwords stored in "parameters_8000.py".
In case, if the file "parameters_8000.py" is deleted accidently or due to some other reasons, the web-based administrative interface is disabled in web2py.
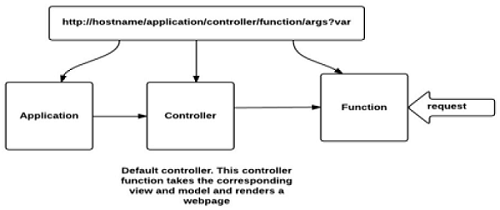
URL Mapping / Dispatching
The functioning of web2py is based on model-view-controller, which maps the URL in a specific form − http://127.0.0.1:8000/a/d/f.htmlIt routes till the function “f()” mentioned in the controller d.py is under the application named “a”. If the controller is not present in the application then web2py uses a default controller named “default.py”.
If the function, as given in the URL is not present, then the default function called init() is used. The working of the URL is shown schematically in the image below.
 The extension .html is optional for the URL. The extension determines the extension of View
that renders the output of the function defined in the controller. The
same content is served in multiple formats namely html, xml, json, rss
etc.
The extension .html is optional for the URL. The extension determines the extension of View
that renders the output of the function defined in the controller. The
same content is served in multiple formats namely html, xml, json, rss
etc.The request is passed, based on the functions, which accept the arguments and gives the appropriate output to the user. It is the controller, which interacts with model and view of the application for giving the output as per the user’s need.
web2py – Workflow
The workflow of web2py is discussed below −- The web server manages each and every HTTP requests simultaneously in its own thread.
- The HTTP request header is parsed and passed to the dispatcher.
- The Dispatcher manages the application requests and maps the PATH_INFO in the URL of the function call. Every function call is represented in the URL.
- All the requests for files included in the static folder are managed directly, and large file are streamed to the client.
- Requests for anything but a static file are mapped into an action.
- If the request header contains a session cookie for the app, the session object is retrieved; or else, a session id is created.
- If the action returns a value as string, this is returned to the client.
- If the action returns an iterable, it is used to loop and stream the data to the client.
Conditional Models
In the previous chapter, we saw the functionality of the Controllers. web2py uses models, views and controllers in each of its application. Therefore, it is also necessary to understand the functionality of the Model.Unlike any other MVC application, Models in web2py are treated as conditional. Models in subfolders are executed, based on its controller’s usage. This can be demonstrated with following example −
Consider the URL − http://127.0.0.1:8000/a/d/f.html
In this case, ‘a’ is the name of the application, ‘d’ is the controller’s name and f() is the function associated with the controller. The list of models, which will be executed are as follows −
applications/a/models/*.py
applications/a/models/d/*.py
applications/a/models/d/f/*.py
Libraries
web2py includes libraries, which are exposed to the all the applications as the objects. These objects are defined inside the core files under the directory named “gluon”.Many of the modules like DAL template have no dependencies and can be implemented outside the framework of web2py. It also maintains the unit tests which is considered as good practice.
Applications
web2py applications are shown below in a diagrammatic form.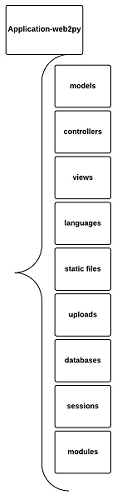 The Applications developed in web2py are composed of the following parts −
- Models − Represents data and database tables.
- Controllers − Describes the application logic and workflow.
- Views − Helps rendering the display of the data.
- Languages − describe how to translate strings in the application into various supported languages.
- Static files − Do not require processing (e.g. images, CSS style sheets etc).
- ABOUT and README − Details of the project.
- Errors − Stores error reports generated by the application.
- Sessions − Stores information related to each particular user.
- Databases − store SQLite databases and additional table information.
- Cache − Store cached application items.
- Modules − Modules are other optional Python modules.
- Private − Included files are accessed by the controllers but not directly by the developer.
- Uploads − Files are accessed by the models but not directly by the developer.
API
In web2py, models, controllers and views are executed in an environment where certain objects are imported for the developers.Global Objects − request, response, session, cache.
Helpers − web2py includes helper class, which can be used to build HTML programmatically. It corresponds to HTML tags, termed as “HTML helpers”.
For example, A, B, FIELDSET, FORM, etc.
Session
A session can be defined as a server-side storage of information, which is persisted throughout the user's interaction throughout the web application.Session in web2py is the instance of storage class.
For example, a variable can be stored in session as
session.myvariable = "hello"This value can be retrieved as
a = session.myvariableThe value of the variable can be retrieved as long as the code is executed in the same session by the same user.
One of the important methods in web2py for session is “forget” −
session.forget(response);It instructs web2py not to save the session.
Running Tasks in Background
An HTTP request arrives to the web server, which handles each request in its own thread, in parallel. The task, which is active, takes place in the foreground while the others are kept in background. Managing the background tasks is also one of the main features of web2py.Time-consuming tasks are preferably kept in the background. Some of the mechanisms are listed as follows, which manage the background tasks −
- CRON
- Queues
- Scheduler
CRON
In web2py, CRON gives the ability to run the task within the specified intervals of the time. Each application includes a CRON file, which defines its functionalities.Scheduler
The built-in scheduler helps in running the tasks in background by setting the priority. It provides a mechanism for creating, scheduling and modifying the tasks.The scheduled events are listed in models with the file name “scheduler.py”.
Building an Application
We had an overview of creating models and controllers in web2py. Here, we will focus on the creation of the application named “Contacts”. The application needs to maintain a list of companies, and a list of people who work at those companies.Creation of Model
Here, identification of the tables for the data dictionary is the model. The model for the contacts application will be created under the “models” folders. The file is stored in models/db_contacts.py.# in file: models/db_custom.py db.define_table('company', Field('name', notnull = True, unique = True), format = '%(name)s') db.define_table( 'contact', Field('name', notnull = True), Field('company', 'reference company'), Field('picture', 'upload'), Field('email', requires = IS_EMAIL()), Field('phone_number', requires = IS_MATCH('[\d\-\(\) ]+')), Field('address'), format = '%(name)s' ) db.define_table( 'log', Field('body', 'text', notnull = True), Field('posted_on', 'datetime'), Field('contact', 'reference contact') )Once the above file is created, the tables can be accessed with the help of URL http://127.0.0.1:8000/contacts/appadmin
Creation of Controller
The Controller will include some functions for listing, editing and deleting the contacts.# in file: controllers/default.py def index():return locals() def companies():companies = db(db.company).select(orderby = db.company.name) return locals() def contacts():company = db.company(request.args(0)) or redirect(URL('companies')) contacts = db(db.contact.company == company.id).select(orderby = db.contact.name) return locals() @auth.requires_login() def company_create():form = crud.create(db.company, next = 'companies') return locals() @auth.requires_login() def company_edit():company = db.company(request.args(0)) or redirect(URL('companies')) form = crud.update(db.company, company, next='companies') return locals() @auth.requires_login() def contact_create():db.contact.company.default = request.args(0) form = crud.create(db.contact, next = 'companies') return locals() @auth.requires_login() def contact_edit():contact = db.contact(request.args(0)) or redirect(URL('companies')) form = crud.update(db.contact, contact, next = 'companies') return locals() def user():return dict(form = auth())The creation of the view along with its output will be discussed in the next chapter.
No comments:
Post a Comment