
WebGL - Introduction
A few years back, Java applications − as a combination of applets and JOGL − were used to process 3D graphics on the Web by addressing the GPU (Graphical Processing Unit). As applets require a JVM to run, it became difficult to rely on Java applets. A few years later, people stopped using Java applets.The Stage3D APIs provided by Adobe (Flash, AIR) offered GPU hardware accelerated architecture. Using these technologies, programmers could develop applications with 2D and 3D capabilities on web browsers as well as on IOS and Android platforms. Since Flash was a proprietary software, it was not used as web standard.
OpenGL
OpenGL (Open Graphics Library) is cross-language, cross-platform API for 2D and 3D graphics. It is a collection of commands. OpenGL4.5 is the latest version of OpenGL. The following table lists a set of technologies related to OpenGL.| API | Technology Used |
|---|---|
| OpenGL ES | It is the library for 2D and 3D graphics on embedded systems − including consoles, phones, appliances, and vehicles. OpenGL ES 3.1 is its latest version. It is maintained by the Khronos Group www.khronos.org |
| JOGL | It is the Java binding for OpenGL. JOGL 4.5 is its latest version and it is maintained by jogamp.org. |
| WebGL | It is the JavaScript binding for OpenGL. WebGL 1.0 is its latest version and it is maintained by the khronos group. |
| OpenGLSL | OpenGL Shading Language. It is a programming language which is a companion to OpenGL 2.0 and higher. It is a part of the core OpenGL 4.4 specification. It is an API specifically tailored for embedded systems, such as those present on mobile phones and tablets. |
What is WebGL?
WebGL (Web Graphics Library) is the new standard for 3D graphics on the Web, It is designed for the purpose of rendering 2D graphics and interactive 3D graphics. It is derived from OpenGL's ES 2.0 library which is a low-level 3D API for phones and other mobile devices. WebGL provides similar functionality of ES 2.0 (Embedded Systems) and performs well on modern 3D graphics hardware.It is a JavaScript API that can be used with HTML5. HTML5 has several features to support 3D graphics such as 2D Canvas, WebGL, SVG, 3D CSS transforms, and SMIL.
WebGL code is written within the <canvas> tag of HTML5. It is a specification that allows Internet browsers access to Graphic Processing Units (GPUs) on those computers where they were used.
Who Developed WebGL
An American-Serbian software engineer named Vladimir Vukicevic did the foundation work and led the creation of WebGL.- In 2007, Vladimir started working on an OpenGL prototype for Canvas element of the HTML document.
- In March 2011, Kronos Group created WebGL.
Browsers Supported
The following tables show a list of browsers that support WebGL −Web Browsers
| Browser Name | Version | Support |
|---|---|---|
| Internet Explorer | 11 and above | Complete support |
| Google Chrome | 39 and above | Complete support |
| Safari | 8 | Complete support |
| Firefox | 36 and above | Partial support |
| Opera | 27 and above | Partial support |
Mobile Browsers
| Browser Name | Version | Support |
|---|---|---|
| Chrome for Android | 42 | Partial support |
| Android browser | 40 | Partial support |
| IOS Safari | 8.3 | Complete support |
| Opera Mini | 8 | Does not support |
| Blackberry Browser | 10 | Complete support |
| IE mobile | 10 | Partial support |
Advantages of WebGL
Here are the advantages of using WebGL −- JavaScript programming − WebGL applications are written in JavaScript. Using these applications, you can directly interact with other elements of the HTML Document. You can also use other JavaScript libraries (e.g. JQuery) and HTML technologies to enrich the WebGL application.
- Increasing support with mobile browsers − WebGL also supports Mobile browsers such as iOS safari, Android Browser, and Chrome for Android.
- Open source − WebGL is an open source. You can access the source code of the library and understand how it works and how it was developed.
- No need for compilation − JavaScript is a half-programming and half-HTML component. To execute this script, there is no need to compile the file. Instead, you can directly open the file using any of the browsers and check the result. Since WebGL applications are developed using JavaScript, there is no need to compile WebGL applications as well.
- Automatic memory management − JavaScript supports automatic memory management. There is no need for manual allocation of memory. WebGL inherits this feature of JavaScript.
- Easy to set up − Since WebGL is integrated within HTML 5, there is no need for additional set up. To write a WebGL application, all that you need is a text editor and a web browser.
Environment Setup
There is no need to set a different environment for WebGL. The browsers supporting WebGL have their own in-built setup for WebGL.WebGL - Basic Graphics Concepts
Rendering
Rendering is the process of generating an image from a model using computer programs. In graphics, a virtual scene is described using information like geometry, viewpoint, texture, lighting, and shading, which is passed through a render program. The output of this render program will be a digital image.There are two types of rendering −
- Software Rendering − All the rendering calculations are done with the help of CPU.
- Hardware Rendering − All the graphics computations are done by the GPU (Graphical processing unit).
WebGL follows a client-based rendering approach to render 3D scenes. All the processing required to obtain an image is performed locally using the client's graphics hardware.
GPU
According to NVIDIA, a GPU is "a single chip processor with integrated transform, lighting, triangle setup/clipping, and rendering engines capable of processing a minimum of 10 million polygons per second."Unlike multi-core processors with a few cores optimized for sequential processing, a GPU consists of thousands of smaller cores that process parallel workloads efficiently. Therefore, the GPU accelerates the creation of images in a frame buffer (a portion of ram which contains a complete frame data) intended for output to a display.

GPU Accelerated Computing
In GPU accelerated computing, the application is loaded into the CPU. Whenever it encounters a compute-intensive portion of the code, then that portion of code will be loaded and run on the GPU. It gives the system the ability to process graphics in an efficient way.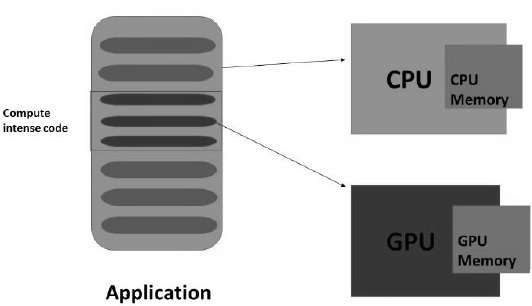 GPU will have a separate memory and it runs multiple copies of a
small portion of the code at a time. The GPU processes all the data
which is in its local memory, not the central memory. Therefore, the
data that is needed to be processed by the GPU should be loaded/copied
to the GPU memory and then be processed.
GPU will have a separate memory and it runs multiple copies of a
small portion of the code at a time. The GPU processes all the data
which is in its local memory, not the central memory. Therefore, the
data that is needed to be processed by the GPU should be loaded/copied
to the GPU memory and then be processed.In the systems having the above architecture, the communication overhead between the CPU and GPU should be reduced to achieve faster processing of 3D programs. For this, we have to copy all the data and keep it on the GPU, instead of communicating with the GPU repeatedly.
Html5 Canvas Overview
To create graphical applications on the web, HTML-5 provides a rich set of features such as 2D Canvas, WebGL, SVG, 3D CSS transforms, and SMIL. To write WebGL applications, we use the existing canvas element of HTML-5. This chapter provides an overview of the HTML-5 2D canvas element.HTML5 Canvas
HTML-5 <canvas> provides an easy and powerful option to draw graphics using JavaScript. It can be used to draw graphs, make photo compositions, or do simple (and not so simple) animations.Here is a simple <canvas> element having only two specific attributes width and height plus all the core HTML-5 attributes like id, name, and class.
Syntax
The syntax of HTML canvas tag is given below. You have to mention the name of the canvas inside double quotations (“ ”).<canvas id = "mycanvas" width = "100" height = "100"></canvas>
Canvas Attributes
The canvas tag has three attributes namely, id, width, and height.- Id − Id represents the identifier of the canvas element in the Document Object Model (DOM).
- Width − Width represents the width of the canvas.
- Height − Height represents the height of the canvas.
Example - Create a Canvas
The following code shows how to create a canvas. We have used CSS to give a colored border to the canvas.<html> <head> <style> #mycanvas{border:1px solid red;} </style> </head> <body> <canvas id = "mycanvas" width = "100" height = "100"></canvas> </body> </html>It will produce the following result −
HTML Context (Rendering)
The <canvas> is initially blank. To display something on the canvas element, we have to use a scripting language. This scripting language should access the rendering context and draw on it.The canvas element has a DOM method called getContext(), which is used to obtain the rendering context and its drawing functions. This method takes one parameter, the type of context 2d.
The following code is to be written to get the required context. You can write this script inside the body tag as shown below.
<!DOCTYPE HTML>

<html>
   <body>
      <canvas id = "mycanvas" width = "600" height = "200"></canvas>

      <script>
         var canvas = document.getElementById('mycanvas');
         var context = canvas.getContext('2d');

         context.font = '20pt Calibri';
         context.fillStyle = 'green';
         context.fillText('Welcome to Tutorialspoint', 70, 70);
      </script>

   </body>
</html>
It will produce the following result −
For more example on HTML-5 2D Canvas, check out the following link HTML-5 Canvas.
WebGL Context
HTML5 Canvas is also used to write WebGL applications. To create a WebGL rendering context on the canvas element, you should pass the string experimental-webgl, instead of 2d to the canvas.getContext() method. Some browsers support only 'webgl'.<!DOCTYPE html> <html> <canvas id = 'my_canvas'></canvas> <script> var canvas = document.getElementById('my_canvas'); var gl = canvas.getContext('experimental-webgl'); gl.clearColor(0.9,0.9,0.8,1); gl.clear(gl.COLOR_BUFFER_BIT); </script> </html>It will produce the following result −
WebGL - Basics
WebGL is mostly a low-level rasterization API rather than a 3D API. To draw an image using WebGL, you have to pass a vector representing the image. It then converts the given vector into pixel format using OpenGL SL and displays the image on the screen. Writing a WebGL application involves a set of steps which we would be explaining in this chapter.WebGL – Coordinate System
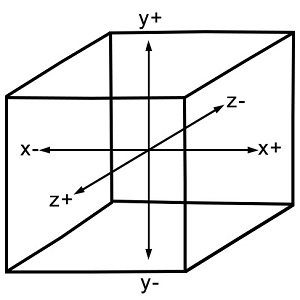
Just like any other 3D system, you will have x, y and z axes in WebGL, where the z axis signifies depth. The coordinates in WebGL are restricted to (1, 1, 1) and (-1, -1, - 1). It means − if you consider the screen projecting WebGL graphics as a cube, then one corner of the cube will be (1, 1, 1) and the opposite corner will be (-1, -1, -1). WebGL won’t display anything that is drawn beyond these boundaries.The following diagram depicts the WebGL coordinate system. The z-axis signifies depth. A positive value of z indicates that the object is near the screen/viewer, whereas a negative value of z indicates that the object is away from the screen. Likewise, a positive value of x indicates that the object is to the right side of the screen and a negative value indicates the object is to the left side. Similarly, positive and negative values of y indicate whether the object is at the top or at the bottom portion of the screen.
No comments:
Post a Comment