
PyQt - Introduction
PyQt is a GUI widgets toolkit. It is a Python interface for Qt, one of the most powerful, and popular cross-platform GUI library. PyQt was developed by RiverBank Computing Ltd. The latest version of PyQt can be downloaded from its official website − riverbankcomputing.comPyQt API is a set of modules containing a large number of classes and functions. While QtCore module contains non-GUI functionality for working with file and directory etc., QtGui module contains all the graphical controls. In addition, there are modules for working with XML (QtXml), SVG (QtSvg), and SQL (QtSql), etc.
Supporting Environments
PyQt is compatible with all the popular operating systems including Windows, Linux, and Mac OS. It is dual licensed, available under GPL as well as commercial license.Windows
You can download and install an appropriate installer from the above download link corresponding to Python version (2.7 or 3.4) and hardware architecture (32 bit or 64 bit). Note that there are two versions of PyQt that are available namely, PyQt 4.8 and PyQt 5.5.While PyQt4 is available for Python 2 as well as Python 3, PyQt5 can be used along with Python 3.* only.
PyQt4 Windows Binaries
| PyQt4-4.11.4-gpl-Py3.4-Qt4.8.7-x64.exe | Windows 64 bit installer |
| PyQt4-4.11.4-gpl-Py3.4-Qt4.8.7-x32.exe | Windows 32 bit installer |
| PyQt4-4.11.4-gpl-Py3.4-Qt5.5.0-x64.exe | Windows 64 bit installer |
| PyQt4-4.11.4-gpl-Py3.4-Qt5.5.0-x32.exe | Windows 32 bit installer |
| PyQt4-4.11.4-gpl-Py2.7-Qt4.8.7-x64.exe | Windows 64 bit installer |
| PyQt4-4.11.4-gpl-Py2.7-Qt4.8.7-x32.exe | Windows 32 bit installer |
PyQt5 Windows Binaries
| PyQt5-5.5-gpl-Py3.4-Qt5.5.0-x64.exe | Windows 64 bit installer |
| PyQt5-5.5-gpl-Py3.4-Qt5.5.0-x32.exe | Windows 32 bit installer |
Linux
For Ubuntu or any other debian Linux distribution, use the following command to install PyQt −sudo apt-get install python-qt4 or sudo apt-get install python-qt5You can also build from the source code available on the ‘download’ page.
| PyQt-x11-gpl-4.11.4.tar.gz | Linux, UNIX source for PyQt4 |
| PyQt-gpl-5.5.tar.gz | Linux, UNIX, MacOS/X source for PyQt5 |
Mac OS
PyQtX project (http://sourceforge.net/projects/pyqtx/) hosts binaries of PyQt for Mac. Use Homebrew installer as per the following command −brew install pyqt
PyQt - Hello World
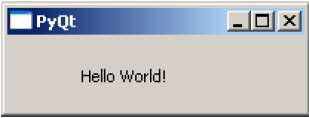
Creating a simple GUI application using PyQt involves the following steps −import sys from PyQt4 import QtGui def window(): app = QtGui.QApplication(sys.argv) w = QtGui.QWidget() b = QtGui.QLabel(w) b.setText("Hello World!") w.setGeometry(100,100,200,50) b.move(50,20) w.setWindowTitle(“PyQt”) w.show() sys.exit(app.exec_()) if __name__ == '__main__': window()The above code produces the following output −
PyQt - Major Classes
PyQt API is a large collection of classes and methods. These classes are defined in more than 20 modules. Following are some of the frequently used modules −QApplication class manages the main settings and control flow of a GUI application. It contains main event loop inside which events generated by window elements and other sources are processed and dispatched. It also handles system-wide and application-wide settings.
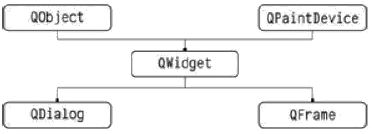
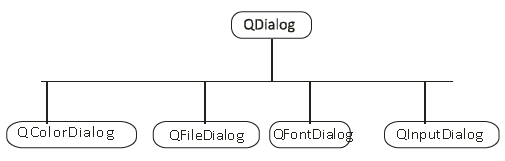
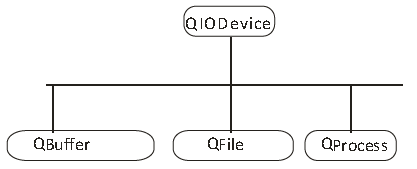
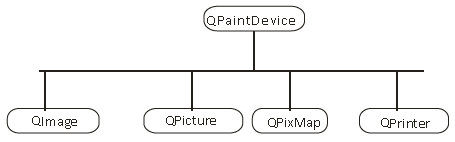
QWidget class, derived from QObject and QPaintDevice classes is the base class for all user interface objects. QDialog and QFrame classes are also derived from QWidget class. They have their own sub-class system.
Following diagrams depict some important classes in their hierarchy.
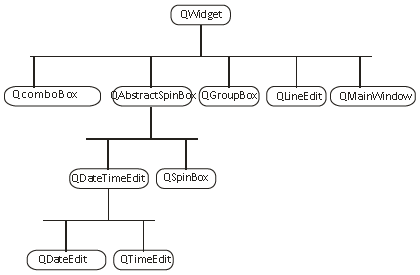
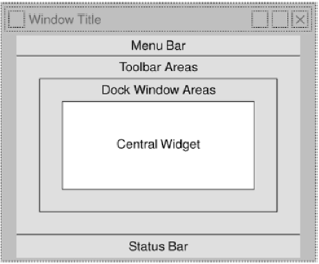
 Here is a select list of frequently used widgets −
The following diagram shows the QMainWindow framework −
PyQt - Using Qt Designer
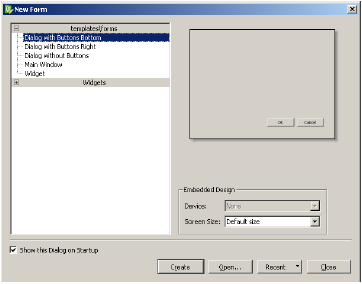
The PyQt installer comes with a GUI builder tool called Qt Designer. Using its simple drag and drop interface, a GUI interface can be quickly built without having to write the code. It is however, not an IDE such as Visual Studio. Hence, Qt Designer does not have the facility to debug and build the application.Creation of a GUI interface using Qt Designer starts with choosing a top level window for the application.
 You can then drag and drop required widgets from the widget box on
the left pane. You can also assign value to properties of widget laid on
the form.
You can then drag and drop required widgets from the widget box on
the left pane. You can also assign value to properties of widget laid on
the form.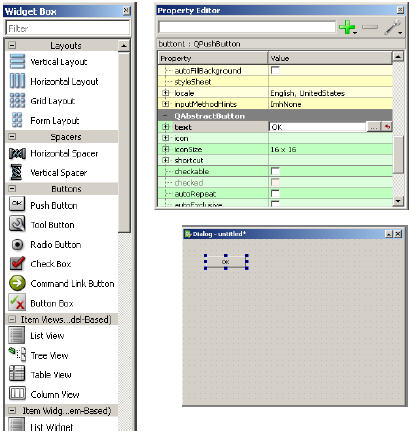 The designed form is saved as demo.ui. This ui file contains XML
representation of widgets and their properties in the design. This
design is translated into Python equivalent by using pyuic4 command line
utility. This utility is a wrapper for uic module. The usage of pyuic4
is as follows −
The designed form is saved as demo.ui. This ui file contains XML
representation of widgets and their properties in the design. This
design is translated into Python equivalent by using pyuic4 command line
utility. This utility is a wrapper for uic module. The usage of pyuic4
is as follows −pyuic4 –x demo.ui –o demo.pyIn the above command, -x switch adds a small amount of additional code to the generated XML so that it becomes a self-executable standalone application.
if __name__ == "__main__":
   import sys
   app = QtGui.QApplication(sys.argv)
   Dialog = QtGui.QDialog()
   ui = Ui_Dialog()
   ui.setupUi(Dialog)
   Dialog.show()
   sys.exit(app.exec_())
The resultant python script is executed to show the following dialog box −
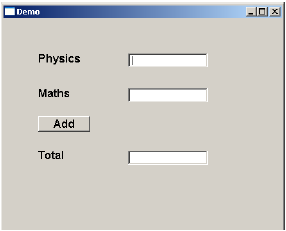 The user can input data in input fields but clicking on Add button
will not generate any action as it is not associated with any function.
Reacting to user-generated response is called as event handling.
The user can input data in input fields but clicking on Add button
will not generate any action as it is not associated with any function.
Reacting to user-generated response is called as event handling.PyQt - Signals & Slots
Unlike a console mode application, which is executed in a sequential manner, a GUI based application is event driven. Functions or methods are executed in response to user’s actions like clicking on a button, selecting an item from a collection or a mouse click etc., called events.Widgets used to build the GUI interface act as the source of such events. Each PyQt widget, which is derived from QObject class, is designed to emit ‘signal’ in response to one or more events. The signal on its own does not perform any action. Instead, it is ‘connected’ to a ‘slot’. The slot can be any callable Python function.
In PyQt, connection between a signal and a slot can be achieved in different ways. Following are most commonly used techniques −
QtCore.QObject.connect(widget, QtCore.SIGNAL(‘signalname’), slot_function)A more convenient way to call a slot_function, when a signal is emitted by a widget is as follows −
widget.signal.connect(slot_function)Suppose if a function is to be called when a button is clicked. Here, the clicked signal is to be connected to a callable function. It can be achieved in any of the following two techniques −
QtCore.QObject.connect(button, QtCore.SIGNAL(“clicked()”), slot_function)or
button.clicked.connect(slot_function)
Example
In the following example, two QPushButton objects (b1 and b2) are added in QDialog window. We want to call functions b1_clicked() and b2_clicked() on clicking b1 and b2 respectively.When b1 is clicked, the clicked() signal is connected to b1_clicked() function
b1.clicked.connect(b1_clicked())When b2 is clicked, the clicked() signal is connected to b2_clicked() function
QObject.connect(b2, SIGNAL("clicked()"), b2_clicked)
Example
import sys
from PyQt4.QtCore import *
from PyQt4.QtGui import *

def window():
   app = QApplication(sys.argv)
   win = QDialog()
   b1 = QPushButton(win)
   b1.setText("Button1")
   b1.move(50,20)
   b1.clicked.connect(b1_clicked)

   b2 = QPushButton(win)
   b2.setText("Button2")
   b2.move(50,50)
   QObject.connect(b2,SIGNAL("clicked()"),b2_clicked)

   win.setGeometry(100,100,200,100)
   win.setWindowTitle("PyQt")
   win.show()
   sys.exit(app.exec_())

def b1_clicked():
   print "Button 1 clicked"

def b2_clicked():
   print "Button 2 clicked"

if __name__ == '__main__':
   window()
The above code produces the following output −

Output
Button 1 clicked
Button 2 clicked
No comments:
Post a Comment