Google+ allows us to connect our Google+ account with other social
networks. Without permission, Google won't share our personal things. It
provides an opportunity to link with Google+ business page. When people
search for us on Google, our profile pops up on the right side of
search results.
This linking primarily affects the SEO and also increases the traffic to our website/page. We can link our Google+ account to any social platform so that people active on other platform can reach our page through these links.
Step 2 − Select the profile from the drop-down menu.
Step 3 − Click ‘About’.
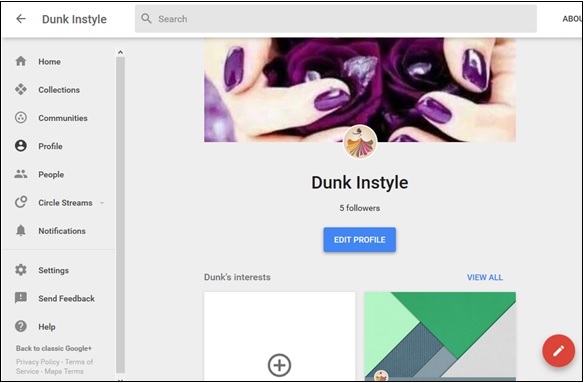 Step 4 − Scroll down the screen to the option ‘Links’.
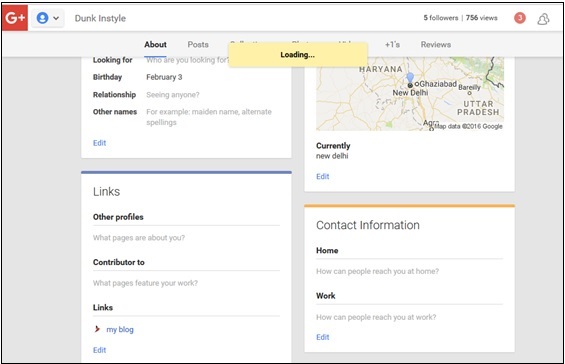 Step 5 − Click the ‘Edit’ option.
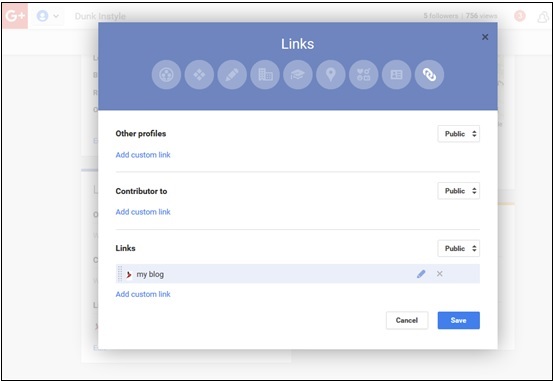 Step 6 − To add a new social account, select “Add custom link”.
Step 7 − Write the URL and label that we want for the account.
Step 8 − Choose the privacy from the following options.
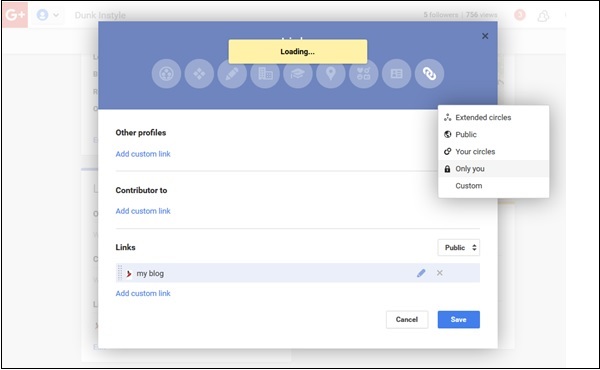 Step 9 − Mark as per choice.
Step 10 − Rearrange the order of your links.
Step 11 − Click ‘Save’.
In case the link is added earlier but not verified, then it can be verified by clicking the website button. When we are done a message pops out with a code. This code we need to label on our home page. In case of being an administrator running our own website, we can easily copy paste it to the home page. In other cases, we have to contact the webmaster. Doing so, links our website to our Google+ page.
Step 2 − Select the profile from the drop-down menu.
Step 3 − Click ‘About’.
Step 4 − Scroll down the screen to the option ‘Links’.
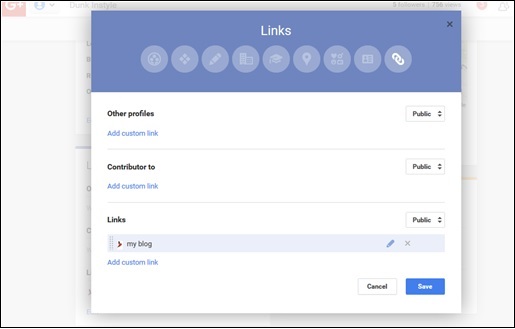 Step 5 − Click ‘Edit’ option.
Step 6 − Click the option “X” beside the linked accounts.
Step 7 − Remove the links by clicking “X”.
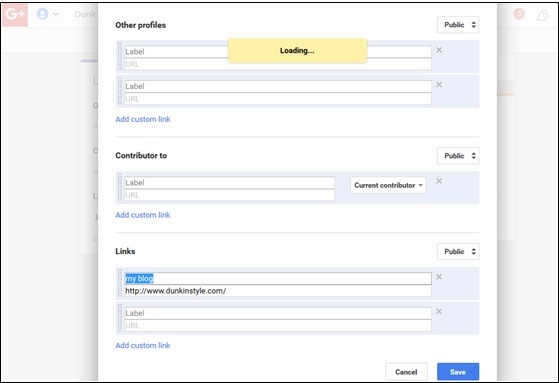 Step 8 − Click ‘Save’.
This linking primarily affects the SEO and also increases the traffic to our website/page. We can link our Google+ account to any social platform so that people active on other platform can reach our page through these links.
Linking Other Social Platforms to Google+
Step 1 − Login to Google+ account.Step 2 − Select the profile from the drop-down menu.
Step 3 − Click ‘About’.
 Step 4 − Scroll down the screen to the option ‘Links’.
 Step 5 − Click the ‘Edit’ option.
 Step 6 − To add a new social account, select “Add custom link”.
Step 7 − Write the URL and label that we want for the account.
Step 8 − Choose the privacy from the following options.
- Public or private
- Extended circles
- Custom
- Only you
 Step 9 − Mark as per choice.
Step 10 − Rearrange the order of your links.
Step 11 − Click ‘Save’.
In case the link is added earlier but not verified, then it can be verified by clicking the website button. When we are done a message pops out with a code. This code we need to label on our home page. In case of being an administrator running our own website, we can easily copy paste it to the home page. In other cases, we have to contact the webmaster. Doing so, links our website to our Google+ page.
Removing Other Social Platform Links From Google+
Step 1 − Login to Google+ account.Step 2 − Select the profile from the drop-down menu.
Step 3 − Click ‘About’.
Step 4 − Scroll down the screen to the option ‘Links’.
 Step 5 − Click ‘Edit’ option.
Step 6 − Click the option “X” beside the linked accounts.
Step 7 − Remove the links by clicking “X”.
 Step 8 − Click ‘Save’.
No comments:
Post a Comment