
In the earlier chapters, we have seen how to draw 2D shapes on an XY
plane. In addition to these 2D shapes, we can draw several other 3D
shapes as well using JavaFX.
Each of the above mentioned 3D shape is represented by a class and all these classes belong to the package javafx.scene.shape. The class named Shape3D is the base class of all the 3-Dimensional shapes in JavaFX.
For example, to draw a 3D box you need to pass its Width, Height, Depth. You can specify these values using their respective setter methods as follows −
The following section discusses the properties of 3D objects.
The Cull Face property is of the type CullFace and it represents the Cull Face of a 3D shape. You can set the Cull Face of a shape using the method setCullFace() as shown below −
Following are the type of materials that are available in JavaFX −
3D Shape
In general, a 3D shape is a geometrical figure that can be drawn on the XYZ plane. These include a Cylinder, Sphere and a Box.Each of the above mentioned 3D shape is represented by a class and all these classes belong to the package javafx.scene.shape. The class named Shape3D is the base class of all the 3-Dimensional shapes in JavaFX.
Creating a 3D Shape
To create a 3-Dimensional shape, you need to −- Instantiate the respective class of the required 3D shape.
- Set the properties of the 3D shape.
- Add the 3D shape object to the group.
Instantiating the Respective Class
To create a 3-Dimensional shape, first of all you need to instantiate its respective class. For example, if you want to create a 3D box, you need to instantiate the class named Box as follows −Box box = new Box();
Setting the Properties of the Shape
After instantiating the class, you need to set the properties for the shape using the setter methods.For example, to draw a 3D box you need to pass its Width, Height, Depth. You can specify these values using their respective setter methods as follows −
//Setting the properties of the Box
box.setWidth(200.0);
box.setHeight(400.0);
box.setDepth(200.0);
Adding the Shape Object to the Group
Finally, you need to add the object of the shape to the group by passing it as a parameter of the constructor as shown below.//Creating a Group object Group root = new Group(box);The following table gives you the list of various 3D shapes provided by JavaFX.
| S.No | Shape & Description |
|---|---|
| 1 |
Box
A cuboid is a three-dimensional shape with a length (depth), width, and a height. In JavaFX a three-dimensional box is represented by a class named Box. This class belongs to the package javafx.scene.shape. By instantiating this class, you can create a Box node in JavaFX. This class has 3 properties of the double datatype namely −
|
| 2 | Cylinder
A cylinder is a closed solid that has two parallel (mostly circular) bases connected by a curved surface. It is described by two parameters, namely, the radius of its circular base and the height of the cylinder. In JavaFX, a cylinder is represented by a class named Cylinder. This class belongs to the package javafx.scene.shape. By instantiating this class, you can create a cylinder node in JavaFX. This class has 2 properties of the double datatype namely −
|
| 3 | Sphere
A sphere is defined as the set of points that are all at the same
distance r from a given point in a 3D space. This distance r is the
radius of the sphere and the given point is the centre of the sphere. In JavaFX, a sphere is represented by a class named Sphere. This class belongs to the package javafx.scene.shape. By instantiating this class, you can create a sphere node in JavaFX. This class has a property named radius of double datatype. It represents the radius of a Sphere. |
Properties of 3D Objects
For all the 3 Dimensional objects, you can set various properties like Cull Face, Drawing Mode, Material.The following section discusses the properties of 3D objects.
Cull Face
In general, culling is the removal of improperly oriented parts of a shape (which are not visible in the view area).The Cull Face property is of the type CullFace and it represents the Cull Face of a 3D shape. You can set the Cull Face of a shape using the method setCullFace() as shown below −
box.setCullFace(CullFace.NONE);The stroke type of a shape can be −
- None − No culling is performed (CullFace.NONE).
- Front − All the front facing polygons are culled. (CullFace.FRONT).
- Back − All the back facing polygons are culled. (StrokeType.BACK).
Example
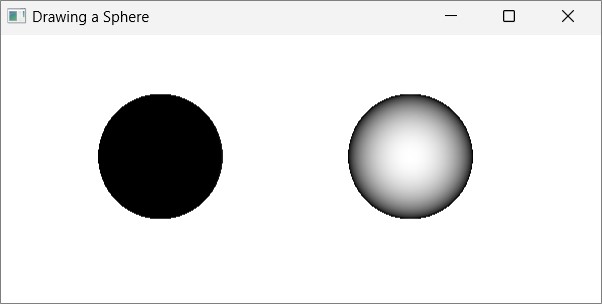
The following program is an example which demonstrates various cull faces of the sphere. Save this code in a file with the name SphereCullFace.java.import javafx.application.Application; import javafx.scene.Group; import javafx.scene.Scene; import javafx.scene.shape.CullFace; import javafx.stage.Stage; import javafx.scene.shape.Sphere; public class SphereCullFace extends Application { @Override public void start(Stage stage) { //Drawing Sphere1 Sphere sphere1 = new Sphere(); //Setting the radius of the Sphere sphere1.setRadius(50.0); //Setting the position of the sphere sphere1.setTranslateX(100); sphere1.setTranslateY(150); //setting the cull face of the sphere to front sphere1.setCullFace(CullFace.FRONT); //Drawing Sphere2 Sphere sphere2 = new Sphere(); //Setting the radius of the Sphere sphere2.setRadius(50.0); //Setting the position of the sphere sphere2.setTranslateX(300); sphere2.setTranslateY(150); //Setting the cull face of the sphere to back sphere2.setCullFace(CullFace.BACK); //Drawing Sphere3 Sphere sphere3 = new Sphere(); //Setting the radius of the Sphere sphere3.setRadius(50.0); //Setting the position of the sphere sphere3.setTranslateX(500); sphere3.setTranslateY(150); //Setting the cull face of the sphere to none sphere2.setCullFace(CullFace.NONE); //Creating a Group object Group root = new Group(sphere1, sphere2, sphere3); //Creating a scene object Scene scene = new Scene(root, 600, 300); //Setting title to the Stage stage.setTitle("Drawing a Sphere"); //Adding scene to the stage stage.setScene(scene); //Displaying the contents of the stage stage.show(); } public static void main(String args[]){ launch(args); } }Compile and execute the saved Java file from the command prompt using the following commands.
javac SphereCullFace.java
java SphereCullFace
On executing, the above program generates a JavaFX window displaying three spheres with cull face values FRONT, BACK and NONE respectively as follows −
Drawing Modes
It is the property is of the type DrawMode and it represents the drawing mode used to draw the current 3D shape. You can choose the draw mode to draw a 3D shape using the method setDrawMode () as follows −box.setDrawMode(DrawMode.FILL);In JavaFX, you can choose two draw modes to draw a 3D shape, which are −
- Fill − This mode draws and fills a 2D shape (DrawMode.FILL).
- Line − This mode draws a 3D shape using lines (DrawMode.LINE).
Example
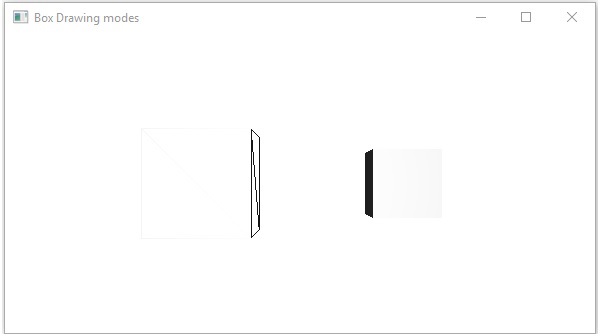
The following program is an example which demonstrates various draw modes of a 3D box. Save this code in a file with the name BoxDrawMode.java.import javafx.application.Application; import javafx.scene.Group; import javafx.scene.PerspectiveCamera; import javafx.scene.Scene; import javafx.scene.shape.Box; import javafx.scene.shape.DrawMode; import javafx.stage.Stage; public class BoxDrawMode extends Application { @Override public void start(Stage stage) { //Drawing a Box Box box1 = new Box(); //Setting the properties of the Box box1.setWidth(100.0); box1.setHeight(100.0); box1.setDepth(100.0); //Setting the position of the box box1.setTranslateX(200); box1.setTranslateY(150); box1.setTranslateZ(0); //Setting the drawing mode of the box box1.setDrawMode(DrawMode.LINE); //Drawing a Box Box box2 = new Box(); //Setting the properties of the Box box2.setWidth(100.0); box2.setHeight(100.0); box2.setDepth(100.0); //Setting the position of the box box2.setTranslateX(450); //450 box2.setTranslateY(150);//150 box2.setTranslateZ(300); //Setting the drawing mode of the box box2.setDrawMode(DrawMode.FILL); //Creating a Group object Group root = new Group(box1, box2); //Creating a scene object Scene scene = new Scene(root, 600, 300); //Setting camera PerspectiveCamera camera = new PerspectiveCamera(false); camera.setTranslateX(0); camera.setTranslateY(0); camera.setTranslateZ(0); scene.setCamera(camera); //Setting title to the Stage stage.setTitle("Drawing a Box"); //Adding scene to the stage stage.setScene(scene); //Displaying the contents of the stage stage.show(); } public static void main(String args[]){ launch(args); } }Compile and execute the saved java file from the command prompt using the following commands.
javac BoxDrawMode.java
java BoxDrawMode
On executing, the above program generates a JavaFX window displaying two boxes with draw mode values LINE and FILL respectively, as follows −
Material
The cull Face property is of the type Material and it is used to choose the surface of the material of a 3D shape. You can set the material of a 3D shape using the method setCullFace() as follows −cylinder.setMaterial(material);As mentioned above for this method, you need to pass an object of the type Material. The PhongMaterial class of the package javafx.scene.paint is a sub class of this class and provides 7 properties that represent a Phong shaded material. You can apply all these type of materials to the surface of a 3D shape using the setter methods of these properties.
Following are the type of materials that are available in JavaFX −
- bumpMap − This represents a normal map stored as a RGB Image.
- diffuseMap − This represents a diffuse map.
- selfIlluminationMap − This represents a self-illumination map of this PhongMaterial.
- specularMap − This represents a specular map of this PhongMaterial.
- diffuseColor − This represents a diffuse color of this PhongMaterial.
- specularColor − This represents a specular color of this PhongMaterial.
- specularPower − This represents a specular power of this PhongMaterial.
Example
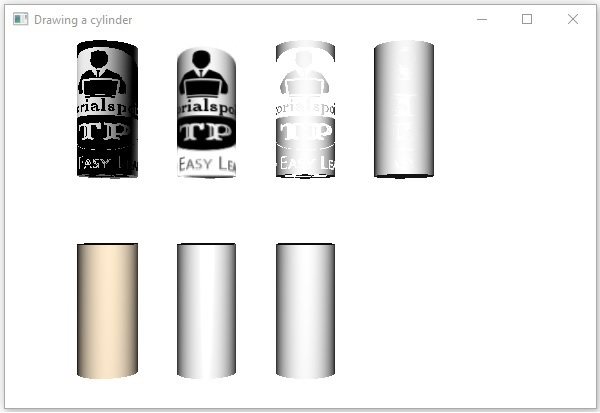
Following is an example which displays various materials on the cylinder. Save this code in a file with the name CylinderMaterials.java.import javafx.application.Application; import javafx.scene.Group; import javafx.scene.PerspectiveCamera; import javafx.scene.Scene; import javafx.scene.image.Image; import javafx.scene.paint.Color; import javafx.scene.paint.PhongMaterial; import javafx.scene.shape.Cylinder; import javafx.stage.Stage; public class CylinderMaterials extends Application { @Override public void start(Stage stage) { //Drawing Cylinder1 Cylinder cylinder1 = new Cylinder(); //Setting the properties of the Cylinder cylinder1.setHeight(130.0f); cylinder1.setRadius(30.0f); //Setting the position of the Cylinder cylinder1.setTranslateX(100); cylinder1.setTranslateY(75); //Preparing the phong material of type bump map PhongMaterial material1 = new PhongMaterial(); material1.setBumpMap(new Image ("http://www.tutorialspoint.com/images/tplogo.gif")); //Setting the bump map material to Cylinder1 cylinder1.setMaterial(material1); //Drawing Cylinder2 Cylinder cylinder2 = new Cylinder(); //Setting the properties of the Cylinder cylinder2.setHeight(130.0f); cylinder2.setRadius(30.0f); //Setting the position of the Cylinder cylinder2.setTranslateX(200); cylinder2.setTranslateY(75); //Preparing the phong material of type diffuse map PhongMaterial material2 = new PhongMaterial(); material2.setDiffuseMap(new Image ("http://www.tutorialspoint.com/images/tp-logo.gif")); //Setting the diffuse map material to Cylinder2 cylinder2.setMaterial(material2); //Drawing Cylinder3 Cylinder cylinder3 = new Cylinder(); //Setting the properties of the Cylinder cylinder3.setHeight(130.0f); cylinder3.setRadius(30.0f); //Setting the position of the Cylinder cylinder3.setTranslateX(300); cylinder3.setTranslateY(75); //Preparing the phong material of type Self Illumination Map PhongMaterial material3 = new PhongMaterial(); material3.setSelfIlluminationMap(new Image ("http://www.tutorialspoint.com/images/tp-logo.gif")); //Setting the Self Illumination Map material to Cylinder3 cylinder3.setMaterial(material3); //Drawing Cylinder4 Cylinder cylinder4 = new Cylinder(); //Setting the properties of the Cylinder cylinder4.setHeight(130.0f); cylinder4.setRadius(30.0f); //Setting the position of the Cylinder cylinder4.setTranslateX(400); cylinder4.setTranslateY(75); //Preparing the phong material of type Specular Map PhongMaterial material4 = new PhongMaterial(); material4.setSpecularMap(new Image ("http://www.tutorialspoint.com/images/tp-logo.gif")); //Setting the Specular Map material to Cylinder4 cylinder4.setMaterial(material4); //Drawing Cylinder5 Cylinder cylinder5 = new Cylinder(); //Setting the properties of the Cylinder cylinder5.setHeight(130.0f); cylinder5.setRadius(30.0f); //Setting the position of the Cylinder cylinder5.setTranslateX(100); cylinder5.setTranslateY(300); //Preparing the phong material of type diffuse color PhongMaterial material5 = new PhongMaterial(); material5.setDiffuseColor(Color.BLANCHEDALMOND); //Setting the diffuse color material to Cylinder5 cylinder5.setMaterial(material5); //Drawing Cylinder6 Cylinder cylinder6 = new Cylinder(); //Setting the properties of the Cylinder cylinder6.setHeight(130.0f); cylinder6.setRadius(30.0f); //Setting the position of the Cylinder cylinder6.setTranslateX(200); cylinder6.setTranslateY(300); //Preparing the phong material of type specular color PhongMaterial material6 = new PhongMaterial(); //setting the specular color map to the material material6.setSpecularColor(Color.BLANCHEDALMOND); //Setting the specular color material to Cylinder6 cylinder6.setMaterial(material6); //Drawing Cylinder7 Cylinder cylinder7 = new Cylinder(); //Setting the properties of the Cylinder cylinder7.setHeight(130.0f); cylinder7.setRadius(30.0f); //Setting the position of the Cylinder cylinder7.setTranslateX(300); cylinder7.setTranslateY(300); //Preparing the phong material of type Specular Power PhongMaterial material7 = new PhongMaterial(); material7.setSpecularPower(0.1); //Setting the Specular Power material to the Cylinder cylinder7.setMaterial(material7); //Creating a Group object Group root = new Group(cylinder1 ,cylinder2, cylinder3, cylinder4, cylinder5, cylinder6, cylinder7); //Creating a scene object Scene scene = new Scene(root, 600, 400); //Setting camera PerspectiveCamera camera = new PerspectiveCamera(false); camera.setTranslateX(0); camera.setTranslateY(0); camera.setTranslateZ(-10); scene.setCamera(camera); //Setting title to the Stage stage.setTitle("Drawing a cylinder"); //Adding scene to the stage stage.setScene(scene); //Displaying the contents of the stage stage.show(); } public static void main(String args[]){ launch(args); } }Compile and execute the saved java file from the command prompt using the following commands.
Javac CylinderMaterials.java
java CylinderMaterials
On executing, the above program generates a JavaFX window displaying 7 cylinders with Materials, Bump Map, Diffuse Map, Self-Illumination Map, Specular Map, Diffuse Color, Specular Color, (BLANCHEDALMOND) Specular Power, respectively, as shown in the following screenshot −
No comments:
Post a Comment