When you have too much data to display on a single page, you should
display it on multiple pages. This is also known as pagination.
To show pagination in action, we need data.
Step 4 − Modify the migration file (m160106_163154_test_table.php in this case) this way.
Step 5 − Inside the project root run ./yii migrate to apply the migration to the database.
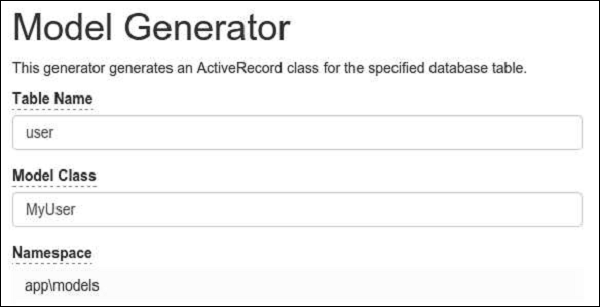
Step 6 − Now, we need to create a model for our user table. For the sake of simplicity, we are going to use the Gii code generation tool. Open up this url: http://localhost:8080/index.php?r=gii. Then, click the “Start” button under the “Model generator” header. Fill in the Table Name (“user”) and the Model Class (“MyUser”), click the “Preview” button and finally, click the “Generate” button.
 The MyUser model appears in the models directory.

To show pagination in action, we need data.
Preparing the DB
Step 1 − Create a new database. Database can be prepared in the following two ways.- In the terminal run mysql -u root -p
- Create a new database via CREATE DATABASE helloworld CHARACTER SET utf8 COLLATE utf8_general_ci;
<?php
   return [
      'class' => 'yii\db\Connection',
      'dsn' => 'mysql:host = localhost;dbname = helloworld',
      'username' => 'vladimir',
      'password' => '12345',
      'charset' => 'utf8',
   ];
?>
Step 3 − Inside the root folder run ./yii migrate/create test_table. This command will create a database migration for managing our DB. The migration file should appear in the migrations folder of the project root.
Step 4 − Modify the migration file (m160106_163154_test_table.php in this case) this way.
<?php
   use yii\db\Schema;
   use yii\db\Migration;
   class m160106_163154_test_table extends Migration {
      public function safeUp() {
         $this->createTable("user", [
            "id" => Schema::TYPE_PK,
            "name" => Schema::TYPE_STRING,
            "email" => Schema::TYPE_STRING,
         ]);
         $this->batchInsert("user", ["name", "email"], [
            ["User1", "user1@gmail.com"],
            ["User2", "user2@gmail.com"],
            ["User3", "user3@gmail.com"],
            ["User4", "user4@gmail.com"],
            ["User5", "user5@gmail.com"],
            ["User6", "user6@gmail.com"],
            ["User7", "user7@gmail.com"],
            ["User8", "user8@gmail.com"],
            ["User9", "user9@gmail.com"],
            ["User10", "user10@gmail.com"],
            ["User11", "user11@gmail.com"],
         ]);
      }
      public function safeDown() {
         $this->dropTable('user');
      }
   }
?>
The above migration creates a user table with these fields: id, name, and email. It also adds a few demo users.
Step 5 − Inside the project root run ./yii migrate to apply the migration to the database.
Step 6 − Now, we need to create a model for our user table. For the sake of simplicity, we are going to use the Gii code generation tool. Open up this url: http://localhost:8080/index.php?r=gii. Then, click the “Start” button under the “Model generator” header. Fill in the Table Name (“user”) and the Model Class (“MyUser”), click the “Preview” button and finally, click the “Generate” button.
 The MyUser model appears in the models directory.
Pagination in Action
Step 1 − Add an actionPagination method to the SiteController.public function actionPagination() { //preparing the query $query = MyUser::find(); // get the total number of users $count = $query->count(); //creating the pagination object $pagination = new Pagination(['totalCount' => $count, 'defaultPageSize' => 10]); //limit the query using the pagination and retrieve the users $models = $query->offset($pagination->offset) ->limit($pagination->limit) ->all(); return $this->render('pagination', [ 'models' => $models, 'pagination' => $pagination, ]); }Step 2 − Create a view file called pagination.php inside the views/site folder.
<?php
   use yii\widgets\LinkPager;
?>
<?php foreach ($models as $model): ?>
   <?= $model->id; ?>
   <?= $model->name; ?>
   <?= $model->email; ?>
   <br/>
<?php endforeach; ?>
<?php
   // display pagination
   echo LinkPager::widget([
      'pagination' => $pagination,
   ]);
?>
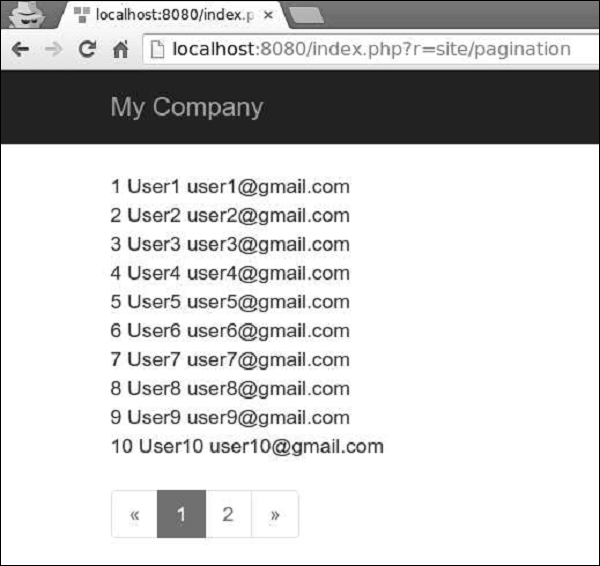
Now, go to the local host http://localhost:8080/index.php?r=site/pagination through the web browser, you will see a pagination widget −


No comments:
Post a Comment