You can easily implement a file uploading function with the help of yii\web\UploadedFile, models and yii\widgets\ActiveForm.
Create a directory ‘uploads’ in the root folder. This directory will hold all of the uploaded images. To upload a single file, you need to create a model and an attribute of the model for uploaded file instance. You should also validate the file upload.
Step 1 − Inside the models folder, create a file called UploadImageForm.php with the following content.
Step 2 − Now, add the actionUploadImage function to the SiteController.
Step 4 − Next, create an upload.php view file inside the views/site directory.
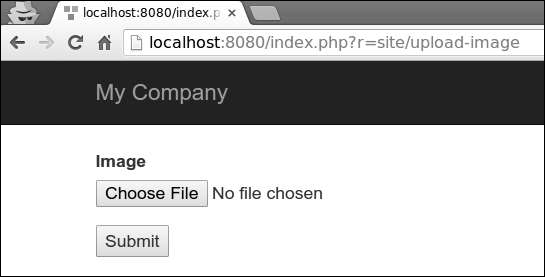
Step 5 − Now, if you go to http://localhost:8080/index.php?r=site/upload-image, you will see the following.
 Step 6 − Select an image to upload and click the “submit” button. The file will be saved on the server inside the ‘uploads’ folder.

Create a directory ‘uploads’ in the root folder. This directory will hold all of the uploaded images. To upload a single file, you need to create a model and an attribute of the model for uploaded file instance. You should also validate the file upload.
Step 1 − Inside the models folder, create a file called UploadImageForm.php with the following content.
<?php
   namespace app\models;
   use yii\base\Model;
   class UploadImageForm extends Model {
      public $image;
      public function rules() {
         return [
            [['image'], 'file', 'skipOnEmpty' => false, 'extensions' => 'jpg, png'],
         ];
      }
      public function upload() {
         if ($this->validate()) {
            $this->image->saveAs('../uploads/' . $this->image->baseName . '.' .
               $this->image->extension);
            return true;
         } else {
            return false;
         }
      }
   }
?>
The image attribute is used to keep the file instance. The file validation rule ensures that a file has a png or a jpg extension. The upload function validates the file and saves it on the server.
Step 2 − Now, add the actionUploadImage function to the SiteController.
public function actionUploadImage() {
   $model = new UploadImageForm();
   if (Yii::$app->request->isPost) {
      $model->image = UploadedFile::getInstance($model, 'image');
      if ($model->upload()) {
         // file is uploaded successfully
         echo "File successfully uploaded";
         return;
      }
   }
   return $this->render('upload', ['model' => $model]);
}
Step 3 − When the form is submitted, we call the yii\web\UploadedFile::getInstance() function to represent the uploaded file as an UploadedFile instance. Then, we validate the file and save it on the server.
Step 4 − Next, create an upload.php view file inside the views/site directory.
<?php
   use yii\widgets\ActiveForm;
?>
<?php $form = ActiveForm::begin(['options' => ['enctype' => 'multipart/formdata']])?>
<?= $form->field($model, 'image')->fileInput() ?>
   <button>Submit</button>
<?php ActiveForm::end() ?>
Remember to add the enctype option when you upload a file. The fileInput() method renders the following html code −
<input type = "file">The above html code allows the users to select and upload files.
Step 5 − Now, if you go to http://localhost:8080/index.php?r=site/upload-image, you will see the following.
 Step 6 − Select an image to upload and click the “submit” button. The file will be saved on the server inside the ‘uploads’ folder.

No comments:
Post a Comment