Any data that you enter into a spreadsheet is always stored in a
cell. We use the labels of rows and columns to identify a cell. This
chapter describes how to manipulate data in cells in a spreadsheet using
Java programming.
The following code snippet is used for creating a cell.
The following code is used to create different types of cells in a spreadsheet.

The following code is used to apply different styles to cells using Java programming.

Create a Cell
You need to create a row before creating a cell. A row is nothing but a collection of cells.The following code snippet is used for creating a cell.
//create new workbook
XSSFWorkbook workbook = new XSSFWorkbook();
//create spreadsheet with a name
XSSFSheet spreadsheet = workbook.createSheet("new sheet");
//create first row on a created spreadsheet
XSSFRow row = spreadsheet.createRow(0);
//create first cell on created row
XSSFCell cell = row.createCell(0);
Types of Cells
The cell type specifies whether a cell can contain strings, numeric value, or formulas. A string cell cannot hold numeric values and a numeric cell cannot hold strings. Given below are the types of cells, their values, and type syntax.| Type of cell value | Type Syntax |
|---|---|
| Blank cell value | XSSFCell.CELL_TYPE_BLANK |
| Boolean cell value | XSSFCell.CELL.TYPE_BOOLEAN |
| Error cell value | XSSFCell.CELL_TYPE_ERROR |
| Numeric cell value | XSSFCell.CELL_TYPE_NUMERIC |
| String cell value | XSSFCell.CELL_TYPE_STRING |
import java.io.File;
import java.io.FileOutputStream;
import java.util.Date;
import org.apache.poi.xssf.usermodel.XSSFCell;
import org.apache.poi.xssf.usermodel.XSSFRow;
import org.apache.poi.xssf.usermodel.XSSFSheet;
import org.apache.poi.xssf.usermodel.XSSFWorkbook;
public class TypesofCells
{
   public static void main(String[] args)throws Exception
   {
      XSSFWorkbook workbook = new XSSFWorkbook();
      XSSFSheet spreadsheet = workbook.createSheet("cell types");
      XSSFRow row = spreadsheet.createRow((short) 2);
      row.createCell(0).setCellValue("Type of Cell");
      row.createCell(1).setCellValue("cell value");
      row = spreadsheet.createRow((short) 3);
      row.createCell(0).setCellValue("set cell type BLANK");
      row.createCell(1);
      row = spreadsheet.createRow((short) 4);
      row.createCell(0).setCellValue("set cell type BOOLEAN");
      row.createCell(1).setCellValue(true);
      row = spreadsheet.createRow((short) 5);
      row.createCell(0).setCellValue("set cell type ERROR");
      row.createCell(1).setCellValue(XSSFCell.CELL_TYPE_ERROR );
      row = spreadsheet.createRow((short) 6);
      row.createCell(0).setCellValue("set cell type date");
      row.createCell(1).setCellValue(new Date());
      row = spreadsheet.createRow((short) 7);
      row.createCell(0).setCellValue("set cell type numeric" );
      row.createCell(1).setCellValue(20 );
      row = spreadsheet.createRow((short) 8);
      row.createCell(0).setCellValue("set cell type string");
      row.createCell(1).setCellValue("A String");
      FileOutputStream out = new FileOutputStream(
      new File("typesofcells.xlsx"));
      workbook.write(out);
      out.close();
      System.out.println(
      "typesofcells.xlsx written successfully");
   }
}
Save the above code in a file named TypesofCells.java, compile and execute it from the command prompt as follows.
$javac TypesofCells.java
$java TypesofCells
If your system is configured with the POI library, then it will compile and execute to generate an Excel file named typesofcells.xlsx in your current directory and display the following output.
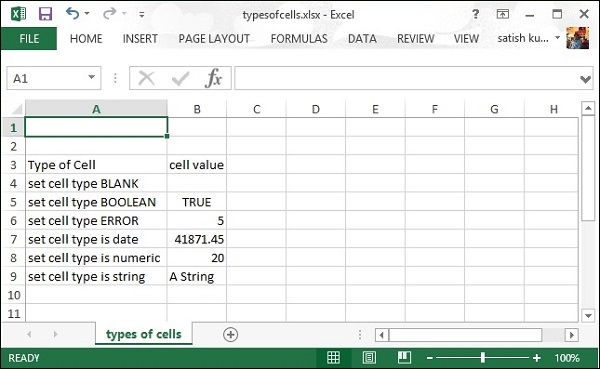
typesofcells.xlsx written successfullyThe typesofcells.xlsx file looks as follows.

Cell Styles
Here you can learn how to do cell formatting and apply different styles such as merging adjacent cells, adding borders, setting cell alignment and filling with colors.The following code is used to apply different styles to cells using Java programming.
import java.io.File;
import java.io.FileOutputStream;
import org.apache.poi.hssf.util.HSSFColor;
import org.apache.poi.ss.usermodel.IndexedColors;
import org.apache.poi.ss.util.CellRangeAddress;
import org.apache.poi.xssf.usermodel.XSSFCell;
import org.apache.poi.xssf.usermodel.XSSFCellStyle;
import org.apache.poi.xssf.usermodel.XSSFRow;
import org.apache.poi.xssf.usermodel.XSSFSheet;
import org.apache.poi.xssf.usermodel.XSSFWorkbook;
public class CellStyle
{
   public static void main(String[] args)throws Exception
   {
      XSSFWorkbook workbook = new XSSFWorkbook();
      XSSFSheet spreadsheet = workbook.createSheet("cellstyle");
      XSSFRow row = spreadsheet.createRow((short) 1);
      row.setHeight((short) 800);
      XSSFCell cell = (XSSFCell) row.createCell((short) 1);
      cell.setCellValue("test of merging");
      //MEARGING CELLS
      //this statement for merging cells
      spreadsheet.addMergedRegion(new CellRangeAddress(
      1, //first row (0-based)
      1, //last row (0-based)
      1, //first column (0-based)
      4 //last column (0-based)
      ));
      //CELL Alignment
      row = spreadsheet.createRow(5);
      cell = (XSSFCell) row.createCell(0);
      row.setHeight((short) 800);
      // Top Left alignment
      XSSFCellStyle style1 = workbook.createCellStyle();
      spreadsheet.setColumnWidth(0, 8000);
      style1.setAlignment(XSSFCellStyle.ALIGN_LEFT);
      style1.setVerticalAlignment(XSSFCellStyle.VERTICAL_TOP);
      cell.setCellValue("Top Left");
      cell.setCellStyle(style1);
      row = spreadsheet.createRow(6);
      cell = (XSSFCell) row.createCell(1);
      row.setHeight((short) 800);
      // Center Align Cell Contents
      XSSFCellStyle style2 = workbook.createCellStyle();
      style2.setAlignment(XSSFCellStyle.ALIGN_CENTER);
      style2.setVerticalAlignment(
      XSSFCellStyle.VERTICAL_CENTER);
      cell.setCellValue("Center Aligned");
      cell.setCellStyle(style2);
      row = spreadsheet.createRow(7);
      cell = (XSSFCell) row.createCell(2);
      row.setHeight((short) 800);
      // Bottom Right alignment
      XSSFCellStyle style3 = workbook.createCellStyle();
      style3.setAlignment(XSSFCellStyle.ALIGN_RIGHT);
      style3.setVerticalAlignment(
      XSSFCellStyle.VERTICAL_BOTTOM);
      cell.setCellValue("Bottom Right");
      cell.setCellStyle(style3);
      row = spreadsheet.createRow(8);
      cell = (XSSFCell) row.createCell(3);
      // Justified Alignment
      XSSFCellStyle style4 = workbook.createCellStyle();
      style4.setAlignment(XSSFCellStyle.ALIGN_JUSTIFY);
      style4.setVerticalAlignment(
      XSSFCellStyle.VERTICAL_JUSTIFY);
      cell.setCellValue("Contents are Justified in Alignment");
      cell.setCellStyle(style4);
      //CELL BORDER
      row = spreadsheet.createRow((short) 10);
      row.setHeight((short) 800);
      cell = (XSSFCell) row.createCell((short) 1);
      cell.setCellValue("BORDER");
      XSSFCellStyle style5 = workbook.createCellStyle();
      style5.setBorderBottom(XSSFCellStyle.BORDER_THICK);
      style5.setBottomBorderColor(
      IndexedColors.BLUE.getIndex());
      style5.setBorderLeft(XSSFCellStyle.BORDER_DOUBLE);
      style5.setLeftBorderColor(
      IndexedColors.GREEN.getIndex());
      style5.setBorderRight(XSSFCellStyle.BORDER_HAIR);
      style5.setRightBorderColor(
      IndexedColors.RED.getIndex());
      style5.setBorderTop(XSSFCellStyle.BIG_SPOTS);
      style5.setTopBorderColor(
      IndexedColors.CORAL.getIndex());
      cell.setCellStyle(style5);
      //Fill Colors
      //background color
      row = spreadsheet.createRow((short) 10 );
      cell = (XSSFCell) row.createCell((short) 1);
      XSSFCellStyle style6 = workbook.createCellStyle();
      style6.setFillBackgroundColor(
      HSSFColor.LEMON_CHIFFON.index );
      style6.setFillPattern(XSSFCellStyle.LESS_DOTS);
      style6.setAlignment(XSSFCellStyle.ALIGN_FILL);
      spreadsheet.setColumnWidth(1,8000);
      cell.setCellValue("FILL BACKGROUNG/FILL PATTERN");
      cell.setCellStyle(style6);
      //Foreground color
      row = spreadsheet.createRow((short) 12);
      cell = (XSSFCell) row.createCell((short) 1);
      XSSFCellStyle style7=workbook.createCellStyle();
      style7.setFillForegroundColor(HSSFColor.BLUE.index);
      style7.setFillPattern( XSSFCellStyle.LESS_DOTS);
      style7.setAlignment(XSSFCellStyle.ALIGN_FILL);
      cell.setCellValue("FILL FOREGROUND/FILL PATTERN");
      cell.setCellStyle(style7);
      FileOutputStream out = new FileOutputStream(
      new File("cellstyle.xlsx"));
      workbook.write(out);
      out.close();
      System.out.println("cellstyle.xlsx written successfully");
   }
}
Save the above code in a file named CellStyle.java, compile and execute it from the command prompt as follows.
$javac CellStyle.java
$java CellStyle
It will generate an Excel file named cellstyle.xlsx in your current directory and display the following output.
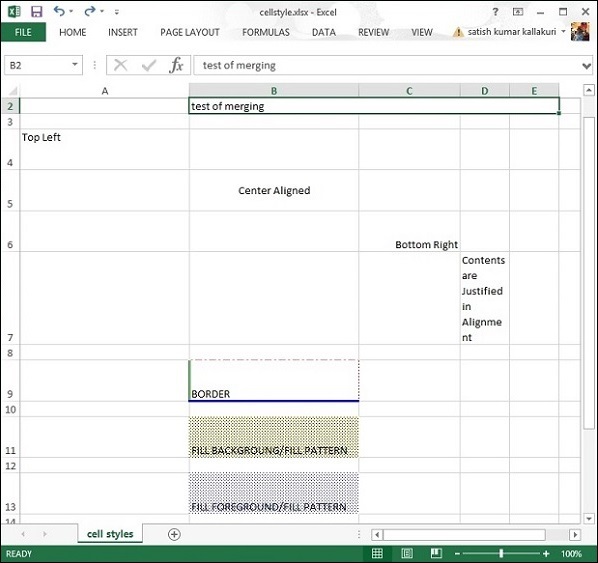
cellstyle.xlsx written successfullyThe cellstyle.xlsx file looks as follows.


No comments:
Post a Comment